4 Foolproof Putting Drills Designed to Reduce Your Handicap
4 Great Putting Drills to Help Reduce Your Handicap
05/06/2016
I have just returned from a three day training camp with the German National team.
Even though they are some of the best amateurs in the world, it always amazes me how issues with the putting strokes themselves, always come back to set-up and poor alignment at address. As a result, the putting stroke becomes a series of compensations. This makes it very difficult to understand the difference between a good putt and a poor putt.
The player can misread a putt, pull it and actually hole the putt. But does this make you a good putter? You got lucky, but two wrongs don’t always make a right. In fact, this style of putting would perhaps at best be streaky. But it’s not one that will deliver a consistent repeatable stroke.
As the season is fast approaching, it is a great time to check your basics in order to give you the best possible chance. Of course, that’s if you want to reduce your handicap!?!
All the best to Golf Team Germany this week in Nations Cup, Sotogrande @theacademybyrjd @GolfVerband #belowthehole pic.twitter.com/WWTQku7l2k
— Dr Paul Hurrion (@PHurrion) February 22, 2016
Posture at Address
Standing correctly to the ball is the centerpiece of my putting instruction. Get this right and the rest will fall easily into place.
Your goal at address is to establish a posture that allows your shoulders and torso to rock in a pendulum motion. The goal is no need for excess hand action or other compensations, as these won’t hold up under pressure. The ability to create a stable posture and pivot point is essential if the putter is to be returned consistently from address, top of backswing and back to impact.
So what width of stance is the most stable for you to achieve this?

I often ask the question to players, “so when it is windy what do you do to remain stable?” 9/10 times the answer comes back as “I widen my putting stance.” Well, if this is more stable when the wind is blowing, isn’t it more stable when it is also calm? Personally I would recommend the width of your putting stance to be the width of your shoulders (not too narrow and not doing the splits!).
Looking from the ‘Ball to Target Line’, the first aim is to have the top of your back flat and horizontal to the ground. It is not a tilt from the hips, but more from the mid section of your back. Imagine a DVD case or even a glass of water resting on this top section of your back. This horizontal position allows your shoulders to rock on a ‘square to square’ path through the impact area.
Your knees should be slightly flexed, with your weight even between heels and toes. Not on your toes, and not on your heels. Ask yourself, “if somebody was to push me, in which direction would be the easiest for them to knock me off balance?”
Tiger is a fantastic example for this. You would struggle to knock him over, regardless of the direction you pushed him. His body looks incredibly stable at address with the putter. He’s in a very efficient biomechanical position to create the desired pendulum stroke. Moreover, his posture enables the path of the putter to be dictated by the shoulders and not the hands!
During practise you looked good. In tournament you are even better. Congratulations @Danny_Willett @EuropeanTour pic.twitter.com/Z4oxSlOk7U
— The Academy by RJD (@TheAcademybyRJD) February 7, 2016
Four Practice Drills
If I had to choose one training aid for golfers to use consistently, it would have to be my Putting Alignment Mirror.
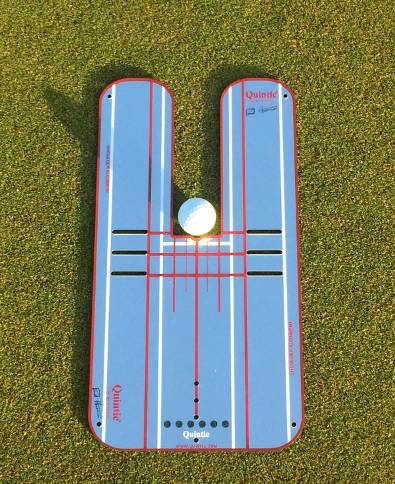
The graphics and tools provided by the mirror enable you to understand and develop consistent alignment. That works for the putter face, shoulder line and eye position during each putt. It is easy to use for a quick practice indoors at home or in the office. As well, it can be used on the putting green where tees can be used in specially designated positions. Also, I recommend they use it on all manner of putts – breaking, straight and different length. Yes, breaking putts.
By eliminating variables such as green reading, alignment, square club face etc… you can start to build an awareness of good and poor strokes. If you expect to improve your understanding, awareness and feel then you have to be honest with yourself. And if your putt misses to the left, I want you to understand what caused it to miss left. “I felt the putter face closing” or “I felt my shoulders open and pull the putt,” etc.
Bit of indoor putting whilst the Mrs and little man rest!! ??⛳️? @Nicolewillett88 @Quintic_Sports @TeamISM pic.twitter.com/2IoCYMpaJw
— Danny Willett (@Danny_Willett) April 3, 2016
1. ‘Precision Alignment to Target Line’
The first step in using the mirror is to align it accurately to your target.
Start with a straight 8-ft putt on a flat and level area of the practice green; stand behind the mirror and aim the centre line exactly at the target. The smaller your target, a tee peg for example, the more accurate your alignment will be. Insert tee pegs in each of the four corners to ensure the mirror doesn’t move. By using the alignment guides on the mirror you can check your eye position, square the putter face to the target, shoulders parallel and check your ball position.
You know the putt is straight and because you have reference guides to square the clubface, I would expect you to get 90% in the hole.
When you become confident at holing around 90%, remove the mirror, and hit the same putt from the same spot on the green… after all, you know the putt is straight! This introduces club face alignment into the equation and if the percentages drops below 80% on this straight putt then you know you have to address the failure of being able to repeat correct alignment.
Once you are achieving 90%, repeat the drill with varying length putts this leads into the next stage of the drills. Find a slope and repeat the drill with breaking putts, align the mirror on the chosen line rather than at the target and repeat the process. This drill examines and improves your pace control which has to be correct for the ball to take the break and find the hole and it helps your focus on the chosen line.
Congrats to @Danny_Willett and team. Danny works with putting expert and TPI Advisory Board member Dr. @PHurrion. pic.twitter.com/DOjY3JfvIe
— TPI (@MyTPI) April 11, 2016
2. ‘Putter Face is Square’ – Non-negotiable
It is vital that the putter face is square to the target line.
Use the transverse lines directly behind the ball as your reference point. You should be able to see the line directly in front of the putter blade which is at 90 degrees to the target. If you strike the ball with an open or closed face, not only will the ball start off line, it will impart unwanted side spin which will further reduce the accuracy of your putting.
3. ‘Toe & Heel Tee’ – Putter Path (Eliminate Heel or Toe Strikes)
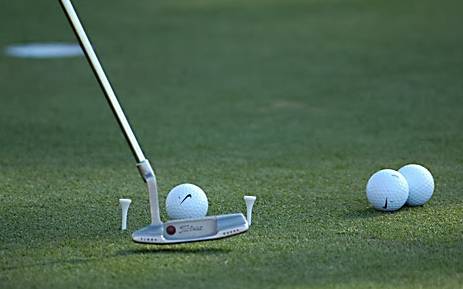
This is one of my favourite and certainly one of ‘Tiger’s putting drills.’
It is very simple but also very effective. Can you return the putter through the gate consistently? More three-putts are caused by pace control than poor alignment, so in order to control the pace of the golf ball, it is vital that the ball must come consistently out of the sweet spot of the putter face each time.
Square your putter face to the target and place two tees in the slots provided in the Putting Alignment Mirror at the toe and the heel of the putter. The aim of the drill is to make a normal full stroke without touching either of the tees on the through swing. Gradually bring the tees closer together to ensure consistent return of the putter head to the same position each time.
Once you can produce a consistent path with a square impact, you will start the ball on the line you have read… then it’s over to you and the line you have read on the green… with a repeatable stroke, you will quickly learn so much more about your green reading ability – perhaps for the first time!
4. Green Reading / Which is the Correct Start Line?
I find the majority of amateurs and even professionals under-read breaking putts.
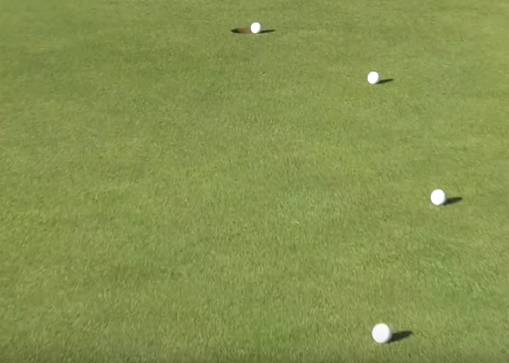
The first image shows the result of my first putt on the green, you can see the path the ball has taken by the positions of the balls on the putting green. I always like a player to visualize the shape of the putt across the green… however the majority of players always stop at the hole.
Golfers are drawn to the front of the hole and as a result, don’t focus on the true path of the ball. Notice I have placed a ball 18” from the back of the hole, directly in line with the track the ball would have taken if the hole was covered. You can now clearly see the correct entry and exit point of the ball (the true middle of the hole from the perspective of the ball’s path) the position where the ball would have finished if the hole had a ‘cover or lid’ on it!
This is the correct visual image.
Notice how much the ball has broken once it has gone past the hole, remember gravity acts at a consistent rate (the ball breaks more the slower it is moving). The visual of all the balls lined up on the correct path present a powerful visual image!
The next issue I find with amateurs (and even some professionals), is that they are drawn to the hole with their final look.
Notice the effect this can have on your shoulder and hip alignment. If you are drawn to the hole in this way, the perception of the true path of the ball is incorrect, thus making it virtually impossible to start the ball on the correct starting line. So what is the correct starting line for this putt… if you are just stopping your visualization at the hole the pace of the ball will be effected, is that why you are under reading your putts? Your new goal should be to imagine a tee peg, 18” behind the hole. The position of the tee peg is crucial, you need to position the tee peg so that the only way the ball will come to rest by the tee peg (think of crown green bowls) is to run directly through the centre of the hole. This will help you see the true break of the ball rolling across the green and most importantly help you find the correct start line of the putt.
Finally, above all you do need to practice your putting… Rather than finding a straight 3 foot putt (along a chalk line) and hitting putt after putt, find a 10-15 ft putt with the biggest slope on it possible and work out the start line needed for the pace of the green. I promise you will be amazed at your pace control on the golf course.
During tournament play your focus should be turned towards playing and getting the ball in the hole, with speed and pace control the key focus, leaving the technical thoughts behind on the practice green. It’s time to go and play.
******

Dr Paul Hurrion
Twitter @PHurrion
More Information on a Quintic Putting Analysis

To learn more about this putting method in the U.S., visit toddkolbgolf.com.
Quintic Ball Roll – Introduction Video Many thanks @usgolftv @toddkolbgolf "Quintic measures… https://t.co/94BLDLS83n
— Dr Paul Hurrion (@PHurrion) February 25, 2016
Time to start unlocking the real reasons behind great putting. #tkga #oneputt pic.twitter.com/vGJFVd84zj
— Todd Kolb (@toddkolbgolf) July 21, 2015
Great putting drills. Really like the alignment mirror there. Will definitely check it out.
I have checked this post that you have described properly, thanks a lot for this good review.
Hey, thanks for sharing such an informative post like this.here you wrote about different types of putting drills. All the items look good. Want to use one of that. Keep posting this type of helpful post.. 🙂
Thanks for the comment Ella! Which drill did you like the most?