Downhill Lie Golf Shots: How to Guide
How to Hit Shots on a Downhill Lie
02/26/2018
You’ve been there before. You’re having an amazing day on the golf course, hitting some killer shots and having a great time with your friends. Then, you run into a situation that fills you with dread:
The downhill lie.
You know how this story ends. You skull the ball and overshoot the green. Then, you skull it back the other way. Before long, you’ve added unnecessary strokes to your score and you spend the next three holes kicking yourself.

You are far from alone.
Every golfer knows that sinking feeling that comes with the downhill lie. Fortunately, with the right knowledge, you can master this tricky shot and keep that good day going.
The key is to create a situation that negates the slope as much as possible. That may sound complicated, but don’t worry; I’ll walk you through it. I’ll cover the ideal setup and proper motion, including the one key secret that will help you neutralize the slope and approach those downhill shots with confidence.
First, let’s talk about your setup.
https://youtu.be/zRrIvruvcP4
Proper Setup for the Downhill Lie
The first step towards negating the slope of a downhill lie is to create a shape in your setup that mimics the slope. Here’s how that works:
First, you want to tilt your shoulders a little. The lead shoulder should be lower than the trail shoulder. The objective is to match the angle of the slope with the angle of your shoulders.
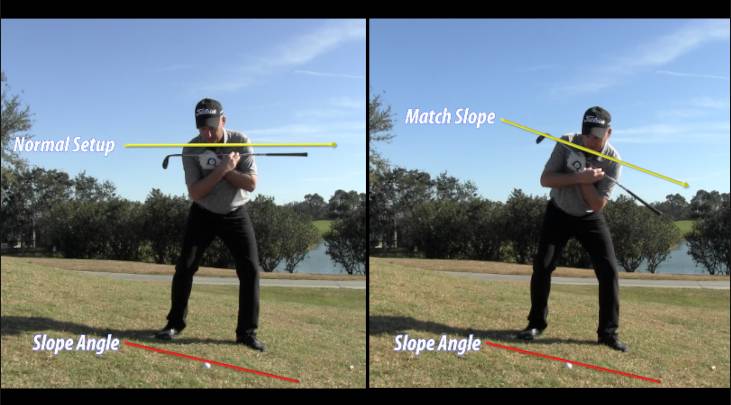
Then, you rotate your lead foot so the toe points slightly down the slope. To find a good angle, you might want to start in regular setup position, with your toes pointed straight ahead in the same direction your body is facing. From there, rotate your lead toe about 45 degrees in the direction of the target.
Angling the lead foot in that way sets up you to put more pressure into your lead thigh. So often, we talk about focusing pressure in the feet when we set up a shot. However, on a slope, you’re not just trying to create momentum through your swing. You are trying to create momentum without wavering in your stance or stumbling downhill. By focusing pressure in your lead thigh, you maintain balance and stabilize the motion of your swing.
Now, let’s talk ball placement. If you’ve seen my videos on chipping, you know I’m not a big fan of the advice to place the ball back in your stance. Well, a downhill lie is my one exception. In this tricky scenario, you do want to set the ball back in your stance . . . just slightly. You know how easy it can be to catch the turf on a downhill swing. By setting the golf ball back a bit, you give yourself a better shot at getting clean contact at impact.

So, now you know what your setup should look like. Let’s talk motion.
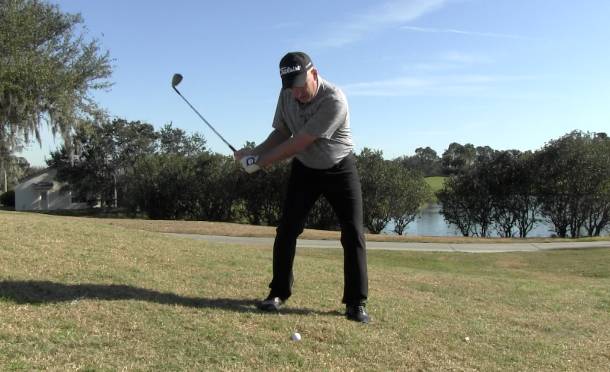
Proper Motion for the Downhill Lie
The motion of your swing with a downhill lie should follow two basic steps.
Step 1
At initiation, make sure the butt end of your club is moving away from the ball. In other words, you should not be hinging your wrists, causing the butt of the club to tilt forward as the clubhead moves back. Wrist hinge is what causes so many golfers to skull the golf ball on the downhill lie. Instead, you want to keep your wrists neutral as you swing back.
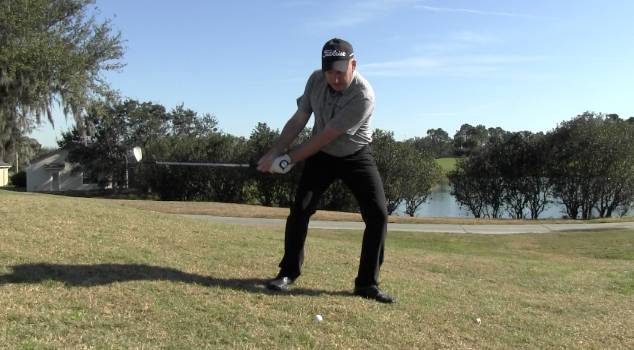
Step 2
This is the key secret to mastering the downhill lie.
As you swing through, make sure the clubhead travels down the slope line as much as possible. To put it another way, try to match the angle of the slope with your golf swing. This is how you neutralize the slope.
When you swing the clubhead along the slope line, you are essentially treating the hill as though it is a flat plane. And the more you’re able to manipulate the setup to mimic a golf shot made on a flat surface, the likelier you are to accomplish the same goals you achieve in all your flat-surface shots. Goals like clean contact and distance control.
Every aspect of the setup is designed to help you swing along the slope line, from tilting your shoulders to pointing the lead foot outward so you can lean into the shot. You’ve done all you can to negate the slope in your body. All you have to do is take advantage of that setup.
The Downhill Lie Cheat Sheet
This is a lot of information that looks, feels, and is very different from the advice you get on most other golf shots. Here’s a quick list for easy reference the next time you’re out on the course, facing the dreaded downhill lie.
Setup
- Tilt shoulders to match the slope.
- Rotate lead foot about 45 degrees in the direction of the target so lead toe points slightly down the slope.
- Feel pressure in the lead thigh.
- Move ball back slightly in stance.
Motion
- Move butt of the club away from the target when you initiate the backswing. (Do not hinge wrists.)
- Swing clubhead down along slope line.
Remember that every one of these steps serves one single purpose: to negate the slope. If you can follow these steps and focus on neutralizing that downward angle, you’ll soon be able to approach a downhill lie with confidence. You’ll see improvement in your ball flight, your scorecard, and your mood.

Was This Helpful?
Do you have any questions? Any other tricky lies you’d like help with? Have you tried this advice? Did it help?
Whatever thoughts you have – from unsolved questions to differing opinions – we want to hear them! Drop us a line in the comments section.
And remember to subscribe to our YouTube channel and follow USGolfTV on Facebook and Instagram for more golf tips, news, and advice. We’re doing everything we can to keep you informed, tackle the tough questions, and help you play better golf.
Your putting tips are GREAT! Can’t wait to try the 2-finger Kolb
and the other 4 tips on set-up plus the drills.
You are a great teacher!
Thanks
Terry Singleton
San Diego
Thanks for the kind words Terry! We do our best to provide our audience with the best information we can, so it’s always refreshing to hear the positive feedback!
If you are looking for a great putting drill to work on your angle of attack for putting, check out this awesome and simple drill: https://www.youtube.com/watch?v=Ksh7U3yd8a8&t=74s
Let us know how it goes!