Draw vs Fade: How to Shape Golf Shots
Draw vs Fade: How to Shape Golf Shots
Updated 06/18/2018
Draw vs Fade: have you ever wanted to hit either (or both) of these shots?
Have you ever wished you had more control over the shape of your golf shots? If you’re like a lot of golfers, you might assume such a refined skill is out of your reach. Someone may have even told you outright that shaping a golf shot is too challenging for the average weekend golfer.
So I am here to tell you that this skill is far from impossible.
No matter your level of experience, you can learn how to control the curve of your ball flight. You don’t even have to make any changes to your swing to learn a draw vs. fade. You simply have to understand what creates curve and how to use those factors to your advantage. Here is a video explaining a Draw vs Fade:
What Creates Curve?
The curve of ball flight is determined by two factors: the angle of the clubface and the direction of the club path at the moment of impact. This is the first piece to understanding a draw vs fade.
If, for example, your clubface is angled to the left at impact, you are essentially instructing the ball to fly at that same angle. Likewise, the club path also determines the direction of ball flight. But what if there is disparity between these two sets of instructions?
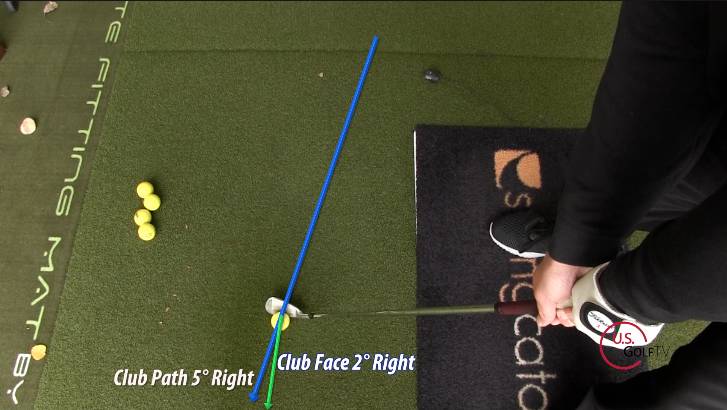
Well, that’s how we get the curve. Let’s say, for example, you make a golf shot where your club path is angled 5 degrees to the right of the target and your clubface is angled 2 degrees to the right. That 3-degree disparity would give you a nice draw, or a left-to-right curve.
The same would be true for the opposite direction. If you angled your club path 5 degrees to the left and your clubface 2 degrees to the left, you’d fade the ball. Or, to put it another way, you’d create a gentle, left-to-right curve in your ball flight.
Now, unless you’re some kind of golf prodigy, you’ve probably learned firsthand that too much curve can be a bad thing. For the sake of simplicity, I’m going to focus on teaching you how to create a deliberate draw or fade in this article. However, if you could also use help fixing your hook or slice, no problem. In fact, we have videos and articles that cover those subjects in depth. Be sure to check them out!
For now, let’s talk about how you can use clubface angle and club path to create a draw vs fade.
Draw vs Fade
Learning how to shape golf shots seems like it would require pinpoint precision and perfect timing. The truth, however, is much simpler. You don’t have to change anything about your swing. The most significant change you have to make is in the position of your body.
As I explained above, you create curve by allowing some disparity between the angle of your clubface and the path of your club. In the case of a draw, the club path should be angled farther to the right than the clubface. To make this happen, all you have to do is reposition your stance.
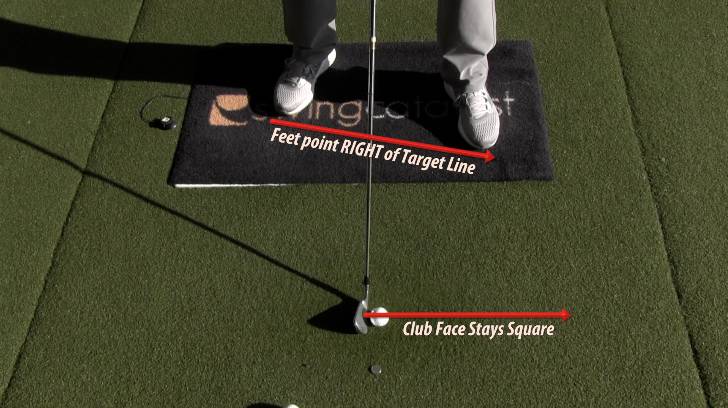
Most likely, your typical setup for a golf shot includes a centered stance, with your feet and hips aimed at the target. In order to create a draw, however, you want to pivot just a little so your feet and hips are aimed about 10 degrees to the right of the target. That is to say, if you were to lay a yard stick against the toes of your shoes, the yard stick would point just to the right of the target.
From this position, you would take your regular golf swing with the clubface square to the target. The angle of your body would create a similar angle in your swing path, while the clubface remains more or less square. The disparity in angles is what creates the draw.
By the Numbers
In order to illustrate my point, I set up a launch monitor to track the shots I took using this technique. According to the launch monitor, my club path was angled 9 degrees to the right, while my clubface was angled 6 degrees to the right. That’s a difference of 3 degrees. And sure enough, I drew the ball on that shot.
As you probably guessed, you simply reverse those instructions to achieve a fade. You angle your feet and hips 10 degrees to the left of the target. Then, you take your regular golf swing with the clubface square to the target.
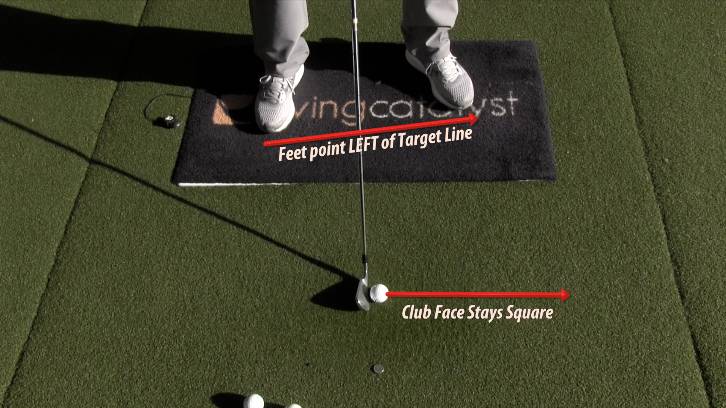
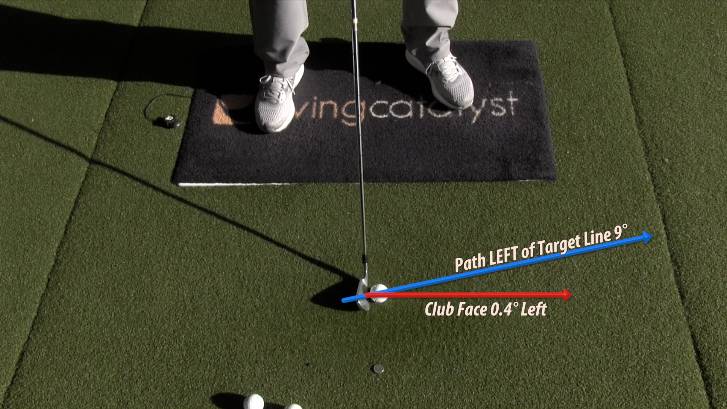
I demonstrated this technique again using the launch monitor. My club path was angled 9 degrees to the left, and the angle of my clubface was 0.4 degrees to the left – almost perfectly square. True to my point, that disparity resulted in an easy fade.
The Main Idea
The bottom line is this: If you want to shape your golf shots, you need to control both sides of the equation. You have to manage the angle of your swing path and the angle of your clubface. By creating a disparity between these two angles, you can create the curve you want in your ball flight.
Fortunately, anybody can make this happen. You don’t have to be a seasoned professional. By adjusting the your body position, you force the club path to either the right or left of the target. Therefore, if you do this while keeping the clubface square to the target at impact, then Bingo! You create the disparity you need to shape your shot. This is how to approach a draw vs fade.
Was this Advice Helpful?
Have you tried putting these ideas into practice? Do you have any questions? Is there a different technique you recommend for how to shape golf shots?
Do you have a preference in hitting a draw vs fade?
Let us know in the comments. We’re always interested to hear what you think and answer your questions. We even welcome a good golf debate if you want to chime in with a difference of opinion!
Please also join the discussion on Twitter and Instagram, and be sure to subscribe to our YouTube channel. We at USGolfTV are all about being as accessible as possible. That way we can answer your questions and help you play better golf.