Golf Swing Tips: 3 Easy Tips for a Better Game
3 Golf Swing Tips That Actually Help Your Golf Swing
If you ever wanted some simple golf swing tips to help improve your golf game, look no further. These 3 simple golf swing tips help you work on 3 different aspects of your swing.
Have you hit a plateau in your golf game? You’re hitting the driving range and golf course every weekend, maybe even practicing at home, but your scores never change.
Even if you don’t care much about besting your buddies, we all want to best ourselves. We want to see clear improvement and know that our hard work is paying off. If you’re stuck in a rut, it’s not because you’ve reached your full potential. More likely, there’s some small error in your golf swing that’s holding you back.
I’m going to share three golf swing basics that are proven to help you play better golf. I’ve used these tips with my students for over twenty years, and the results have been transformative.
These concepts cover three different stages of your swing:
- Takeaway
- Transition
- Finish
You may not need all three golf swing tips, but odds are at least one of these tips will illuminate an error you didn’t realize you were making.
What is a Good Golf Swing?
If you are really looking to improve your golf swing, you should probably start with the basics. If you are struggling with your golf grip or setup, your swing is probably in trouble before you even swing a golf club.
Get a (Good) Grip
For starters, get the club in the fingers instead of the palms, and make sure you keep a short thumb on that lead hand (left thumb for a right-handed golfer). Gripping the club in the palms and extending your thumb are both common mistakes, but are very simple fixes.
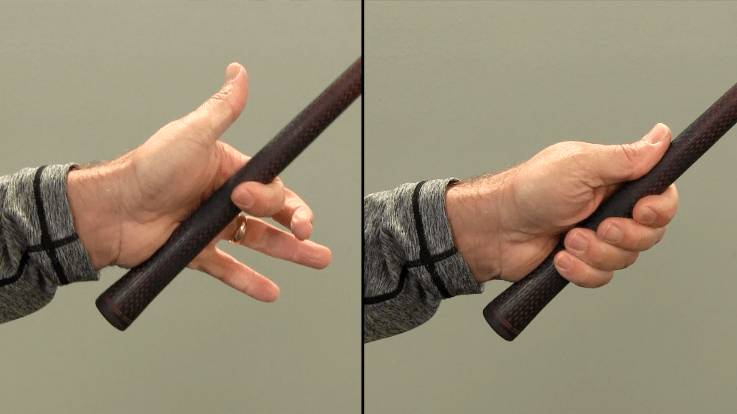
To test your , take the and hold it out in front of you with just the lead hand, using only your index finger. If you are able to hold the club with your index finger and the pad of your hand, you have a good . You will also notice you can perform while holding the club like this, another good indicator of proper .
Setup
Next, let’s move into the setup. An athletic golf stance is key, meaning a nice stable base and a little knee bend. You should not be locking your legs, nor would you squat into your stance. Just being in a ready, athletic posture, feeling nice and natural over the ball at address.
Make sure you get more pressure in the lead foot in your initial setup. We like to promote a 60/40 split, but you can move that up or down as needed. A good place to start would be to bump your hips slightly forward in your setup, so that your lead hip is directly over your lead foot. Stance width should be about shoulder width apart, depending on the club you use. (Learn about the difference between driver vs iron swing here)
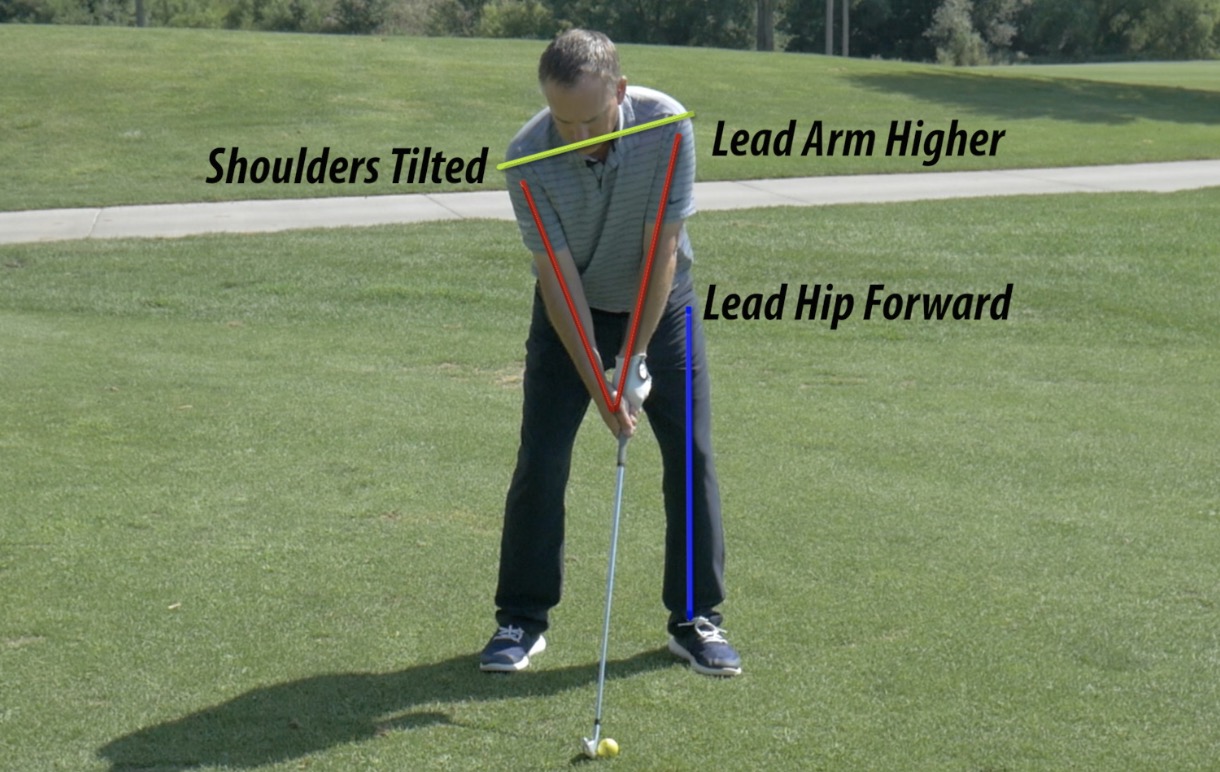
Finally, raise your lead arm ( for a right handed , opposite for lefty) slightly above your trail arm, which should move your a little as well. Your trail shoulder will be slightly lower than the lead shoulder, shaping the ball flight into a nice high draw. This helps move the club path up and to the right, which helps the ball turn over and draw. With practice it becomes easier, and it feels more natural.
Now that we have a good grip, a proper setup and an athletic stance, we can get ready to cover the swing. In fact, you could even teach a golf lesson to most of my students just knowing this information. But now that your grip and setup are in a better place, let’s discuss what is happening in your swing.
What Causes a Slice in the Golf Swing?
This is a good question, a common question, but a complex one. Unfortunately, there are several different things you could be doing in your golf swing mechanics to slice the golf ball. It could be as simple as ball position, or as complex as understanding gear effect. Fortunately, it all boils down to 2 factors: the relationship between the club face and the swing path.
When there is a difference between face and path, that difference is what creates curve. Below, you will see 2 driver swings that both result in a slice. One is a slice based on path, one is based on club face.
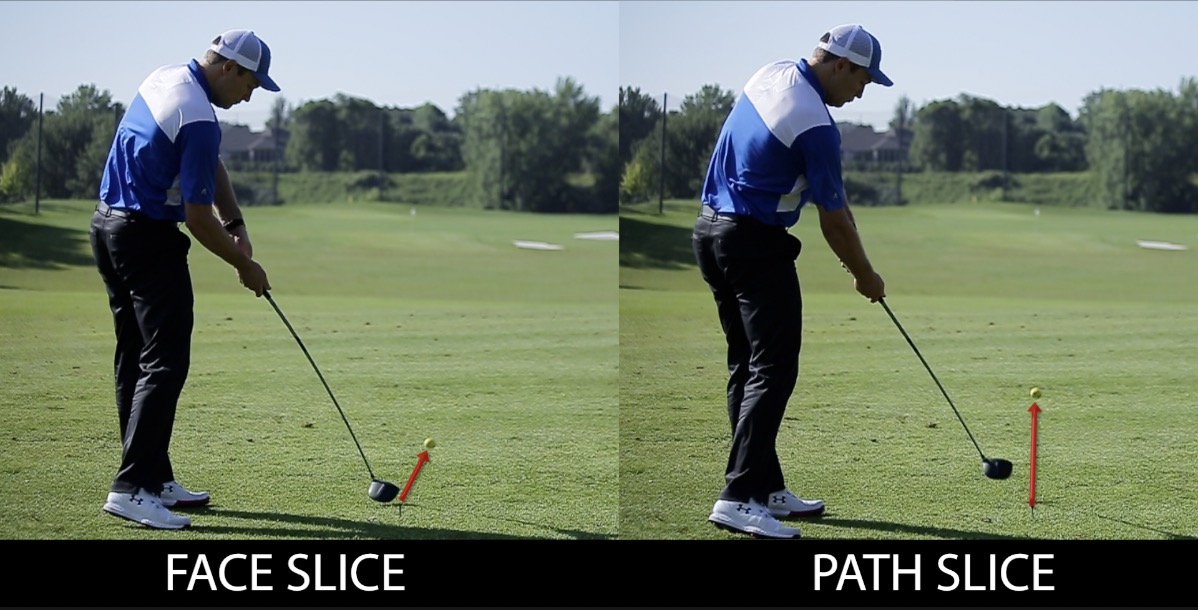
Now, if you are slicing your driver in particular, this is a good visual. Let’s start with right after impact.
In the face slice, the club is wide open, causing the ball to start immediately to the right of the target. In the path slice, it is not immediately known whether or not that ball will slice, hook or go straight. That is the first part of the equation when diagnosing a slice: Where does the ball start?
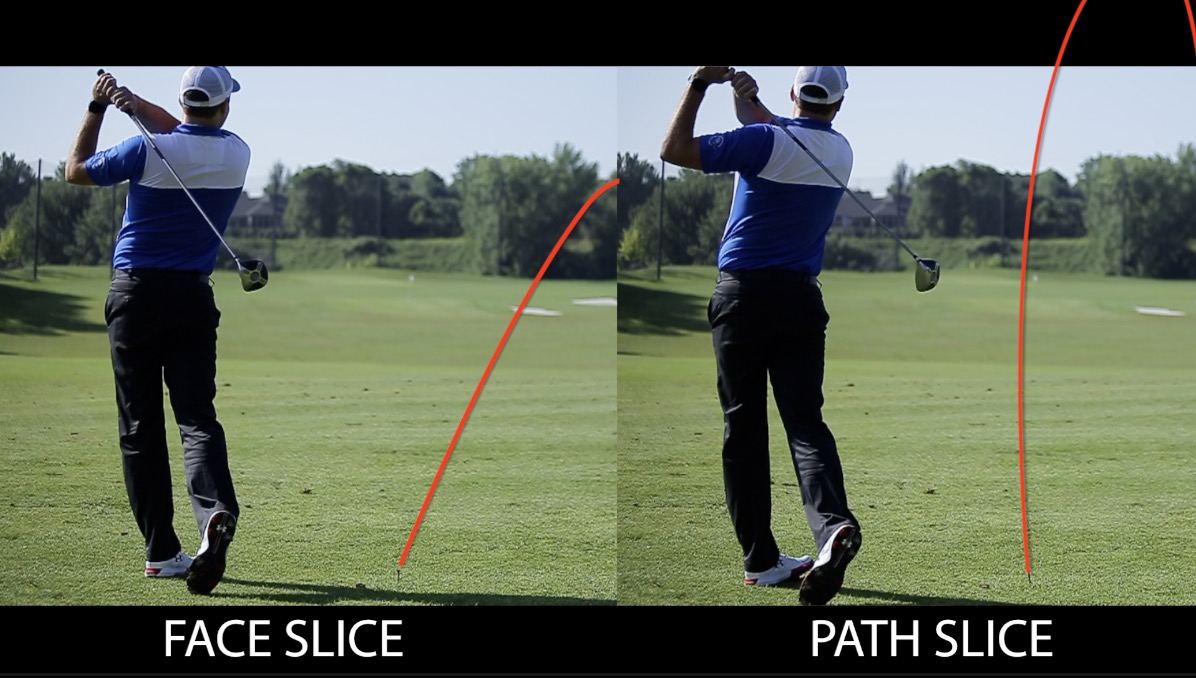
Let’s take it all the way through the golf shot. Now, the first ball obviously started right and continued right. That is a face issue. The second ball starts straight, but then bends off to the right of the target. So if it starts straight, the face was on line, but there is a difference in path creating that resulting curve. This is the second part of diagnosis: Where does the ball curve?
So if the ball starts off line, you have a face issue. If it starts on line, then veers off, you have a path issue. When in doubt, remember this phrase: The face sends it, the path bends it.
Golf Swing Plane
Now that we have talked about the face of the club and the path the club travels on, we should identify a common error in diagnosing an in to out path vs an out to in path. The issue stems from the confusion that swing plane is the same as swing direction. This, however, is not true. Believe it or not, a golfer can have an in to out angled swing plane yet still have a club path at impact that is out to in.
The swing plane is the angle in which the club works up in the backswing and then back down in the downswing. If your angle of attack is exactly zero, the swing plane will be going in the same direction as your swing direction. The issue here is to hit a solid iron shot we hit down into the golf ball. A negative attack angle shifts our swing path to the right (vise versa with a positive attack angle). This shift only occurs with the swing path creating a vast difference between the swing plane and the swing path in our golf swings!
What is the ideal swing plane though? The swing plane changes with a lot of different variables and can be quite different from golfer to golfer. The ideal plane matches the angle that the club shaft makes at setup. Taller players may have a steeper swing path or those who stand a little closer to the golf ball. A steep swing path that comes to mind is Justin Thomas’s golf swing. For an exact comparison, check out Rickie Fowler’s golf swing. He tends to be a bit lower in the setup creating a flatter swing plane.
Remember, the swing plane and swing direction are different measurements. If you are looking at your golf swing on video you are watching the swing plane. A solid swing plane is important to all golfers but it can be very misleading to what the club is actually doing at impact. Understanding how swing path can change depending on attack angle will help you diagnose why those pesky hooks or slices are happening!
The Takeaway
One neglected aspect of the takeaway is the relationship between the hands and the club head.
In fact, it’s far more common to worry about the direction the golf club swings on the takeaway. You may even have received advice on this or heard theories on whether it’s best to swing the club more outside or more inside.
However, if you watch the best players in the world, you’ll notice that there isn’t much consistency when it comes to club direction. Some golfers swing way inside, some swing way outside, and many fall somewhere in between. Meanwhile, they’re all making incredible shots and taking home trophies.
So, here’s a theory: maybe the direction of the club isn’t the real issue.
The Golf Tip: Hand Position
If you watch these same players, you’ll notice there is one thing that remains consistent no matter which direction they guide they club:
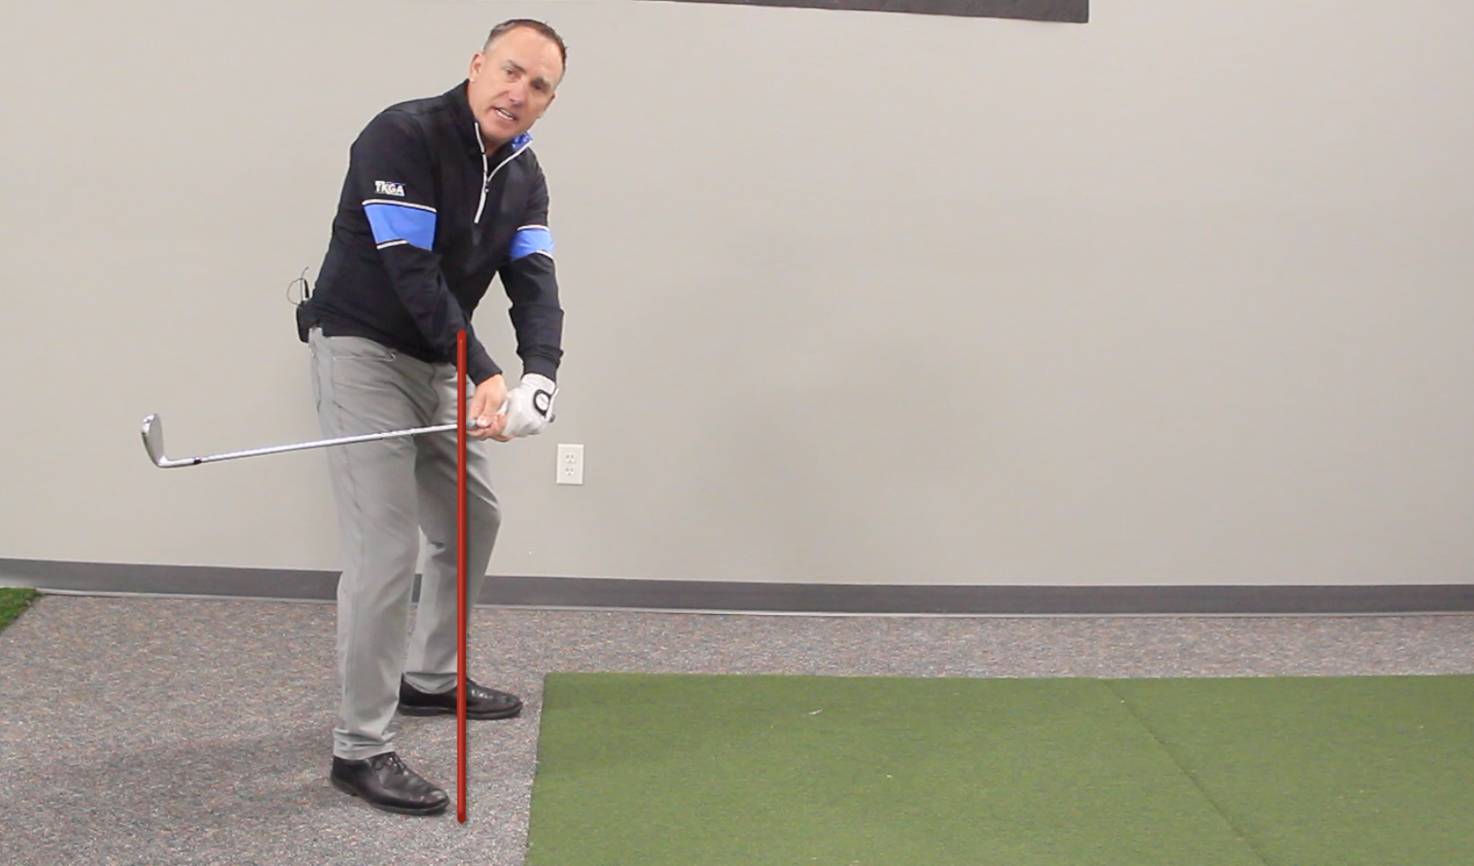
They always keep the clubhead outside of the hands.
To clarify, when we talk about keeping the clubhead outside of the hands, we mean the clubhead is just slightly farther out from the body than the hands are. If the clubhead passes through the plane of your hands and closer towards the body, the clubhead is now inside.
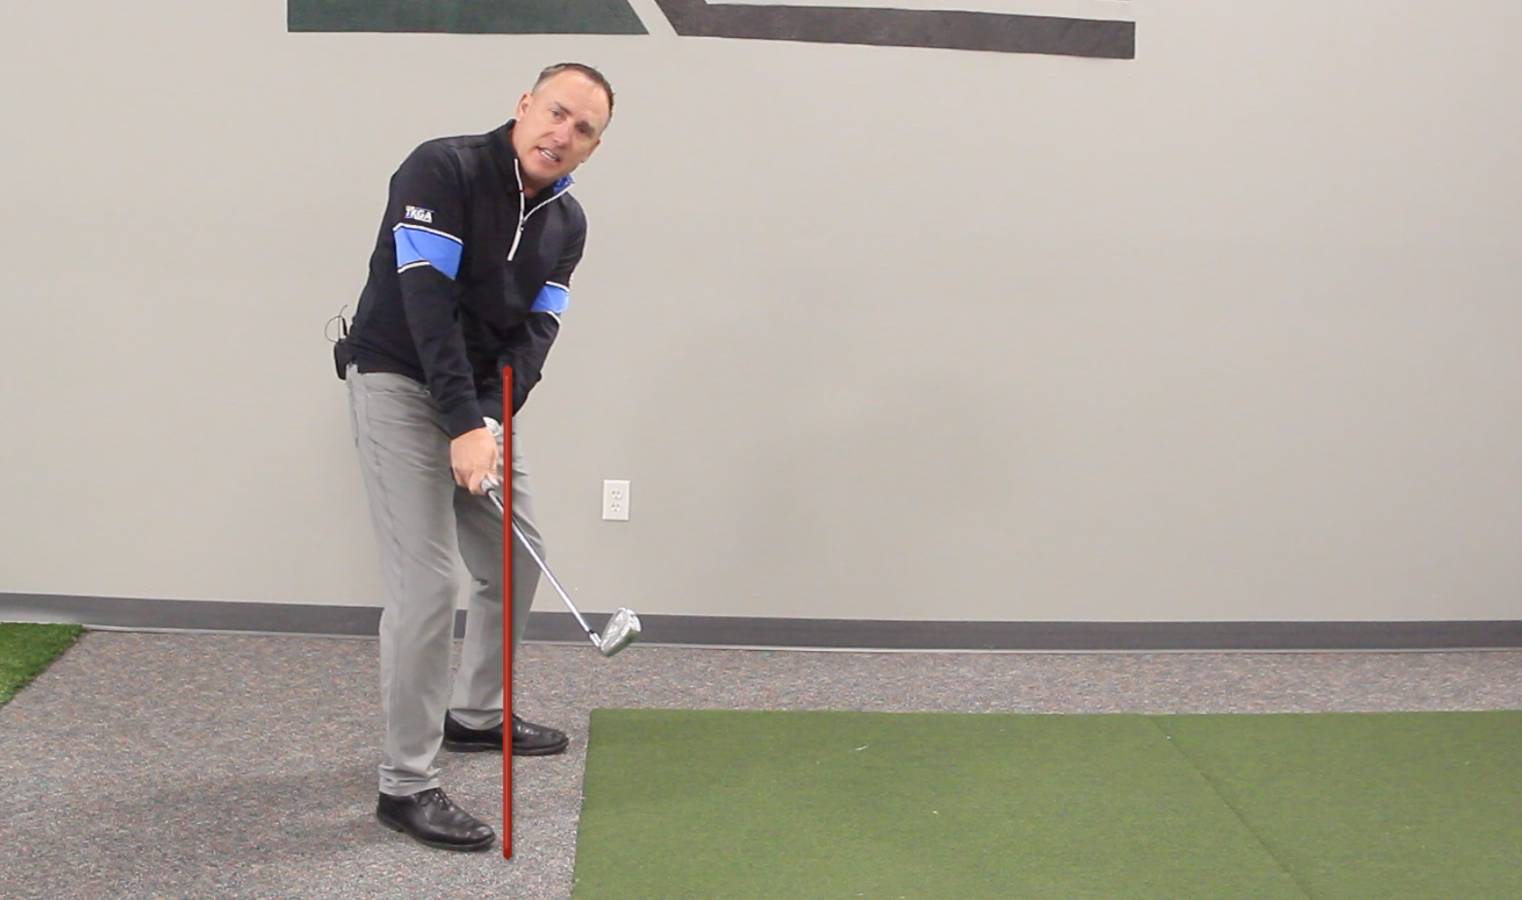
Next time you’re at the driving range, make a special effort to notice where your clubhead is in relation to your hands as you swing back from the ball. Take a few practice swings to check. A good checkpoint is when your club shaft is just about parallel to the ground. If the clubhead is outside your hands at that point, you’re set up for a great transition.
If you’ve hinged your wrists so the clubhead is now inside your hands and almost on the same plane as your body, it’s really unlikely that you’ll hit the solid shot you’re capable of.
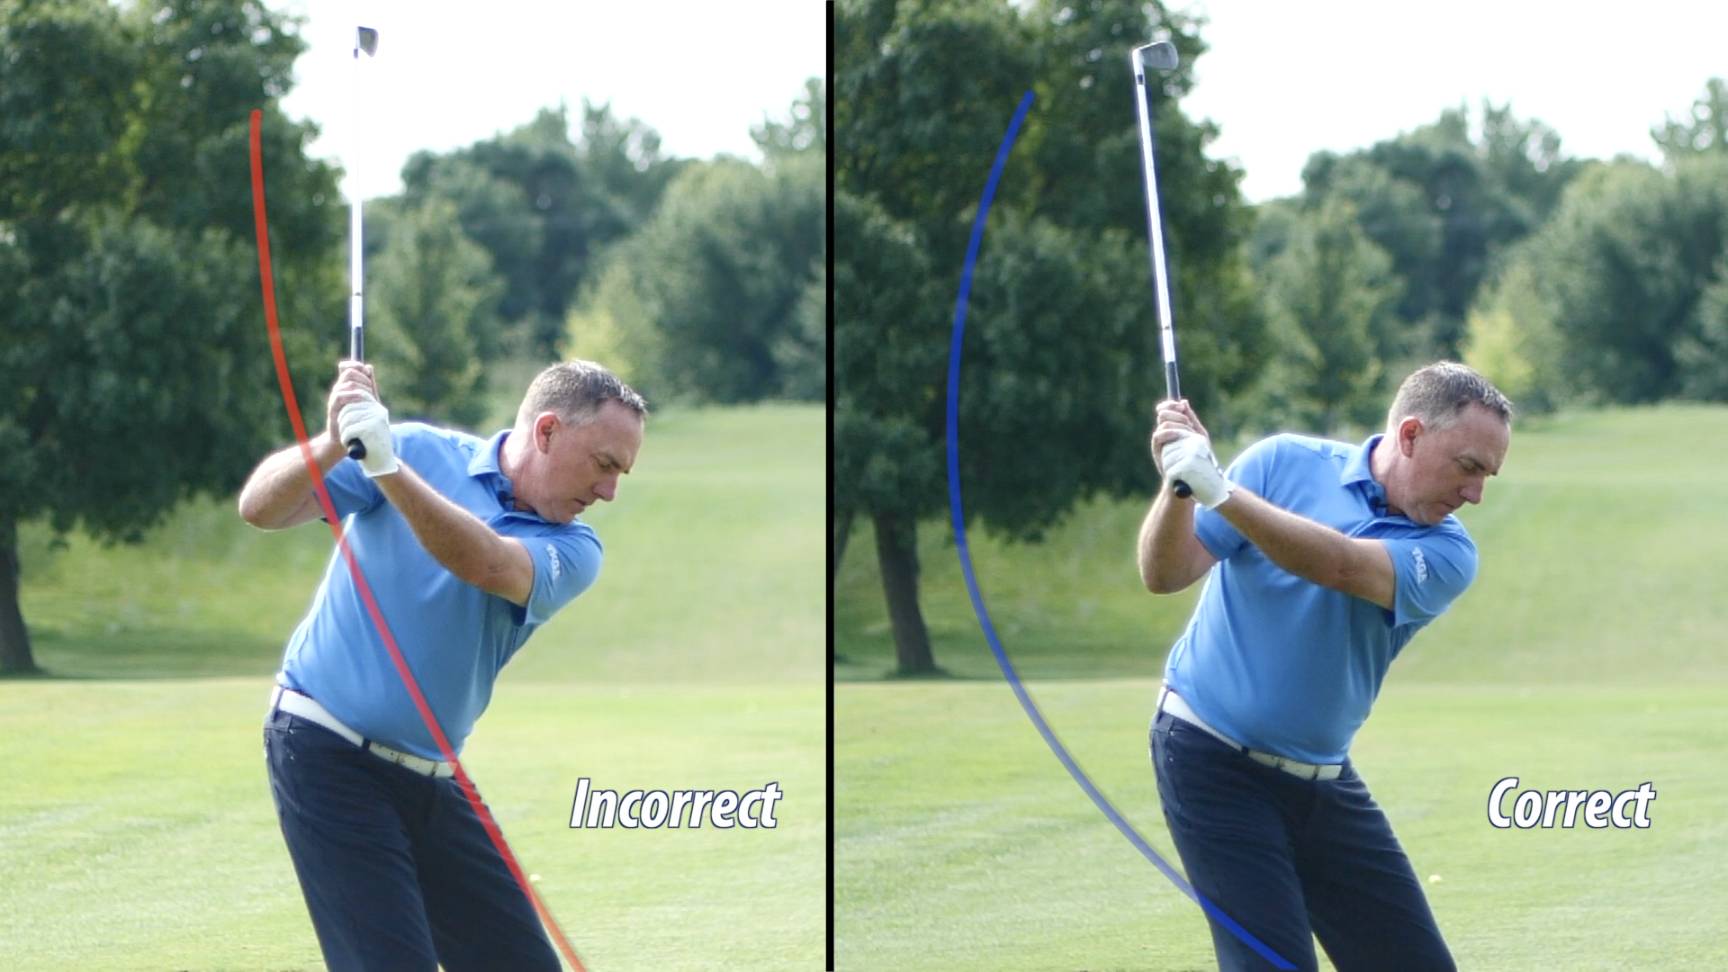
An easy way to check to see if you are making this common error is by watching what your right arm is doing in the takeaway. If by club parallel, you can see the entire bottom part of your right forearm the club is most likely inside of your hands.
To make the club work inside the hands, we have to roll our left hand over the right hand. This motion causes the right forearm to roll as well exposing the bottom part of our forearm. Take the club back to parallel and double check to make sure your right arm has not rolled over in the takeaway.
The Transition
The second of the golf swing tips deals with the Transition.
When I talk about the transition, I’m referring to the transition from the takeaway to the top of your swing. Basically, the meat of your backswing. One very common mistake in this phase is the dreaded chicken wing.
You may have already been told you have chicken wing. And most likely, the person who told you that was referring to your finish, not your transition. “Chicken wing” is most commonly used to describe golfers who finish with their elbows deeply separated. The truth is, even though this error is easiest to see in the finish, it’s often a by-product of a mistake that occurs in the transition.
Many, many golfers are in the habit of allowing their elbows to separate as they move from the takeaway to the top of the swing. It’s one of those instinctual mistakes—it’s just something the body wants to do, especially if you’re not as flexible as you used to be. (Speaking from personal experience.) And before you know it, you’re in trouble before you even start the .
The problem is that when the elbows separate, it limits your body rotation and creates a steeper angle for your club. Both of these side effects are bound to hurt your shot.
Along with the steeper angle that your club works on, the chicken wing can cause some issues with spine angle in the transition. In order to shallow out the golf club (since we steepened it with the chicken wing) we must use our upper body. As the club starts to swing downward from the chicken winged position, our body starts to add side bend creating a lot of shoulder tilt to allow the club to hit the golf ball. This side bend makes it hard for a golfer to finish into the front foot. We also lose a lot of control of the face through impact with this move as well.
The Tip: Elbow Squeeze
To correct this habit, think about your elbows getting closer together as you transition to the top of your swing. Let it feel almost like you’re squeezing them towards each other. It may feel wrong, but trust me: an elbows-together mindset will bring you closer to the form you want.

I recommend practicing with a training aid like the Smart Ball by Tour Striker. It’s essentially an inflatable ball you position between your forearms with the goal of keeping it in place for the entire swing. Drilling with a Smart Ball can do wonders for correcting that chicken wing, as well as other common backswing mistakes.
Once you have those elbows under control, you’ll be set up to swing through to a strong finish.
The Finish Position
This last of the 3 golf swing tips is particularly useful for anyone who struggles with rhythm, tempo, and balance. It’s also the tip I recommend to my students when all else fails . . . and it’s deceptively simple.
First, let’s dive into what the finish position really is. To me, the finish position is a direct reflection of what occurs in the entire golf swing. It is very easy to see that an error occurred in the swing when the finish position looks strange or unbalanced.
The finish position should be in balance. And there is one very simple way to ensure that you are:
Your knees should touch.
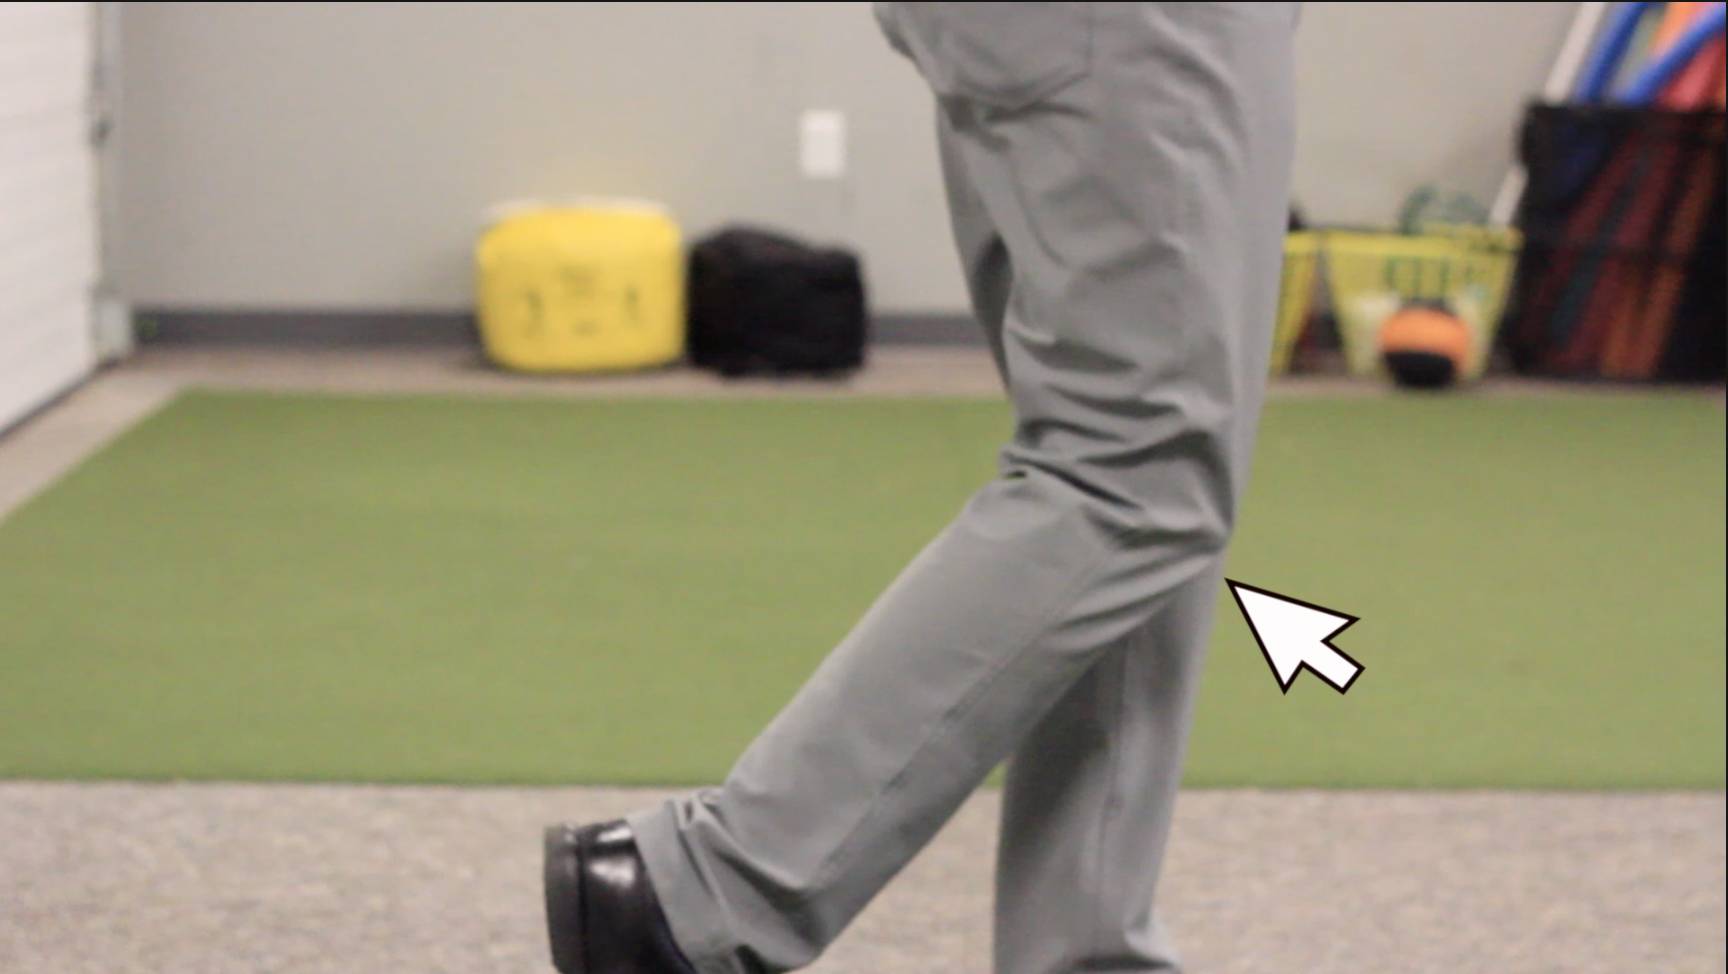
Believe it or not, golf swing tip #3 is as basic as that. If your knees are touching in your golf finish, you’re in balance. Golf swing tips do not need to be complex to make big improvements.
This simple tip allows your body to fully rotate through the shot. The left shoulder rotates all the way around causing your torso to point towards the target, your right elbow will be across your body, and your weight will be forward and not stuck on your back leg.
Even more interestingly, I often find that when golfers go into their golf swing thinking about knees at the finish, the rest of their swing falls into place. I wish I had studies and statistics to prove scientifically that thinking about the finish can smooth out the entire golf swing. Unfortunately, all I have is anecdotal evidence from more than twenty years of teaching.
It’s easy to get bogged down with all the details of the swing. From setup to body rotation to takeaway to transition to lag to impact . . . the checklist for a perfect golf swing can be overwhelming. But I’ve seen a lot of my students improve their entire swing by focusing exclusively on where they want to be at the end of it:
With the club up over their shoulder and their knees touching.

In Short
Identifying the issue in a golf swing can be very difficult and overwhelming to do alone. Practicing with a friend while focusing on the three tips given in this article will make this problem much easier.
Start by looking at the ball flight. Remember if the ball is starting offline, you have a face issue. If the ball is starting on line and then curving off line in either direction there is a path issue. Be careful when looking at video when diagnosing a path issue. Swing plane is not the same as swing direction or swing path.
It’s incredible how one small adjustment to your golf swing can make all the difference. I’ve seen it time and again with my students. If you feel like you’re not hitting the kind of shots you’re capable of, take a minute to notice every part of your swing. Ask yourself:
- On the takeaway: “Am I keeping the clubhead outside of my hands?”
- During the transition: “Am I keeping my elbows close together?”
- On the finish: “Am I in balance with my knees touching?”
If your answer to any one of these is “no,” you may find turning that “no” into a “yes” is all it takes to start playing better golf.
Have These Tips Worked for You?
Was this helpful? Had you heard any of these tips before? Is there anything here you disagree with?
Join us in the comments section to share your thoughts, questions, and difference of opinion.
For more in-depth golf swing tips, visit us at GreatGolfTipsNow.com. This new video series is completely free and packed with detailed advice to help you play better golf!
I worked on the 3 swing keys on the range today and it really worked well. One problem I had was not completing the backswing caused me to duck hook . When I told myself to see my left shoulder turn behind the ball I hit it super. Making sure the club was outside my hands on the backswing slowed my swing down a little. Will try it on the golf course tomorrow. Jimarbs@hotmail.com
James, this is awesome! It is fun to have a few concrete things to work on while at the range. What tip/suggestion did you find the most helpful?
Hi Todd
You are such a good teacher and the shows makes the game so much simpler to understand!
My regards Georg Trolin
Georg, thank you for the kind words. It is a team effort on our part! Doing our best to help our fellow golfers enjoy this great game. If you would like more of our content check out our YouTube channel https://www.youtube.com/channel/UCgz5-3igA0IfsyWGKTr6YKA
I’m planning to play golf this coming weekend, and since this will be my first time, maybe it will be best to invest in a Digital Green reader so it will be easier to play. Well, you’re also right about the importance of practicing the athletic posture. Thank you for explaining the technique of playing the golf swing plane as well.
Rachel, appreciate you posting…good luck!
As a former high school coach (a lot of different sports, but not golf) I have alway adhered to the KISS principle.
Now retired, I have taken up golf and find it a very challenging skill set to achieve a good swing. Your 3 tips – club outside hands, elbows close and knees touching – are exactly the type of information I am looking for.
Thanks very much for this.
Dave Taylor
Dave, awesome! Appreciate the kind words and taking the time to post…thanks for your coaching service!
I have been playing for 20 years and I am 70 years old. I have good range of motion and I am left handed. I have just not been able to stop slicing my driver set at 12 degrees. I also have a tail on my woods. I have never been able to draw the ball. I lift my head a lot according to friends. I’ve watched many of your videos but just cannot break this flaw. What can I do?
Jim,
Two ideas:
1. Here is a great video to help with the slice https://youtu.be/KUxg9bnq-rg
2. You can also check out our Vertical Line Swing System which was just launched https://www.verticallinegolf.com/landing-page1620850340667
I have been wondering about this topic of late and was thinking of searching the internet to increase my knowledge. Thank God that I visited your website otherwise I wouldn’t have come across such a nicely-written article. Once I liked this particular post, I was going through few other posts as well. I simply loved them! Kudos to the writers who work hard to write these.
Appreciate the kind words. Thanks! Check out our YouTube website for more great content https://youtu.be/Mm37PJ6-O8A