Stop Slicing Your Driver: Fix Your Driver Slice
How to Stop Your Driver Slice: The Ultimate Guide to Straighter Shots and More Fairways
Your seems to be dialed in. But for whatever reason, you have one that seems to plague your . And for many amateur golfers, that is the same: the dreaded driver slice.
For one, the way you approach your driver vs irons is different. That alone is a big factor in why you may slice your driver (and possibly no other clubs).
Whether it be a setup issue, improper , poor , or unreliable , we’ve got you covered. If you are ready to play your best and finally start your driver straight, you’ve come to the right place.
We’re going to cover how to analyze your We’ll identify what role your in your swing. From there, we discuss some common mistakes that a makes to cause their driver slice. And of course, some great drills to help you finally hit a draw and play your best !

How to Analyze Your Swing to Fix the Driver Slice
There are numerous components that are in play any time you make a swing. From the takeaway to the , to the transition to the , to , follow through and finish, if you are unable to diagnose the issue, chances are you are going to continue to slice your driver.
What follows is the actual process that we go through to help identify what is causing the ball to curve. So let’s start to break it down.
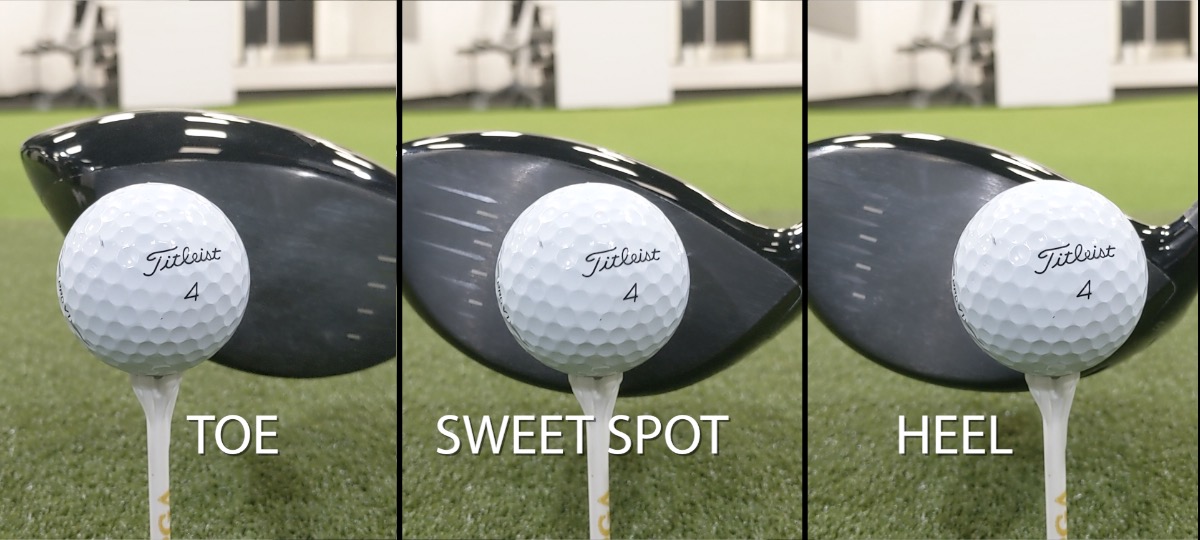
For starters, there are two basic components to start our analysis. Number one is where the ball is the club : the toe, or center of the (). Number two is in two parts: where is the ball starting? From there, what direction is it going as it falls to the ground?
Where You Are the Ball on The
If you play regularly, you have probably heard of a term called Gear Effect. Without getting too deep into the weeds here, gear effect is basically a way to explain what happens to the club at the moment of .
Again, we will shy away from the science for the purposes of this article (here’s another nice article that simplifies for you). Irons have less gear effect, because their center of gravity is essentially right behind the club face. For a driver, the center of gravity is farther back as the club is deeper, and the resulting curve is more pronounced.
Now, when you a ball on the or toe of the club, the club will tend to twist based on the of the ball. This is where things get a little deeper, but for our analysis this gives us a baseline introduction. Again, we will shy away from the science for the purposes of this article.
Irons have less gear effect, because their center of gravity is essentially right behind the club face. For a driver, the center of gravity is farther back as the club is deeper, and the resulting curve is more pronounced.
If you hit the ball on the outside/toe–generally speaking–the ball will have less spin. This will tend to cause your shot to draw or hook. If you hit the ball on the inside/heel, the ball will generate more spin. Consequently, you will see higher, fading or slicing shots.
This is the first place we will look when someone is slicing their driver. If the ball is being hit on the heel, the rest of your swing is essentially irrelevant. You can have a Tour-caliber swing and still slice the ball hitting it on the inside of the face.
How to Test Impact Position
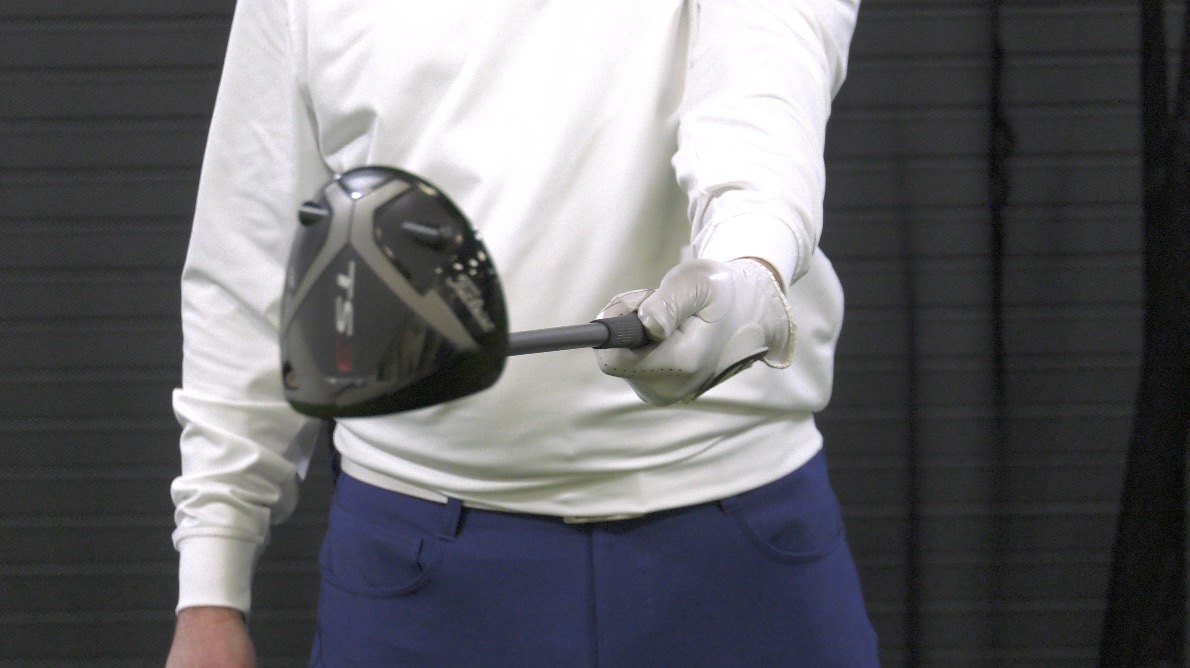
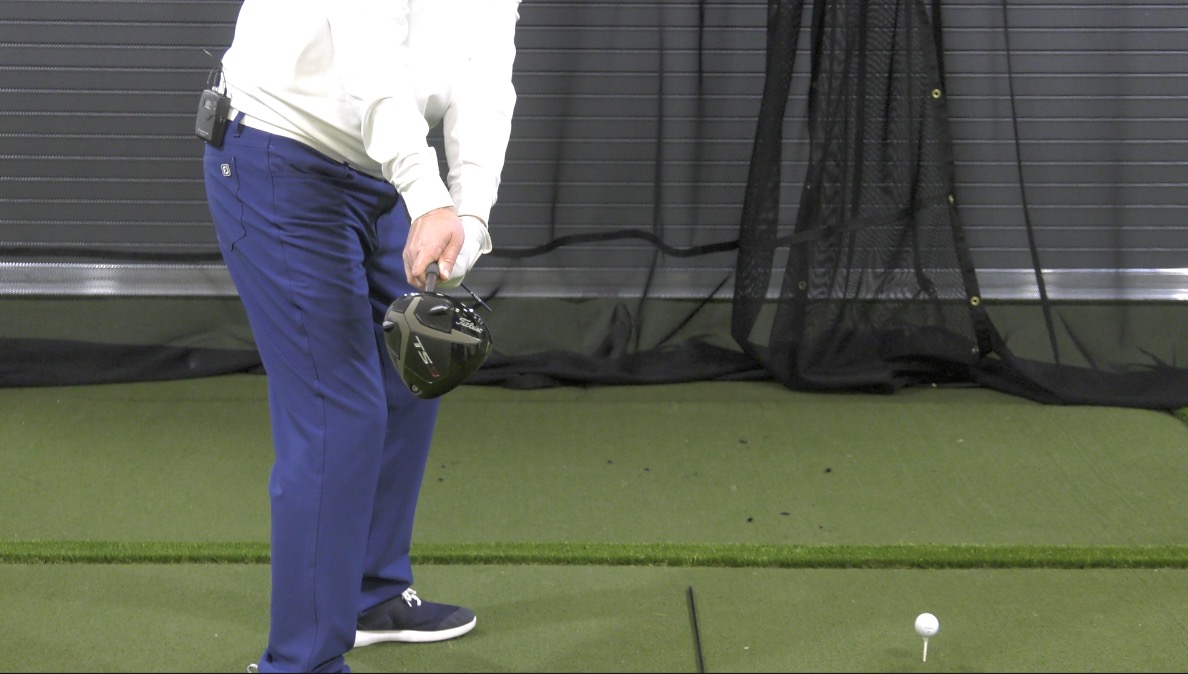
If you are on the driving range by yourself, it might be tough to know where you hit the ball on the face. So here’s a quick little tip to get instant feedback. Take a can of foot spray and lightly on your driver’s face. Then tee up your shot, take a swing and see where your ball leaves a mark. It’s that simple.
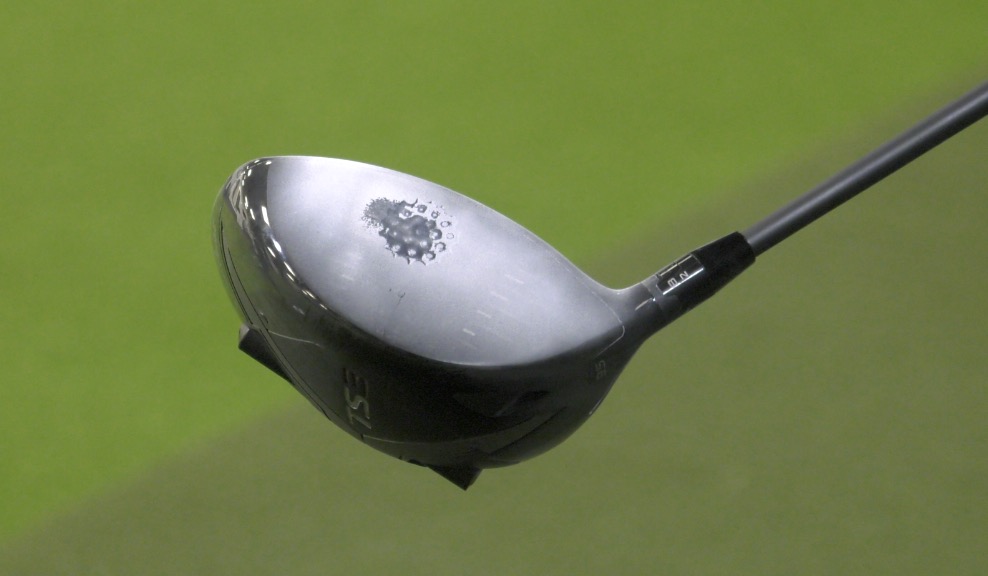
The outline of the ball will leave a nice dimple pattern where impact occurs. And just like that, you have analyzed the first part of your equation. Now it’s time to look at ball flight.
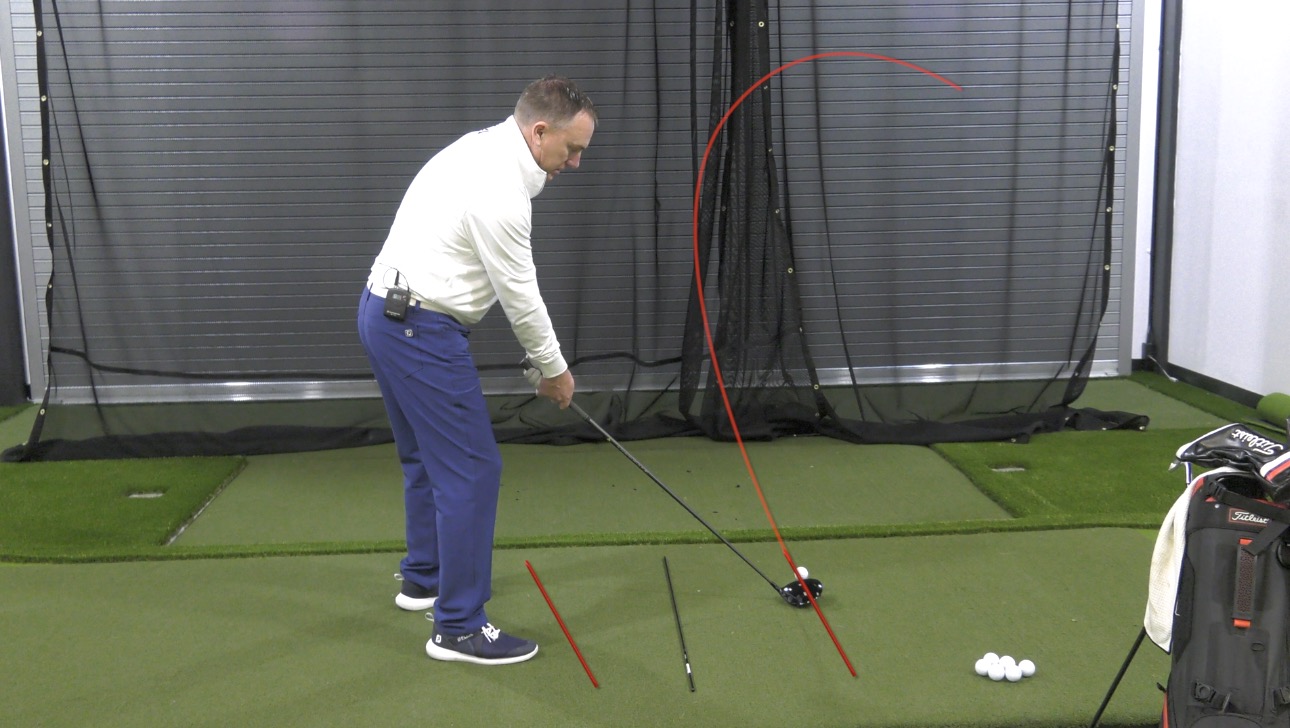
Where Does the Ball Start, Where Does it Curve?
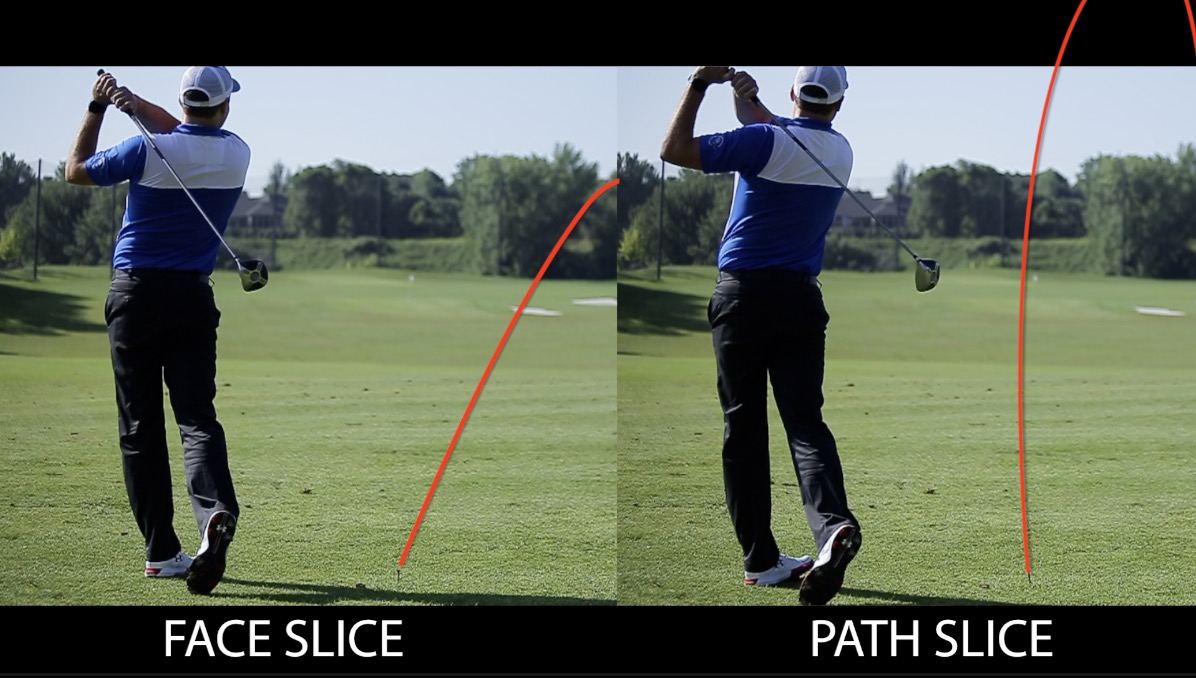
Now, if you have followed any of our instruction at USGolfTV, then you may already know this. But the ball flight primarily starts based on where the club face is pointing at the moment of impact. So let’s start with the basics. If the ball starts relatively straight, the club face is relatively square. If it starts right, the face is to the right of the target line. And if it starts left, the face is left.
So to create curve in the ball’s flight, there must be another part of the equation. And that other part is swing path. Swing Path is essentially the direction the club is swinging at impact. To create curve, there needs to be a difference in direction between the club face and the club’s swing path.
So to do your analysis, start with where the ball starts. If the ball is starting basically on line, your club face is pretty good. Now when it is coming to the ground, if it curves hard you probably have a swing path issue. On the other hand, if you hit a shot and the ball is immediately off line, you know you have a face issue.
How to Stop Your Driver Slice
The nice thing about learning how to stop slicing your driver is you don’t have to overhaul your swing. Most of it actually has to do with the setup, with one simple swing thought.
When you set up to the ball, get more pressure towards your lead foot. We typically encourage a 60/40 split, but if you are really slicing it, bump it forward a little more. Take your lead arm and raise it up. What these two setup changes will do (especially for driver slicers) is promote a swing path that works more toward the curve of the golf ball.
So if you are hitting rightward slicing shots (left for left hand golfers), you want to swing towards the curve. And with that simple swing thought, you will start correcting your driver slice in no time.
Now that we know how to perform an analysis on our swing, let’s work on the importance of the grip and wrists.
How Important Are the Wrists and Grip in the Golf Swing?
Let’s start with the obvious here: you are slicing your driver, and you no longer want to slice your drives. We can guess with near certainty that you have probably been given this advice before. If you want to fix your driver slice, strengthen your grip. How’s that working for you?
Well, if you have heard that advice and you are reading this article, we both know the answer.
Yes, you can use a strong grip and it may temporarily fix the problem. But chances are good that it ends up being a Band-Aid fix that does not address the real issue.
So what is the real issue? Let’s address that, but first let’s go over a few things.
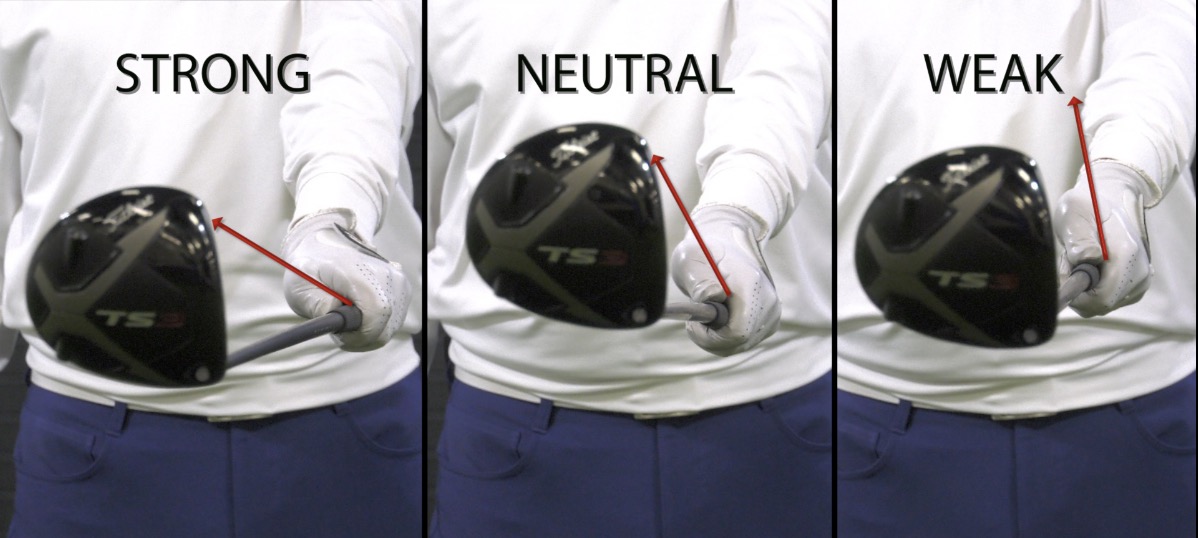
What is a Strong Grip?
For starters, when we discuss grip strength, we are talking about how the lead hand holds the golf club. If you are right handed golfer, that would be the left hand, while the right hand is the lead if you play on the left hand side of the ball.
Now, there are basically three types of grip strength: strong, neutral, and weak. Most people would agree that with a neutral grip, when you look down at the lead hand, you will see the top two knuckles. For a stronger grip, your hands will rotate over and show more knuckles (3 or more). A weak grip will rotate the hands the other way, and show no knuckles.
If you are looking for more information on the strong grip, we put together 3 Ugly Truths About a Strong Grip. But for now, let’s stay focused on why you are here.
Wrist Movement: Extension vs Flexion
Now that we have talked through the different types of grips, let’s move on to the real key to fixing that nasty ball flight: your wrists. This is really the secret to finding success on the golf course.
Extension vs Flexion
Now, if you took a golf club and held it in a neutral position out in front of you, your lead wrist can do one of two things. Let’s focus on the back of the hand, or where a logo might be on a golf glove.
If you took that logo and rotate the wrist towards the sky, that is called Extension. Conversely, if you take your wrist and rotate it towards the ground, that is called Flexion. Now this is where the secret comes into play. Watch the club face as you work your wrists into those two positions, and notice what happens.

If you take the club in a neutral grip and rotate it towards the sky (Extension), the club face opens up. What type of shot do you think you are going to produce with an open club face? Probably a nasty slice.
But what happens if you take the logo and move towards the ground (Flexion)? The club face closes. So why are you being told to strengthen your golf grip? Because it promotes a closed club face at impact. But is that really fixing the problem, or just masking it?
So it really is not a question of whether or not you are using a strong, neutral or weak golf grip. Because each of those can result in a draw, fade, hook, or slice, whatever. But instead, focus on how the wrists are moving to help you square that club face and hit the ball straighter down the fairway.
How to Practice Proper Wrist Movement
So now that we know what we want to work on, how can we practice it? Moreover, when should we get that movement built into our swing? Great questions, especially for casual amateur golfers.
In our experience, you will want to get into flexion early in the takeaway. So when you set up to the ball, as soon as you take the club back, you are going to rotate the wrist toward the ground early. When you do this, the club face will get into a nice square (or slightly closed) position, which will help you draw or straighten your golf shot.
Now for most amateur golfers, the common mistake is to take the wrists and rotate them up toward the sky. This will immediately promote an open club face. You can draw the ball or hit it straight from this position, but there will be a lot of compensation in the rest of the swing to get back to square at impact.
The Drill
So let’s say you start your backswing in a good position, but you are extending at the top of the swing. From here, your club head is opening up and stays open through impact. How can you fix that?
Start by taking a golf tee, open your golf glove flap and close it around the base of the tee. The base should rest on the back of your hand, with the tee sticking straight out.

- As you start your takeaway, rotate the tee towards the ground, pointing straight down
- When you get to the top of the backswing, make sure the tee is pointed toward the sky
- If the tee is pointed forward or down, the club face is open
- As you transition down to impact, rotate the tee back towards the ground, maintaining flexion
The first few times, just practice the drill movement without a ball or club. What you will probably find is that tee wants to point up at the beginning of your takeaway. No problem; now you have a quick test to help you get in a better position.
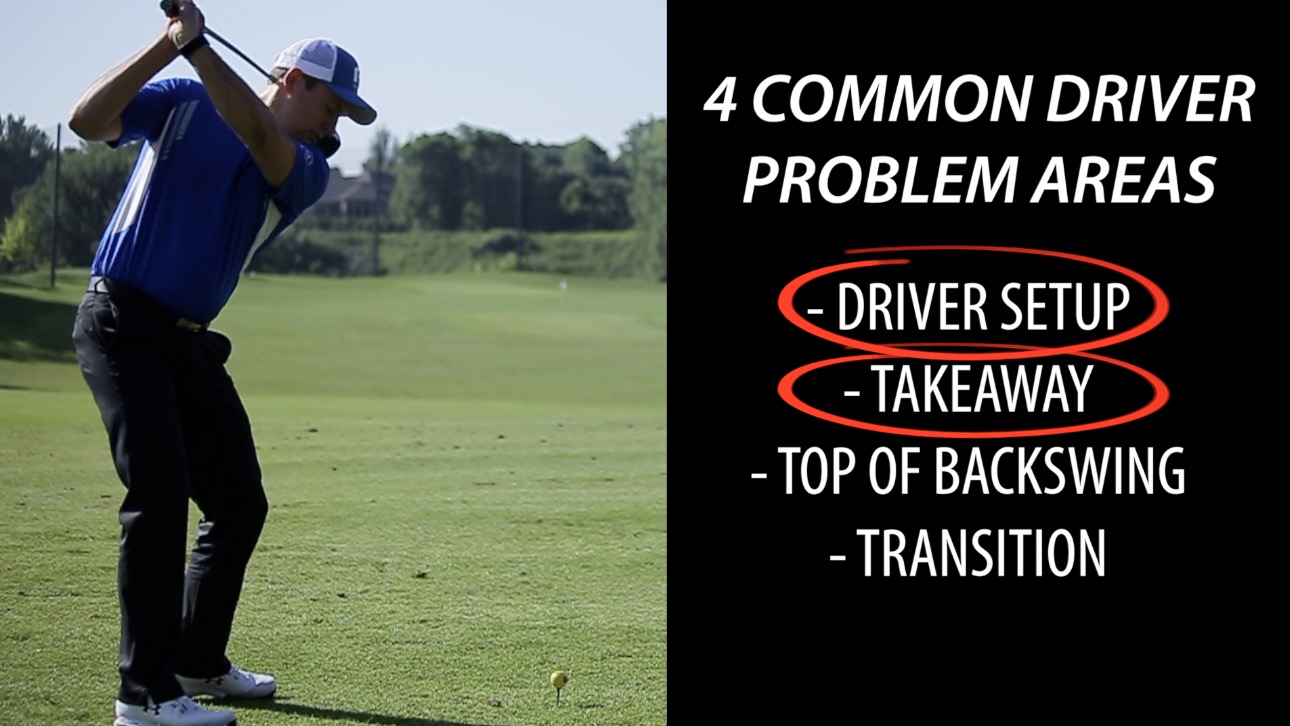
What Are the Most Common Driver Swing Errors?
There are several spots in your golf driver swing that can be causing your slice. So how do you know where you are having the issue? Let’s start with the setup, work into the takeaway up to the top of the backswing, and finish with the transition, and see if we can diagnose where the breakdown might occur.
Outside of the swing, there are some other common golf driver mistakes amateur golfers make. Something as simple as ball position or how you position the shoulders could be wreaking unnecessary havoc on your game as well. (Did you know that having level shoulders could be costing you distance?) Definitely worth checking out, but let’s stick with parts of the actual swing for now.
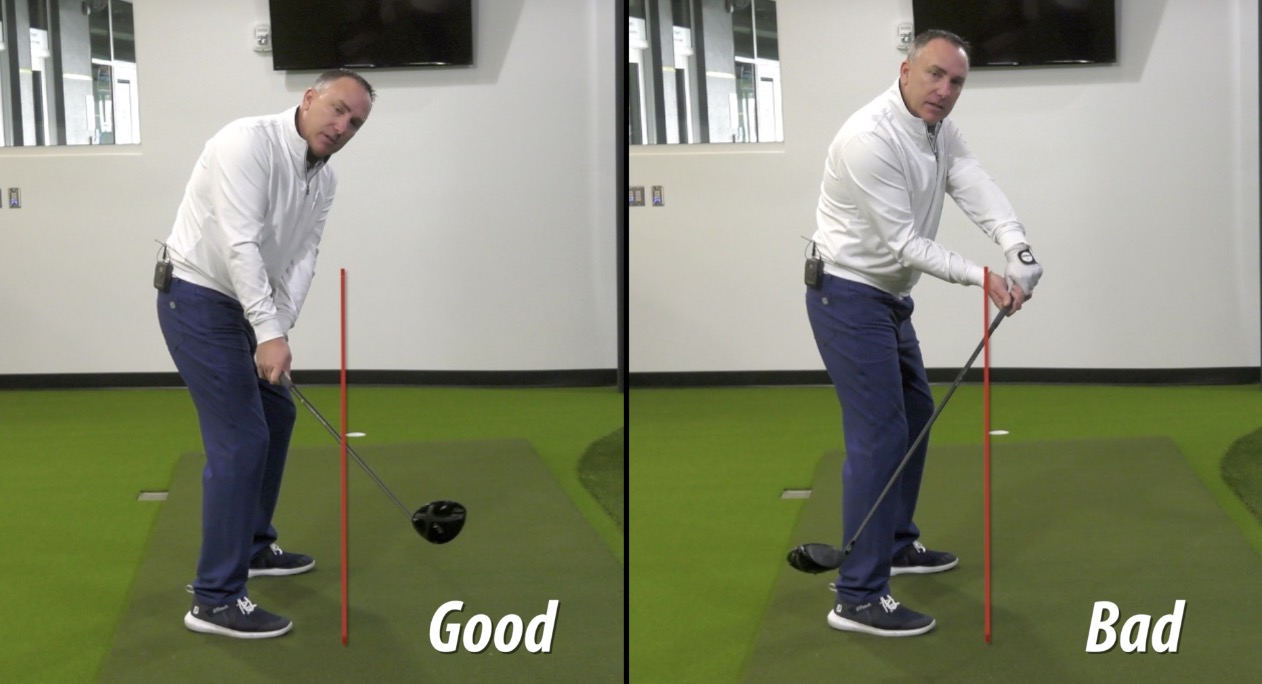
The Setup
Before you even start your golf swing, you could be setting yourself up for failure. There could be many different reasons, but here are the 3 most common mistakes we see:
- Your Stance is Open
- Improper Weight/Pressure on the Feet
- Trail Arm is Too High
The Stance
If you are haunted by watching your ball tail right (or left for left-handed golfers), this is probably going to sound familiar. You start to aim more open to either give yourself more room for error or to get the ball to try to stay in the fairway. Unfortunately, this is probably doing more harm than good.
When you take your setup, if you have your feet parallel to your target line, that would be a square stance. Because you are slicing the ball to the right, you probably start aiming more to the left and open your stance. By moving your aim left, it actually is promoting more of the slicing motion.
Basically, you are taking your slice and slicing it even more. Your swing path is now working across the ball, giving you more of that ugly banana curve as your ball sails across the fairway instead of down it. Don’t worry, we’ll fix that in a minute.
Foot Pressure and Shoulders
The next common setup mistake is having too much pressure or weight on the trail foot. If you are familiar with our instruction, you know we like to favor more pressure on the lead foot at setup. A good place to start is a 60/40 split, but if you are really struggling, maybe bump it to 65-70% on that lead foot.
The third common setup mistake is having the trail arm too high. When the trail arm is level with or higher than the lead arm, this can give your swing fits. For one, this setup would promote hitting down on the ball. Second, it causes the path to start working across the ball (see a trend?) which will cause the ball to slice.
The Fix
Start by addressing the golf ball with your feet together. Next, take your lead foot and move it forward and slightly out towards the target line. Take your trail foot and move it back and slightly behind you. Your stance will now be a little be closed relative to your target line.
To get a proper foot pressure, take your lead hip and bump it forward in your stance, so it is now above your lead foot. From there, just raise the lead arm slightly, allowing your trail arm to settle underneath. These 3 setup tips will help you start working that path to the right more and start hitting that nice high draw.
The Takeaway
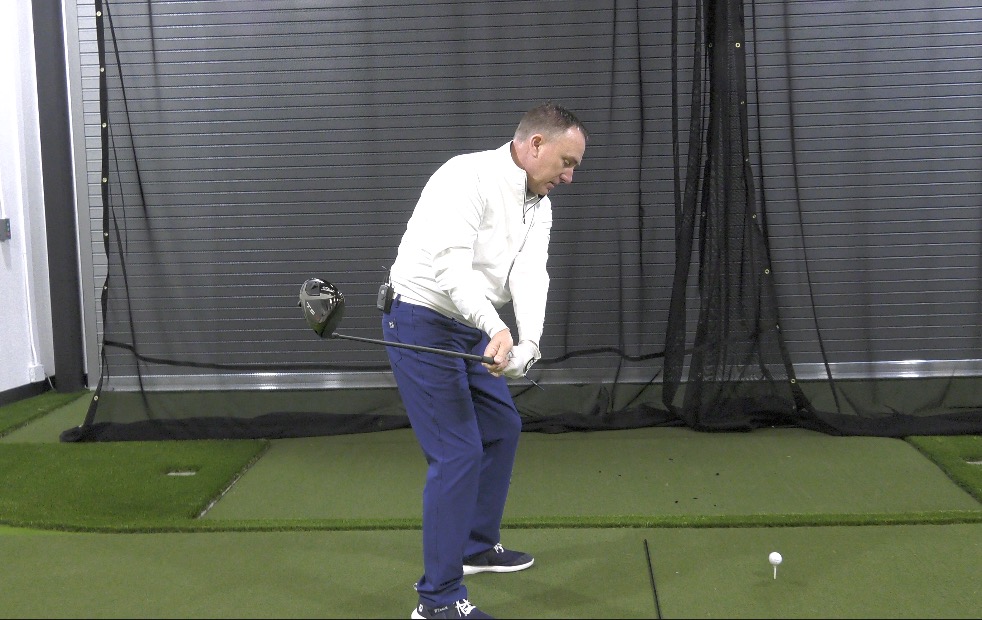
Out of all the parts of your golf swing, the takeaway is probably the most common place to find your problem. You may have a good setup, but if you start your swing with issues, you are doing a lot of fixing to get back to a proper impact position. So what does a bad takeaway look like?
Well, two things typically happen. First, the hands tend to raise the handle at the start of the takeaway. Then the club head starts working inside and around the body. From here, the club face is wide open, the handle is high, and this is just a terrible precursor to a nasty slice.
The Fix
Now that we have identified what we are doing wrong, let’s work on fixing it. To fix it, remember this phrase: hands in, club head out. So when you start the takeaway, the hands stay in towards the thigh, while the club head stays out away from the body.
The opposite (which is the common mistake) would be hands work up and out, club head snatches inside and around the body. Start there with the setup and takeaway, and chances are good you already have fixed your slicing woes.
Top of the Backswing
So you now have a proper setup, you’ve started your golf swing with a proper takeaway, but you still have that slice. What else could it be? Let’s head up to the top of the swing. Now there are some common backswing mistakes golfers make as well, and we have you covered. But for now, let’s continue to focus on the driver slice.
Easily the most common mistake at the top of the swing is amateur golfers trying to make their swing too long. Many amateur golfers equate a longer swing to more distance, but more often the added length just gets the club into a poor position.
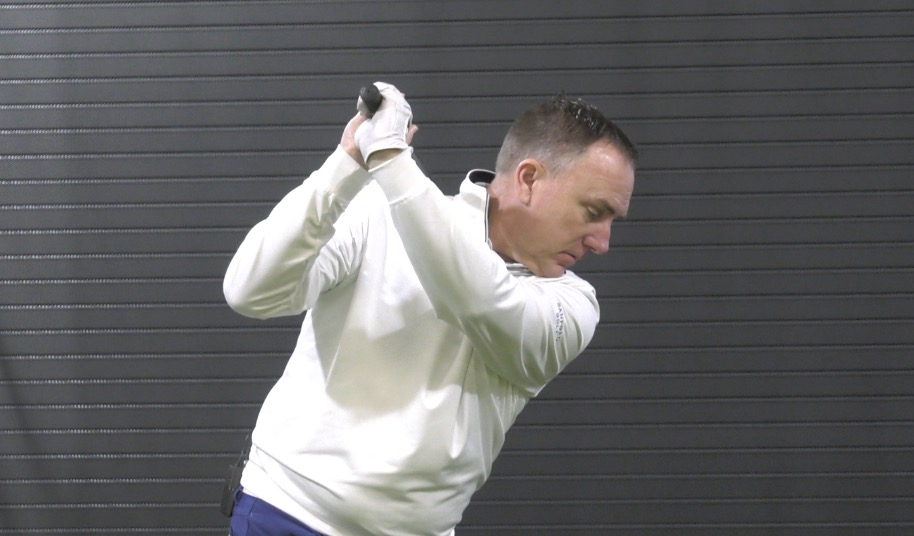
Usually when this happens, the wrists get into an extension position (see above). The club head drops behind them, opening the face and giving you fits at impact.
The Fix
Luckily, this is a pretty simple fix. When you get to the top, feel like the swing is short, and the back of your lead wrist (or the logo on a golf glove) is pointed up towards the sky. This will keep the face square or slightly closed, and put you in a better position to make solid contact at impact.

The Transition
If you have a good setup and takeaway, and are in a good position at the top, your slice may be coming in the transition from backswing to downswing. This is where we see issues for higher level golfers, especially when trying to generate more swing speed.
Generally what happens is the golfer is pulling on the handle to generate more swing speed. That can help get more speed into the head of the club, but oftentimes it also produces a more open club face in the downswing.
The Fix
If this is the scenario for your swing, simply let the club head work out and away from you. This allows the club to lower instead, keeping a more square club face and maintaining through impact. If you want a good drill, follow the tee drill in the golf glove from earlier in the article, maintaining that flexion in the downswing.
Chances are if you are an average golfer though, nearly 9 times out of 10 it’s a setup or takeaway issue. So start there, and if you still are fighting the driver slice, work into the top of the swing and transition to help you pinpoint the issue.
Driver Slice: Review
Many amateur golfers struggle to stop slicing their golf drivers. Unfortunately, there are many different reasons. Fortunately, you now have a journey to take to help you diagnose and correct it.
Start with analyzing your golf swing: where does the ball start, where does it curve? That will help you understand if the issue is path or face related. If it’s a face issue, use a little foot spray to help you understand where you hit it. If it’s a path issue, get your lead arm higher and bump your lead hip forward to get that path working in the right direction. And when in doubt, swing towards the curve.
Next, understand that your wrists have more bearing on your shot than your grip strength. Extension promotes a more open club face, while Flexion promotes a more closed club face.
Finally, work through the parts of your swing to see where the issue is starting. While the top of your swing and transition are common culprits, for the majority of average golfers the issue lies in the setup and/or takeaway. Once you identify the area of concern, work through the fixes to help you straighten out your ball flight.
What Do You Think?
Was this information helpful? Where do you feel you learned the most about your own golf swing? Let us know in the comments! We encourage the dialogue to give our readers more perspective to help us all play better golf!
And be sure to follow us Facebook, Twitter and Instagram for product reviews, golf tips, and information on new brands. For helpful video tips, subscribe to our YouTube channel!
Also visit us at GreatGolfTipsNow.com for more tricks and insight on all aspects of the game. We’re always here to help you play better golf.
I’m 70, 5’10”. 175 # and about 18″ from shoulder to shoulder. A few years ago, I tore a tendon in my right bicep while moving furniture but it’s almost healed. I am right handed and fighting a slice. I have only played one time this year but want to play more now that my wife has been one year since a triple bypass. I shot 95 on a 5700 yard course (from the gold tees). I failed to lose a ball or to make a putt over 6 feet.
My irons are Ping G2 with TFC 100 regular shafts. I have 3 specialty wedges and 3 “woods.” This next part is a painful description of club types, shaft lengths (from top of grip to top of hosel), and balance points from the hosel top for some clubs. I also include typical, not maximum, length. Driver: Distance Master Pro 460 13^(degrees) L shaft 41.75″ 8.25 balance point 225-240 yds. 3 wood: Distance Master 15^, M shaft 40.5″, 9″ BP, 200 yards. 4 wood: Nike Slingshot 20^, 36″ shaft, R shaft, 5.5″ balance point, 190 yards. 3 iron is 36.75″ long and each club gets 0.5″ shorter. BP is 7″ and 170 yards. 4 iron 155 yards, 5 iron 150 yards and 6.75″ balance, 6 iron 145 yards, 7 iron 135 yards and 6.25″ balance point, 8 iron 120 yards, 9 iron 110 yards, PW 90 yards. 52^ gap 33.4 shaft 80 yards (Hippo). Lob 60^ Adams Tom Watson 50^. Sand 33″ shaft Nike 54^ 75 yards.
I do not have a fast backswing. Even when I close the face, the ball might take off leftish but cuts right. I am exercising to correct a flaw where I have to take the toe off the ground at address because I found the toe dragging on impact, which might cause the ball to be hit right immediately. Taking the club back low, slow, and inside does not work. I hit the ball straighter, although shorter, when I take the club back shorter, with the shaft pointing almost straight up before I start down. This makes me think that the shorter time for a downswing either does not give my grip enough time to weaken or I don’t have enough time to spin my hips out of the way so I don’t cut across the ball as much. That could be corrected by figuring out how to slide my hips toward the target instead of spinning them but I can’t swear I’m doing that. Regardless, the more compact swing costs 5-10 yards so it is not optimal. I used to hit drives of 270-300 with steel shafts and persimmon heads with a set from K Mart. But that was 45 years ago.
This was very helpful
i found the all the information extremely helpful now to put it to the test
Thank you. If you would like to learn more, check out our book The Bad Lie. Amazon link here if interested https://www.badliegolfbook.com/