Perfect Golf Swing: It’s Easier Than You Think
Want a Perfect Golf Swing? These 3 Tricks Will Finally Get You Out of Your Head and Into the Motion.
Who doesn’t want a perfect golf swing? A solid, consistent golf swing is a thing of beauty . . . not to mention it can really shave strokes off your score and make a round of golf way more fun.
If you’ve been chasing that elusive perfect golf swing, you’ve probably collected loads of advice, golf swing tips, and insight from every possible source. You’ve read magazine articles about how your favorite professional golfers do it. Perhaps you’ve watched instructional videos on YouTube. You’ve even swapped secondhand advice with your buddies.
And if you’re like most amateur golfers, you’ve come to one disheartening conclusion:
The perfect golf swing is complicated and cannot be accomplished without years of focused training.
 .
.
Here’s the good news. Mastering the perfect golf swing doesn’t have to be that hard after all.
A great golf swing is comprised of three cleanly executed phases:
- Setup
- Top of the backswing
- Finish
Now, if you do a deep dive on any of these three phases, you will likely find some complex golf swing tips for honing your technique. While these swing tips may not be wrong, they are likely to get you overthinking your swing.
Instead, I’m going to share an incredibly easy trick to help you master each element of a perfect golf swing. Then, I’ll share a bonus tip for tempo, so you can make the most of your new technique.
But before we start… It is important to understand how we learn the golf swing and why it can seem so difficult to get rid of those nasty habits.
How We Learn the Golf Swing
We have all heard the expression “muscle memory” before. But do muscles actually have memory? Of course not; muscles are controlled by our brain and the so called memory is better described as a motor program. These motor programs are learned as our bodies develop and grow.
A simple motor pattern to think of is walking or running. We no longer have to think about walking. Instead, our brain has a built in motor pattern that has been refined and perfected. We simply walk forward and the motor pattern takes over and the muscles move accordingly.
The issue with motor patterns in golf stems from how hard a pattern is to unlearn. Once we have learned a motor pattern like the golf swing, it is very difficult to replace that pattern with a new movement. This is where understanding how to replace the old golf swing mechanics with a new pattern is extremely helpful for every golfer.

Developing Your Motor Pattern
The first step is recognition. We first have to feel and be able to recognize the difference between the old movement pattern and the new pattern. Once we feel the new movement and can successfully recognize the difference, we can start replacing the motor pattern that we have developed. (Side note: if you are looking for a great swing trainer tool, we recommend the LiveView Pro camera)
Step two is replacing the old with the new. This step varies in length depending on the difficulty of the movement and the speed in which the movement is being made. First, start with slow body movements making sure the club and the body are working in the correct pattern. It helps to have video or a friend give feedback so you know when you perform the new pattern correctly.

Finally, once the new pattern is programmed at slow speeds we can ramp it up and start hitting full shots. The final step is simply practice. Continuing to practice the new motor pattern will remove any influence the old pattern has on the golfer’s swing. The motor pattern is fully developed when the motion can be made autonomously.

Let’s dive into the motor patterns that lead to a perfect golf swing and better golf shots.
The Perfect Setup
Your setup can make or break your swing. If you start off on the wrong foot (literally or figuratively), you have no hope of making that dream swing.
Now, if you’d like a little background on these details, you can learn more about ball position here and get some additional swing tips for setting your iron shots here. But as I said, I’m focusing on keeping things as simple as possible in this article. So, I’m going to jump right into an incredibly easy setup technique that helps my students make an excellent golf swing almost every time.
Here’s what you do:
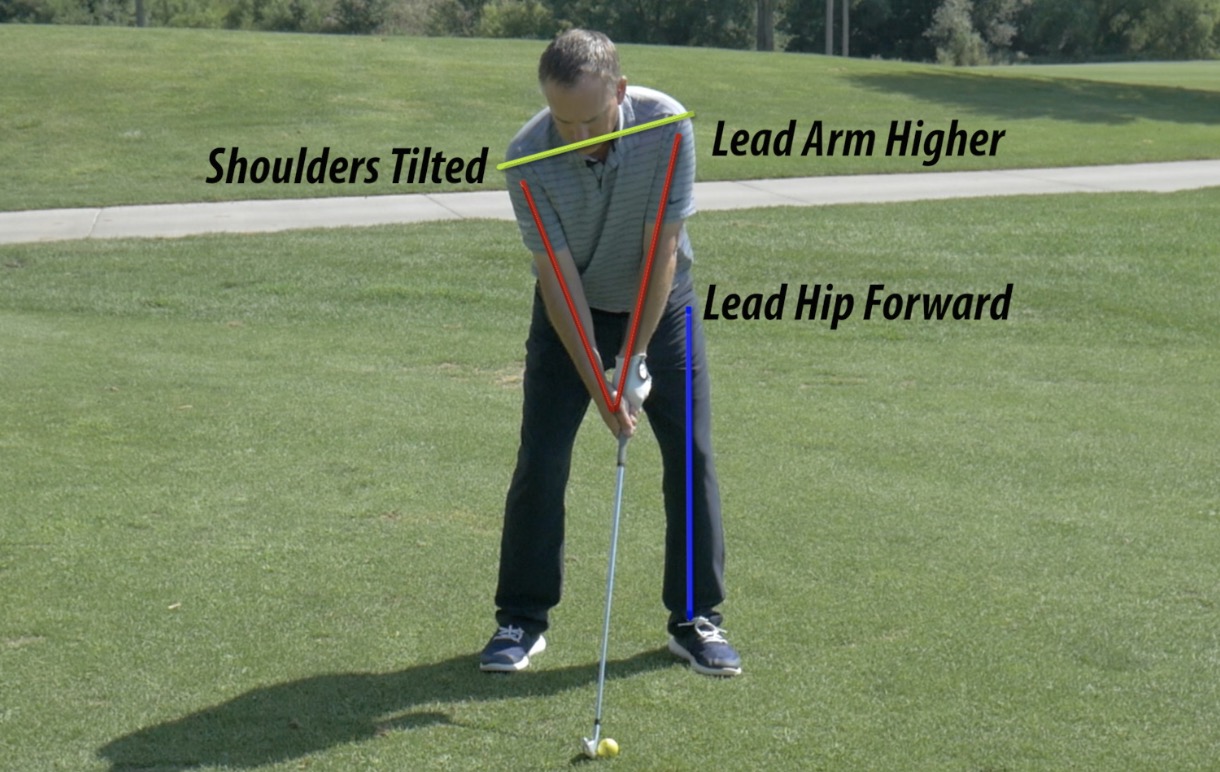
- Stand in front of the ball with your feet together and the ball in line with the crack between your feet.
- Then, step the lead foot forward toward the target and the trail foot away from the target. These steps should be the same size.
That’s it. Just those two steps. So, what exactly are we accomplishing here?
For one thing, this trick for setting up your shot naturally squares your body position. It also gets the ball in the center of your stance—right where it needs to be for your perfect golf swing.
The Importance of Good Posture
Within the setup there is a key fundamental of golf called posture. We have all been told to get into a good golf posture before we hit the ball but what is that and why is it so important? A good athletic posture is key to a relaxed but powerful golf swing.
A good golf posture is an athletic stance similar to the stance of a player receiving a ground ball or getting ready to receive a serve in volleyball. The knees are slightly bent and we bend over at the waste keeping the knees, shoulders and balls of the feet all stacked up on top of each other.
When a golfer gets into the proper posture it sets them up to make a strong fluid pivot and properly use the ground to create club head speed. When we do not have good posture in the swing, the body tenses up in certain areas and we can not rotate well in the hips and upper body. This tense feeling also creates tempo issues and we lose control of the clubface throughout the golf swing.
Try to work on your posture next time you are out on the range. Make sure the shoulders, knees and balls of your feet are all relatively in line with each other. Relax the back so that it is not arced and be athletic. These tricks will allow the body to rotate well and improve your swing tempo.
Why the Setup is So Important
From the steps above we can see that getting into the proper setup is not challenging. It is all about building a routine that you, the golfer, can replicate over and over again. But why is this so important?
The setup is where we prepare to take the golf club back and eventually hit the ball. Just like in any other sport, being in the proper starting position will greatly increase your consistency. Our body can recognize any irregularities in our motor pattern. Due to this, we will make compensations in our golf swing when we feel something out of place.
The setup is no different. If we are set to hit the ball and the shoulder line is aimed right of the target, we will change something in our backswing to correct for this mistake. If the ball is too far back or forward in the stance, the golfer will compensate and try to fix the issue by making a different swing.
Consistency is King
These small corrections are what cause lack of consistency. We may be able to compensate and have good timing through the swing a few times but these moves are not repeatable. Being in the proper setup position for every shot gives the golfer a better chance at making the same motion every single time.
Not only does having the same setup for every shot help with consistency, it can also help a golfer perform the correct golf swing takeaway. If the golfer is in a proper setup, the body can move more naturally in the takeaway back into the right heel. We set ourselves up for failure when we do not have the right weight distribution in our feet at address.
Wrist angles at address can also help the golfer perform the proper takeaway. Having a little hinge in the wrists in the setup allows the golfer to hinge the club in the takeaway with ease. If the club shaft and arms make a straight line to the ball it will be harder to get the proper amount of hinge in the wrists during the backswing.
Keys To a Great Golf Grip
There is no perfect grip in the game of golf. However, I do look for some common mistakes made by golfers who try to use grip to fix their slice or hook.
There are three styles of grip whether you interlock or overlap. The three styles are weak, neutral, and strong. I am an advocate of a neutral grip due to the following reasons.
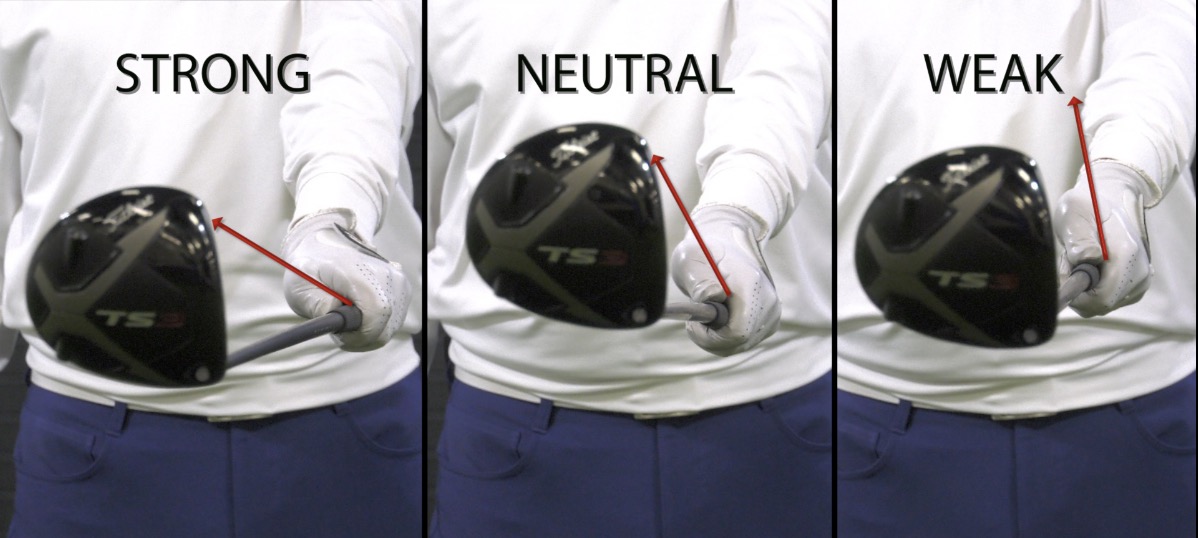
Strong Golf Grip
When a player has a strong grip, they tend to make a major mistake in their takeaway. A strong grip is when the left hand is rolled over the top of the grip and the right hand is underneath. Usually, if you can see three or more knuckles on your left hand at address, you have a strong grip.
A strong grip promotes the hands to roll over and work outside during the takeaway. The club then works inside and behind our body. With this move, we have to compensate in the downswing with a lot of side bend and early extension through impact.
Weak Golf Grip
A weak grip is when you can only see up to one of the knuckles on your left hand at address. Players with a weak grip will have issues controlling the face through impact. This grip will lead to players hitting weak fades with all of their clubs due to an open clubface at impact.
Neutral Golf Grip
A neutral grip is when roughly two knuckles can be seen on the left hand at address. To grip the club consistently with a neutral grip, perform this setup drill for every shot.
- Hold the club in your left hand at your side while standing up.
- Take the club and grip it naturally and then pull it up and out in front of you. Check to make sure you can see two knuckles on your left hand.
- Next, take the right hand and place it on the grip while the club is still out in front of you. Make sure the right hand is on top of the left thumb and not underneath the grip.
- Now take that grip and get into your perfect setup. This will give you the best control of the clubface through the entire swing.
I can go on and on about how important the proper setup is to making the perfect golf swing. The most important part is to find a routine that you can repeat over and over. This will set yourself up to make the best swing possible.
The Perfect Swing Plane
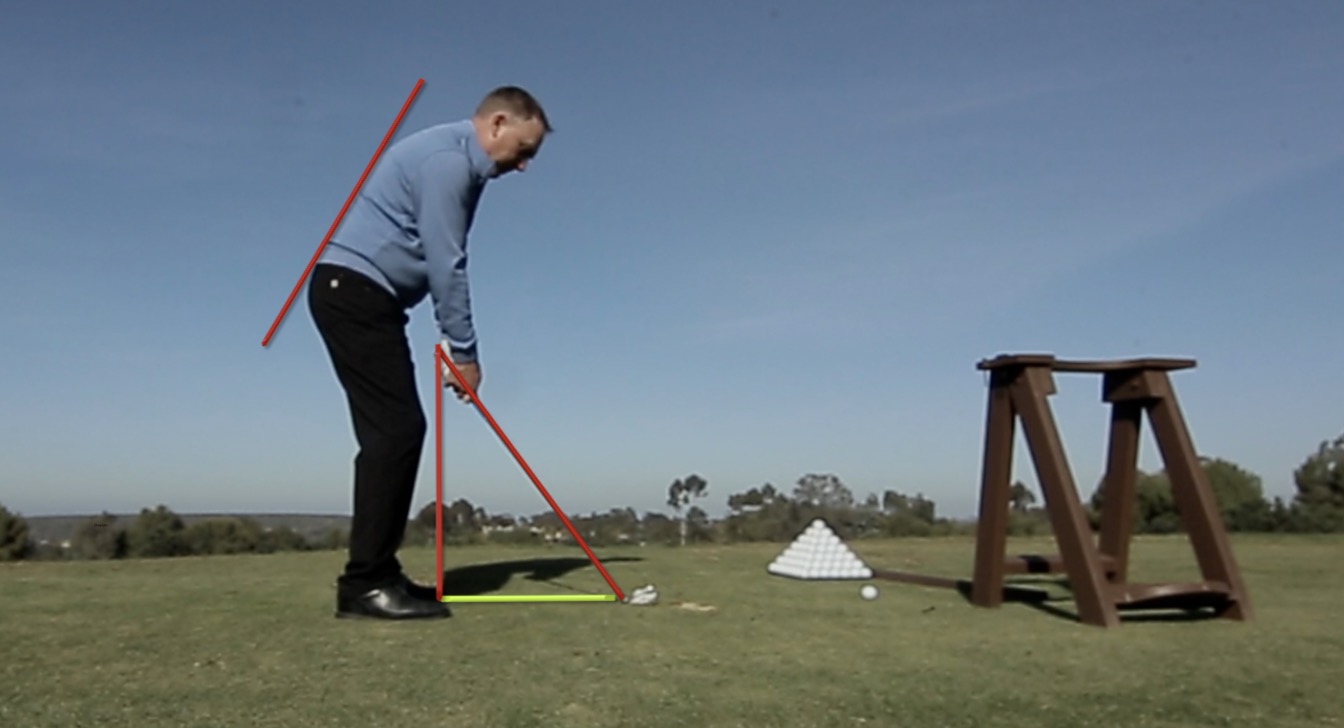
Before we talk about the top of the backswing, let’s dive into the takeaway and the plane the club works on to get to the top. The swing plane is the natural line in which your club swings back to the top of the swing and then down to the golf ball.
The perfect swing plane is driven by the golfer’s setup. To find the perfect swing plane, draw a line that is matching the angle of the club shaft starting at the ball and extending out from the end of the club up to where your hands end up at the top of the backswing. This line creates the swing plane and is where the club head should work as the club swings back to the top of the swing.
Now that we have established the proper swing plane created by the setup, we can talk about the perfect takeaway motion. In the takeaway there are four key areas to be aware of. All of the items I am about to mention work in tandem with each other in the takeaway.
The Takeaway
The first topic is what the hands are doing in the takeaway. The most common mistake I see with the hands in the takeaway is when the hands work out away from the body and the left hand rolls over the right hand. This move creates separation between the hands and the rest of our body. The hands should work in over the right foot as the hips rotate back and away from the target.

Next up, we have the hips. During the takeaway, the hips need to rotate away from the target to create space for our hands to work inside over the right foot. This move should happen at the same time as when the hands start moving.
This motion of the hips will also start to make our upper body rotate away from the target. The hands and hips start to move and the upper body stays nice and connected with the hands.
The arms should feel connected with the upper body. Again, the most common mistake I see is when the hands extend out away from the upper body. This move creates space between the chest and elbows.
The last piece of the takeaway puzzle is the club head. The club head is easy to compare to the hands. When I see the hands extend and roll over, the club works inside the hands and back behind the body.
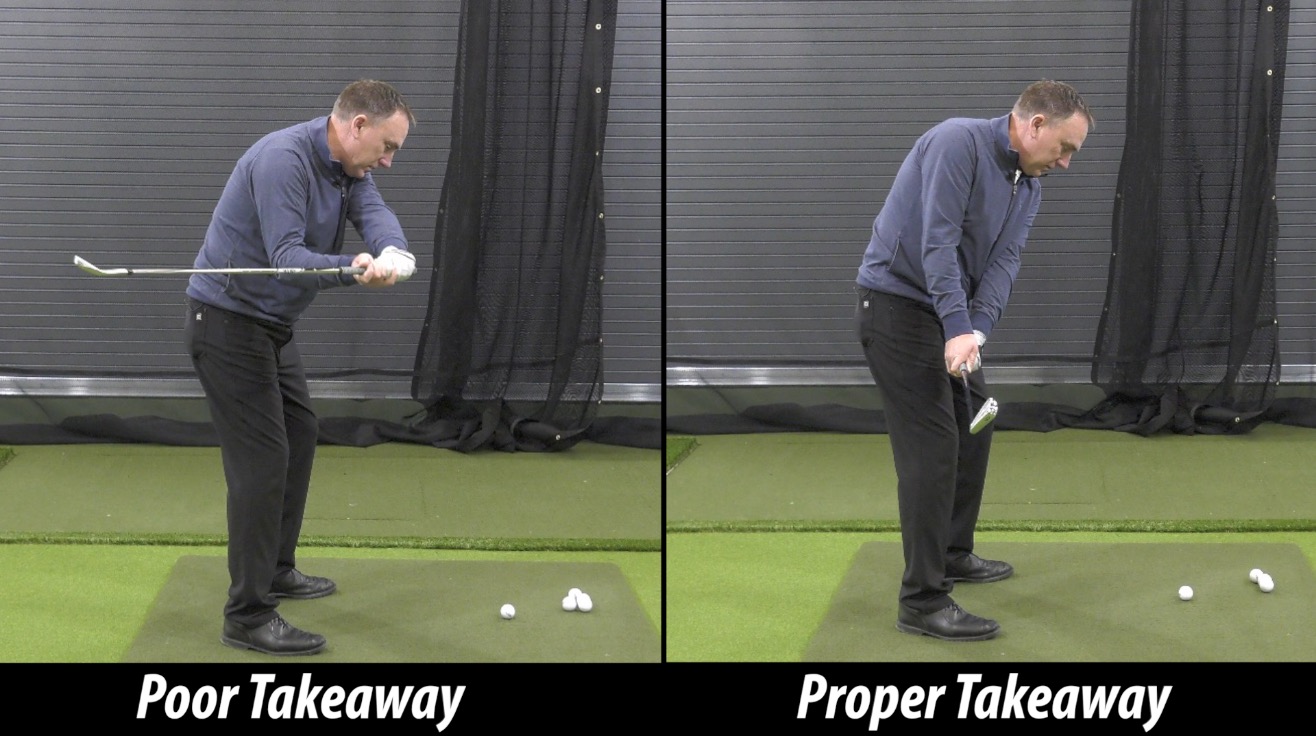
When the hands work inside and over the right foot, the club will stay out in front of the hands and body. If done correctly the club will start to travel up the swing plane we created earlier.
Putting It All Together
Now that all of the pieces have been explained, it is important to remember that these moves happen all at once. I have found it most beneficial to focus on the relationship of the hands and the clubhead. When the hands work in and the club stays out in front, the hips and upper body usually work as they are supposed to.
Now that you’ve mastered setup and understand the takeaway, let’s take a look at arguably the trickiest aspect of the perfect golf swing.
The Top of a Proper Golf Backswing
If you’ve been trying to improve your swing in any way, your brain is probably already overheating from too many backswing and transition tips.
From getting the clubhead into the ideal position to managing momentum, few golf topics are as complex as this one. As a result, the deeper you dive into the effort to perfect your backswing, the more likely you are to become paralyzed by too much information.

That said, if you want to check yourself for some of the most common backswing mistakes, you’ll find some easy fixes explained in plain English right here.
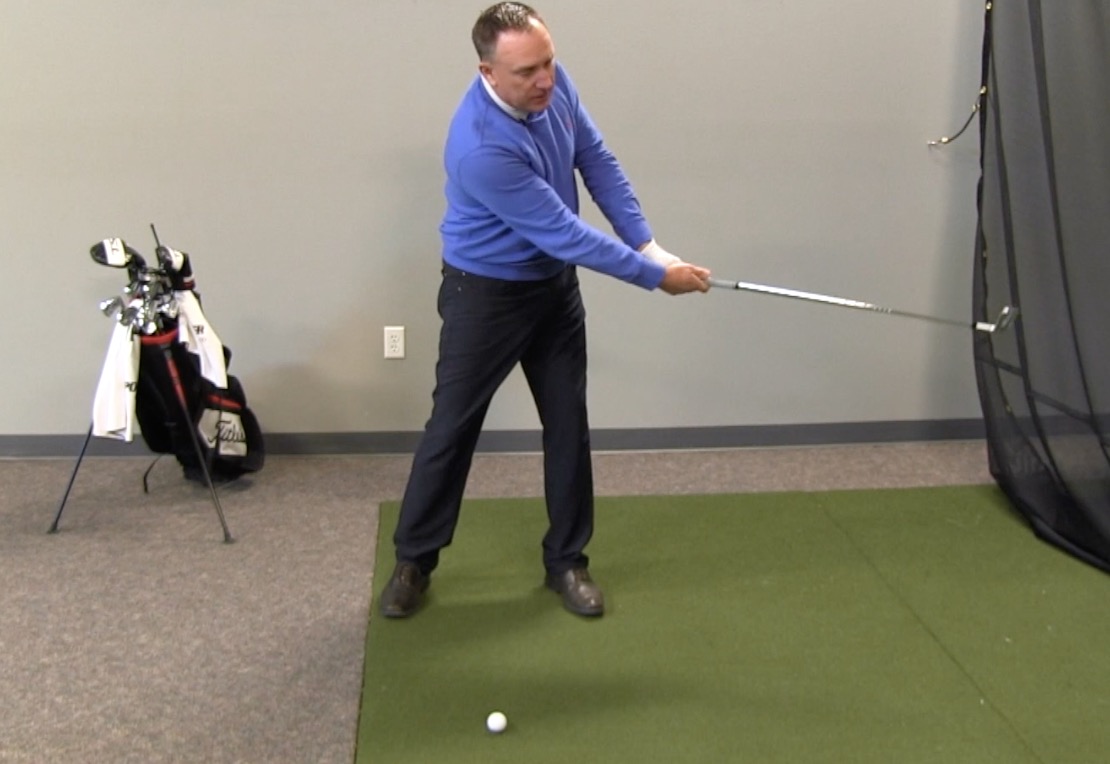
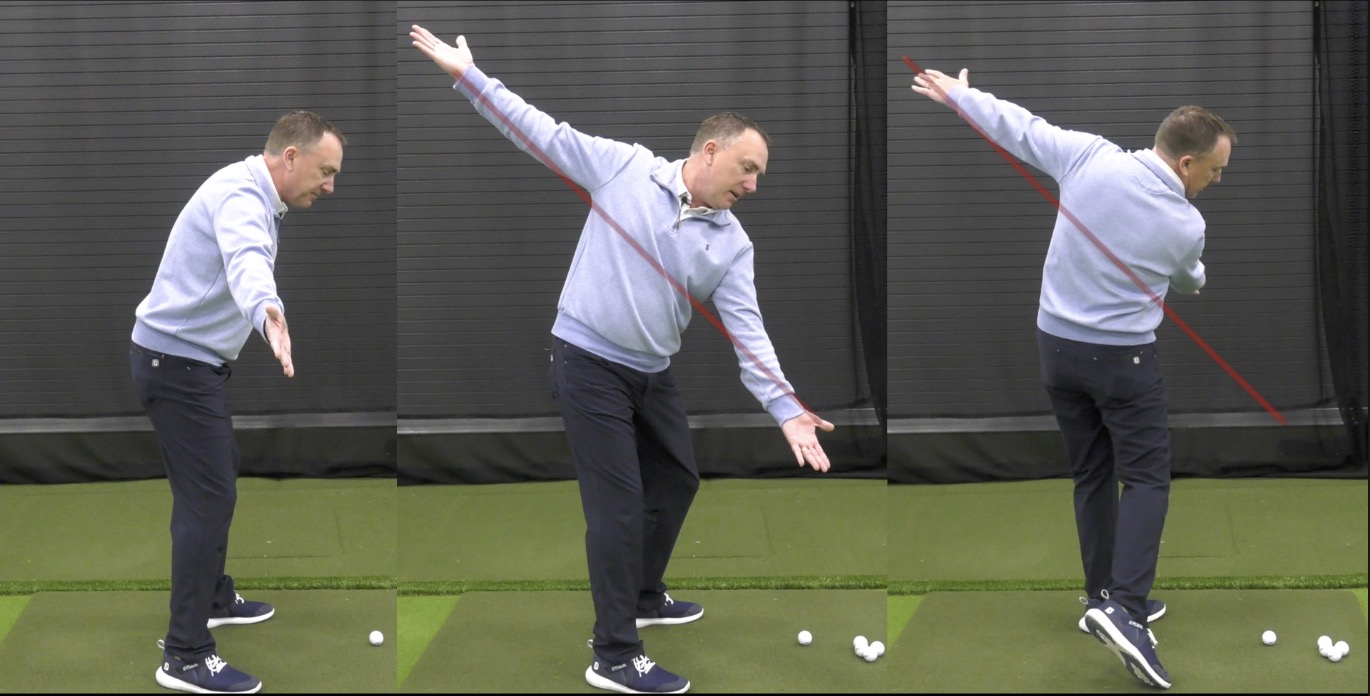
In the meantime, I’m going to share a basic drill that will help you find that ideal position at the top of your backswing naturally. It’s like this:
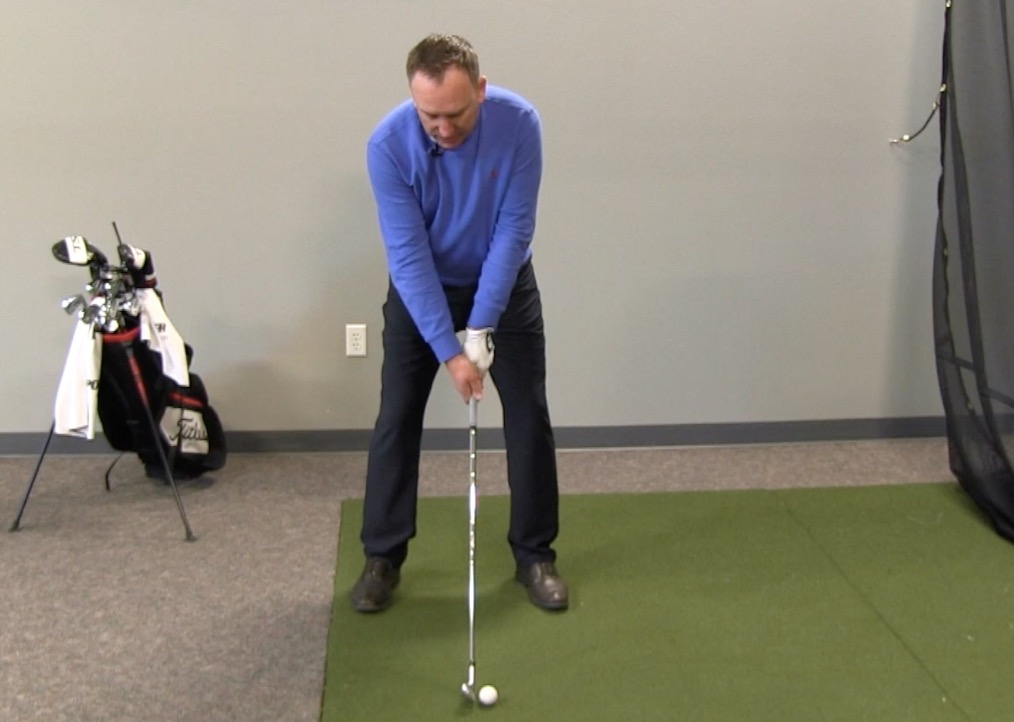
- Take your setup (no ball) with your 7-iron.
- Hold the club out in front of you (toward the target) so the clubhead is about 3 or 4 feet away from your body. In other words, your club is positioned at about the midpoint between where the golf ball would be and where you would finish.
- From this position, swing the club back and through like you’re taking a regular golf shot.
- Take that same swing several times to get the feel of it in your body.
- Once you have a feel for it, use that same swing motion—starting out in front of the body—to hit the golf ball.
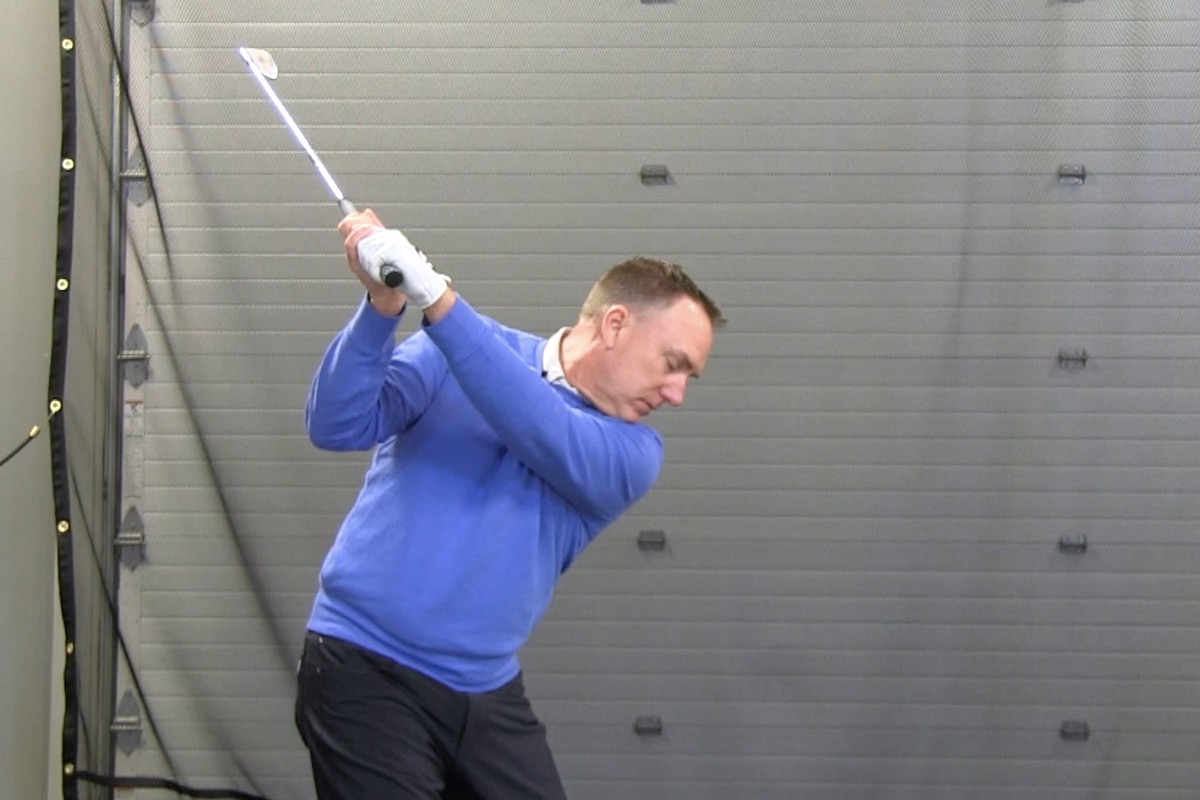
So, what are we accomplishing here? Well, this drill takes all the thinking out of the backswing and helps you use momentum to get into the perfect top position naturally. It may seem too simple, but I promise it works. Give it a try.
The Perfect Finish Position
Why does finish position matter? After all, the ball is gone at that point, anyway.
Well, the way you move is influenced by where you plan to end up. And a balanced swing ends in a balanced position. The finish position is a result of all the moves made during the golf swing. As an instructor, I can learn a lot about a person’s golf swing simply by looking at their finish position.
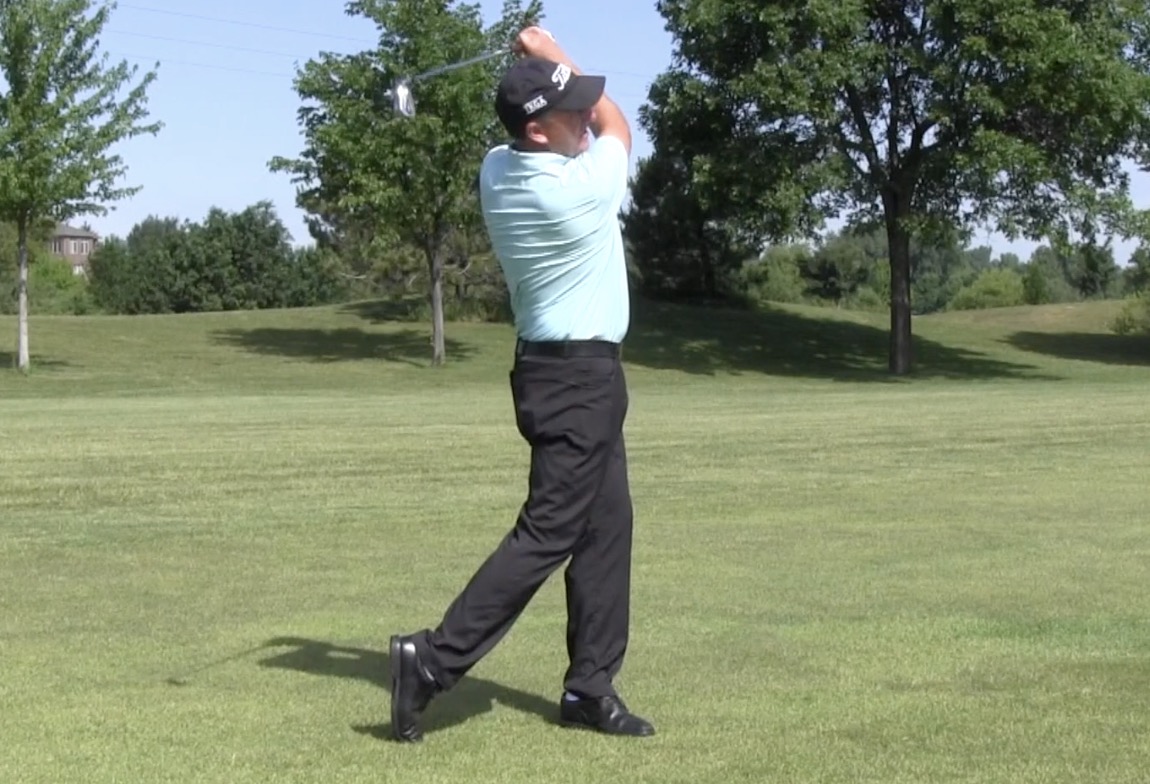
If you’re trying to master the perfect golf swing, you want to think about finishing with your knees touching. Your hips and body should be facing the target.
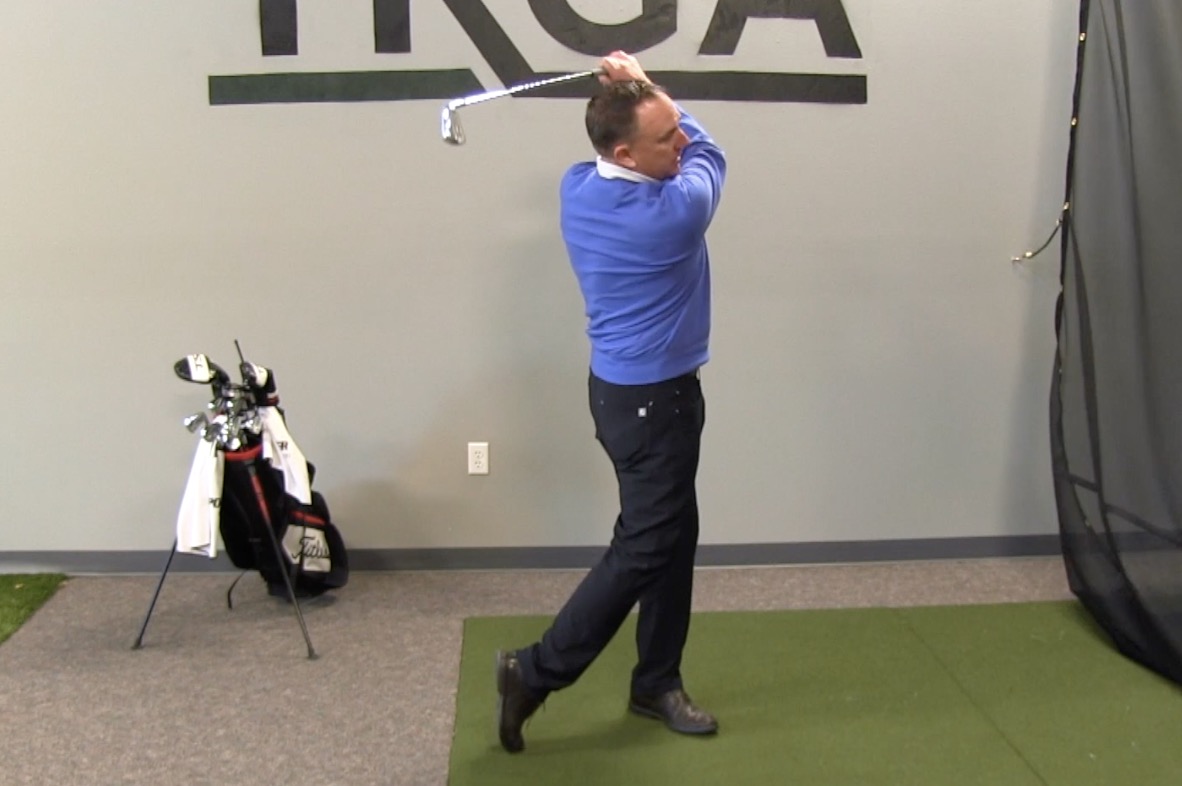
Believe it or not, it’s that simple. Swing through with that finish position in mind, and I guarantee you’ll see results.
The perfect finish is really just a snapshot of the perfect golf swing. Every move made in the golf swing leading up to the finish influences where the finish position is. The key to a balanced, tall finish on the lead foot happens in the golf swing.
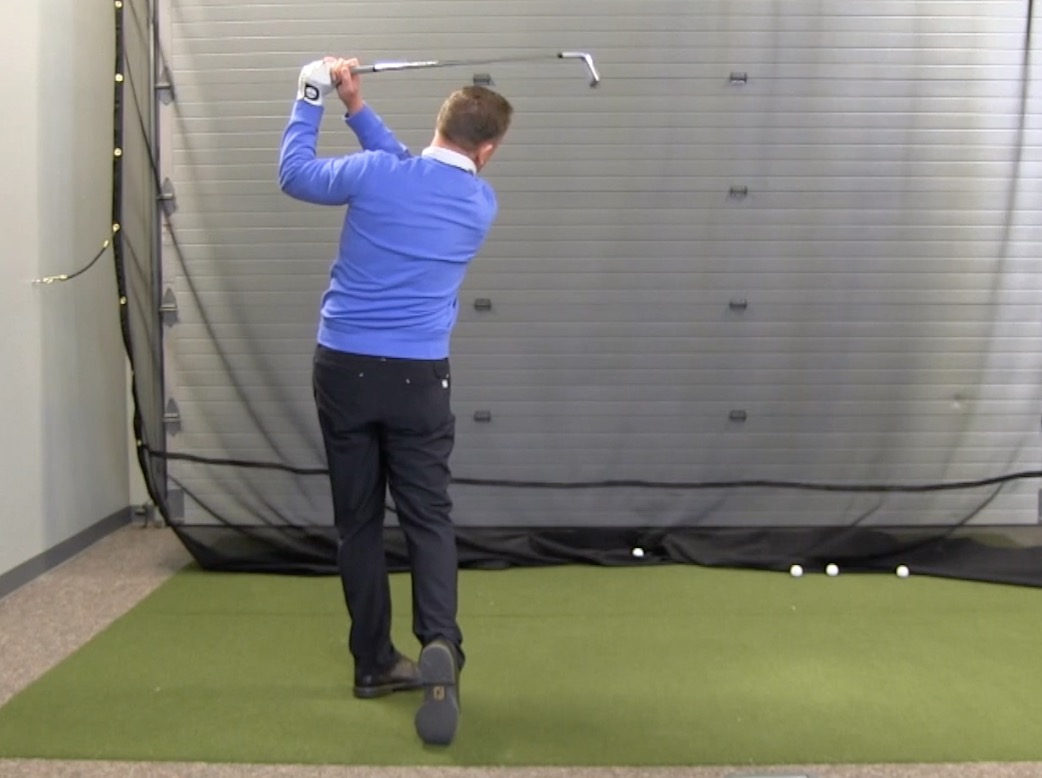
Importance of Finishing Towards the Target
As mentioned earlier, the ideal finish position is knees together and hips and shoulders facing the target. But why do we want the shoulders and hips finishing at the target? It is all about face control through impact.
When the body stops rotating at the bottom of the swing, the hands will still swing through and then roll over quickly. This rolling of the hands also rolls the face over. This is also known as a flip of the hands. Flipping the hands creates a lot of speed and feels powerful but this move can cause a lot of inconsistent ball flight and contact.
Rotating the body through impact is a great way to add accuracy and consistency to your golf game. Keeping the hands from rolling over by rotating through and towards the target keeps the clubface square through impact for a longer time. Keep that body rotating through the swing and start hitting straighter shots more often!
Bonus Tip: Improve Your Tempo
Now that you’re consistently making a perfect golf swing (right?), get the most out of your hard work by nailing tempo, too.
Tempo is absolutely essential for solid contact and better distance. Fortunately, it’s also fairly easy to learn. The tip I’m about to share has been used by a lot of tour professionals and great amateurs. I personally love running this drill with my driver—it’s just more fun—but it’s a good idea to practice your iron shots this way, too.
Here’s how easy it is:
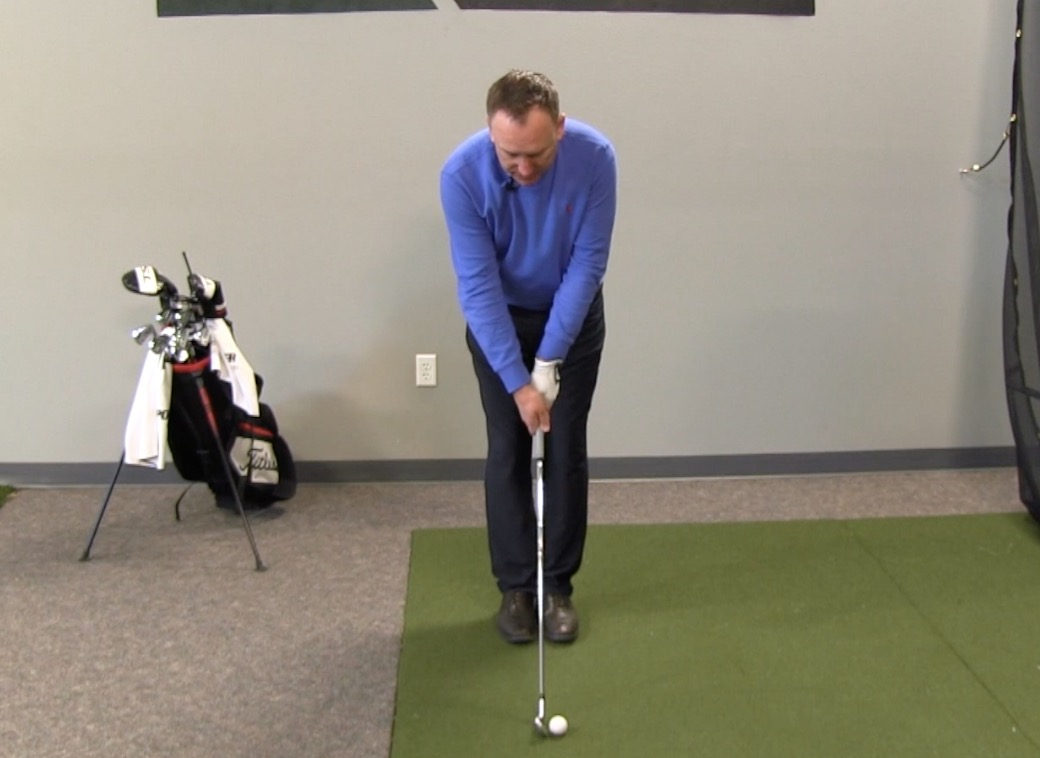
- Take your regular setup.
- Elevate the club about .5-1” off the ground.
- Take your golf swing.
That’s it! You see, when the club hovers, it releases tension. And tension is the biggest tempo killer. With this drill, you get a nice, loose swing with an even rhythm and solid contact.
Run this drill regularly and combine your mastery of tempo with your new, perfect golf swing. I promise you’ll have your best-ever time on the golf course as a result.
Did These Swing Tips Help You Find Your Perfect Golf Swing?
Sometimes we get in our own way when we try to improve our golf game. Because there’s so much information out there, the wealth of golf swing tips and tricks can just turn into a tangle of distraction in your head. In these cases, I find it helps to get out of your head and focus on finding new habits and rhythms in your body.
Start with finding a way to create a consistent setup and grip before you hit each shot. Once the setup is rock solid transition into some takeaway practice. Remember to focus on the relationship between the hands and the clubhead. The hands will work inside over the right foot and the club will stay out in front of the hands. This takeaway will allow you to finish the backswing and achieve the perfect position at the top of your swing.
Try the drills I shared here and let us know what you think. Did these concepts help you? See anything you disagree with? Have some advice of your own to share? Jump into the comments and let us know!
And be sure to follow us Facebook, Twitter and Instagram for product reviews, golf tips, and information on new brands. For helpful video tips, subscribe to our YouTube channel!
Also visit us at GreatGolfTipsNow.com for more tricks and insight on all aspects of the game. We’re always here to help you play better golf.
Slow motion video would be soo much help with emphasis on each tip and position of the club during the tip
Solid point, slow motion is a good visual for all us golfers. Will be sure to pass along the idea to our team….thanks!
This is one of the most amazing and useful lessons ever. After a really stupid freak accident I was laid up for a while and totally lost touch with my body let alone my golf swing. I am just getting back into shape and fluidity of movement. I am so enjoying your videos on various topics, but this article really rocks as it embraces the essence of the game- the golf swing. Thank you Todd – you rock too.
Lady, sorry to hear about your accident. Hope you are doing ok. I really appreciate the kind words and you sharing your story. Always makes our day when we can help our fellow golfers…be sure to join our email list, more great content to come.
In the last part of your great piece on ther perfect swing, you say that the knees should touch at the finish. As I recall when you have written about the swing for senior golfers you advocate that for better balance the feet should be spaced further apart. Should the fact that my knees don’t touch mean that my feet are too far apart?
I need some help in gaining distance. Although I am an “EXPERIENCED” golfer of 90.. I am doing fairly well finding the sweet spot, get a good turn and hit the ball straight, I can’t seem to increase my ditance. I cant seem to be able to catapult the bsll. I believe the problem is that I am not using the ground properly. Can you suggest some drills to help?
George,
Thanks for posting. Great to hear you are still playing golf and looking to improve. Here is a great video we did that will give you some ideas on more distance https://youtu.be/AVcXAyzUsbE
Ken,
This is a great question. As an “experienced” golfer it is more important we in balance and hit the ball in the center of the face than our knees touching. Hope that helps!
You suggested what you called the “baseball drill”, where a right hander would pull the right foot back and kind of have a right field direction foot alignment. It’s unclear what the baseball drill is supposed to accomplish for me…I guess I just missed the point of it. I’ve tried pulling the right foot back but still swinging straight ahead and I find that it has made my iron shots much more accurate. However, I feel out of balance so I’m not swinging as hard and therefore sacrificing distance for accuracy. I’ve even played two rounds using that stance and both accuracy and loss of distance occur on the golf course. However, I’ll take the accuracy over distance and just adjust the club. Since you called it a drill I think that you didn’t mean for me to do this all the time. What is that drill supposed to teach me.
Gary,
Good question. The drill is to teach the body to swing and move the club from inside to out. The visual of the baseball field is a way to see/feel this.
Todd – I understand that you have written a book on the Vertical Line Swing System. How can I secure a copy of the book.
Daniel,
You are correct. We just received the first few copies today for proof.Your timing is good! Be sure to join our email list and you will receive updates. Excited to share the book with the golfing world. Appreciate your kind words!