How to Swing a Golf Club: The Ultimate Guide
Do You Really Know How to Swing a Golf Club? Check Out Our Ultimate Swing Guide & Catch Errors Before They Wreck Your Next Round.
Anyone who has ever asked how to swing a golf club knows the answer can get really complicated really fast.
You just want to know proper form, and suddenly you’re hearing about swing plane and lag and angle of attack . . .
. . . it’s all getting a little too mathematical.

Listen, all those concepts are useful as you work to improve your golf game. But if you’re new to the sport or you just want to get back to the fundamentals, there is a simpler place to start.
I’m going to explain how to swing a golf club, focusing on the most basic elements of golf swing technique. These concepts are easy to follow and set you up to execute an effective swing motion to transform your game.
You’ll soon see that a perfect swing is not as complicated as you might imagine.
How to Get the Proper Golf Stance
You can obsessively dissect the backswing of your favorite golfer. Or you could read articles on face control and swing path. You might invest hours in weight training to increase swing speed so you can really crush the golf ball.

But none of those efforts will amount to anything if you haven’t perfected your golf stance.
After all, a solid golf game is about consistency. And the best way to achieve consistency is with a fine-tuned, well-practiced setup.
Now, if you’re really serious about perfecting your form, I recommend practicing with a LiveView camera. This is one of my favorite tools, because it gives you live, mirror-image video of your golf stance, and is a great swing analyzer so you can catch mistakes and fix them immediately.

But even if you choose to forgo the technology, I still suggest practicing your stance and setup frequently… at least until it becomes habit.
I’m going to outline the ideal golf stance for both irons and drivers. You need to understand that these two different shots require different setups. If you use the exact same setup for both, you’re going to have problems.
We have extensive information regarding the best golf swing for drivers versus irons, if you’d like to know more. For now, I’m going to cut to the chase.
Proper Iron Setup
Whenever you swing your iron, your objective is to hit down on the golf ball. To make this happen, you have to set up your shot so that the club head catches the ball before the low point of your swing.
To make sure your golf posture and stance promote that timing, you need to keep an eye on three checkpoints:
- Ball position
- Hip position
- Upper body position
Now, let’s break this down one by one.
Golf Ball Position
For an iron shot, the golf ball should be in the center of your stance. To ensure that it is:
- Stand with your feet together and the ball in alignment with the crack between your shoes.
- Check that your hands are either in a neutral position or slightly in front of the ball. (By “in front of,” I mean closer to the target.) Your hands should never be behind the ball.
- Step your lead foot forward and your trail foot back equal distances. Ultimately, you want your feet to be about shoulder-width apart.
The ball should now be in the center of your golf stance.
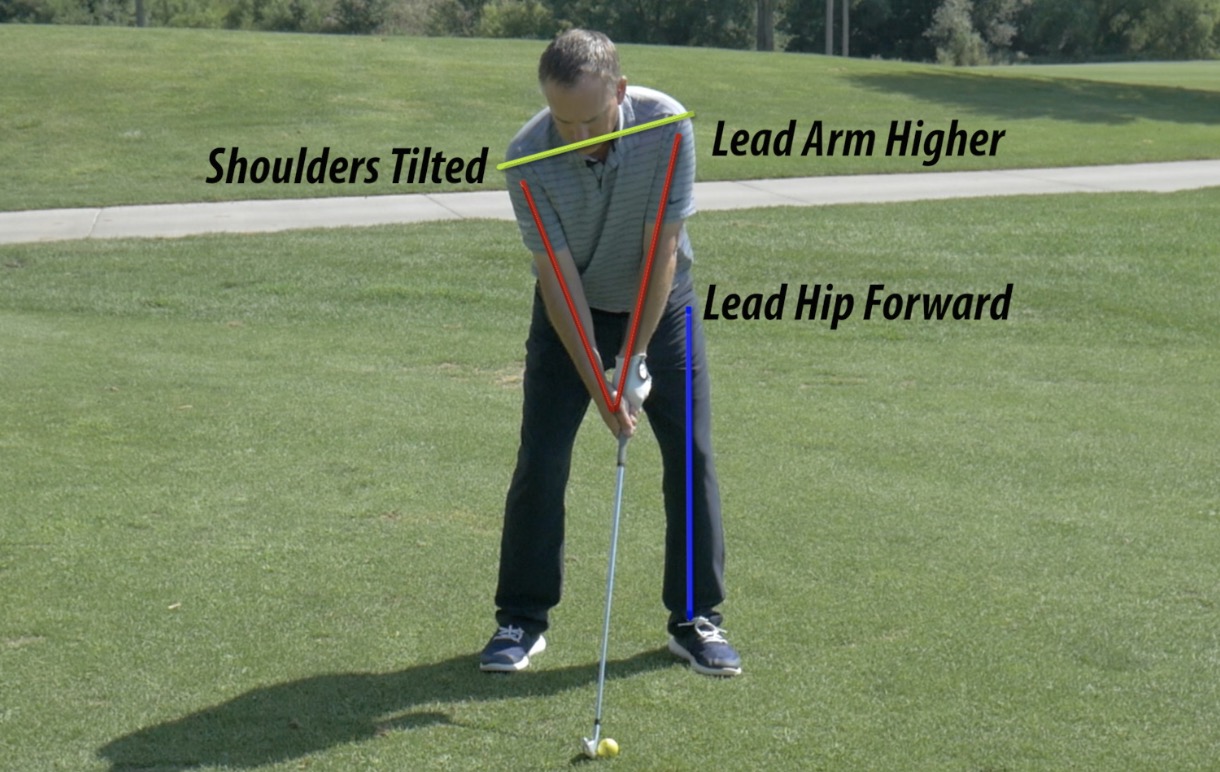
Hip Position
This step really could not be easier.
Take your lead hip and bump it towards the target just slightly.
By making this minor adjustment, you set yourself up to swing the club from the inside.
Upper Body Position
You want to tilt your body away from the target just slightly. Think of it as moving your head back so the center line of your golf stance (the golf ball, ideally) is in line with your lead ear.
Proper Driver Setup
Driver setup is exactly as easy as proper iron setup. The only difference is that you swing your driver with the opposite goal in mind.
Instead of hitting down on the golf ball, you want the club head to catch the ball at an upward angle.
To make sure you’re set up to do this, you’re going to review the same three checkpoints as you did with your iron.
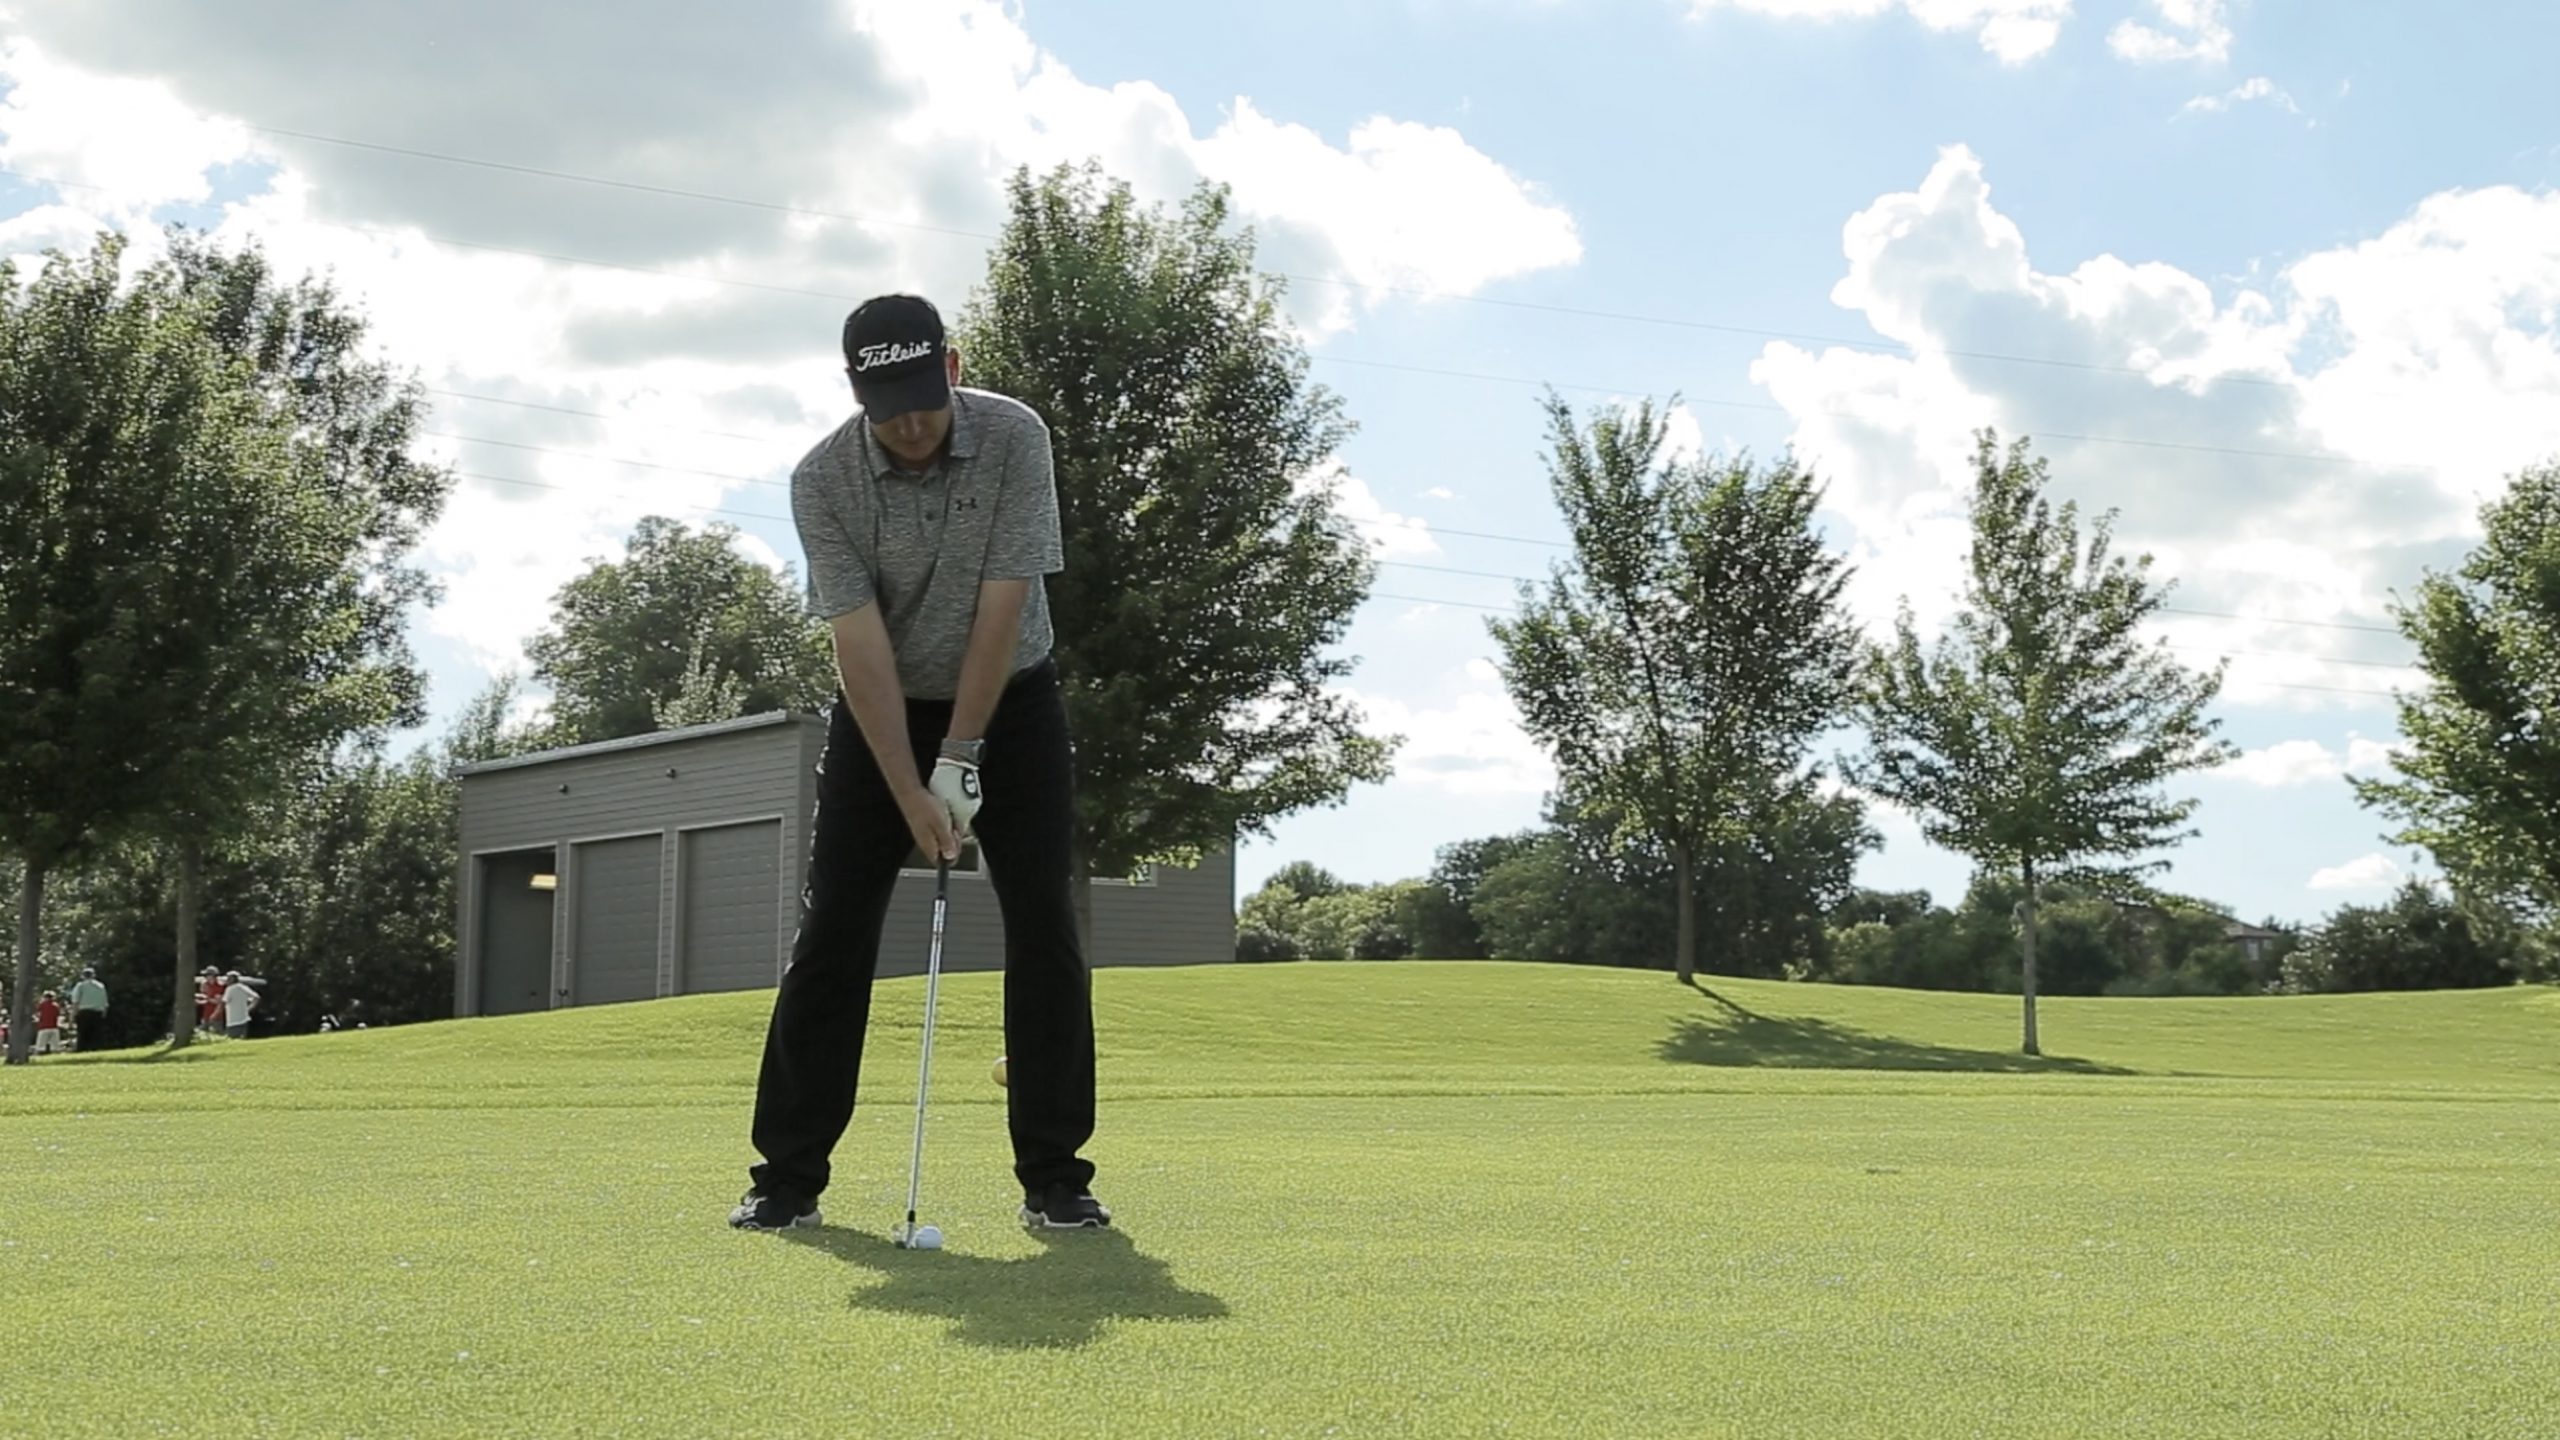
Golf Ball Position
This time, you want the ball slightly forward in your golf stance. Here’s how you find the right spot.
- Hold your club and extend your arm out in front of you, letting the club head touch the ground. That spot is your center.
- Now, move the club head forward just slightly. That’s the spot where you’re going to tee up.
To get your feet in the right place relative to the golf ball:
- Stand with your feet together.
- Take a small step towards the target with your lead foot.
- Take a bigger step away from the target with your trail foot.
You should wind up with the ball slightly forward in your golf stance.
Keep in mind, you still want a shoulder-width stance for your driver shots. It’s only the ball position that changes.
Hip Position
Just as you did with your iron, you’re going to bump your lead foot towards the target. This step is especially key for getting that perfect golf swing with your driver.
Upper Body Position
Once again, tilt your upper body back slightly so that lead ear aligns with the center of your stance.
Now, it may feel like these tips don’t tell you anything about how to swing a golf club. After all, your club still hasn’t gone anywhere.
But trust me, if you can nail your set up, you know one of the most important details for how to swing a golf club. Practice your setup. Perfect it. And you’ll be halfway to your best swing.
How to Hold the Golf Club
Golf grip is one of the most debated topics in the game. And in fact, your grip is as important as most other golf skills. How you hold a golf club has a big impact on how you swing a golf club.
That said, I would personally argue there’s no one-size-fits-all answer to the perfect golf grip. But there are some basic principles everyone should learn if they want to know how to swing a golf club properly.
Take a little time to master your grip for the sake of your swing. Here’s how.
How to Grip the Club
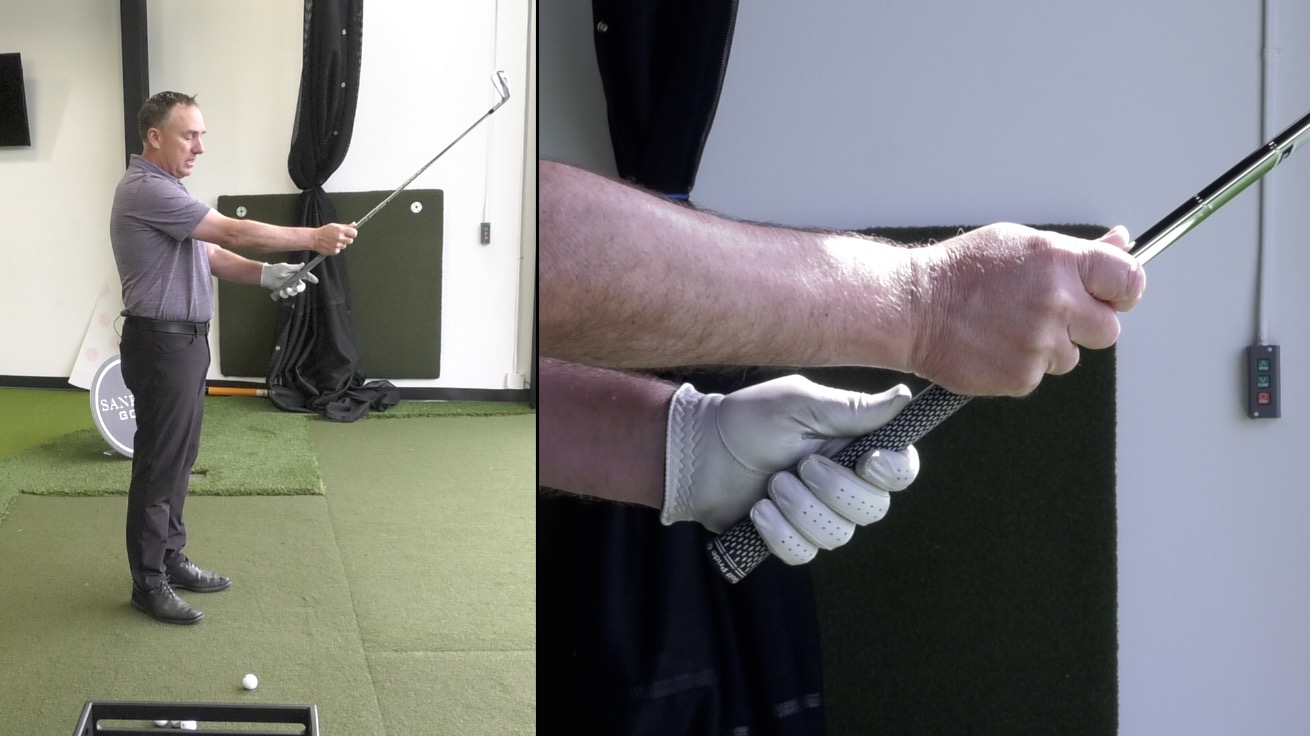
When I work with my students on their grips, I always recommend holding the club out in front of themselves at eye level. By doing this, they give themselves a better view of what’s actually going on in the grip.
I recommend you do the same, especially now when you might be incorporating a new technique.
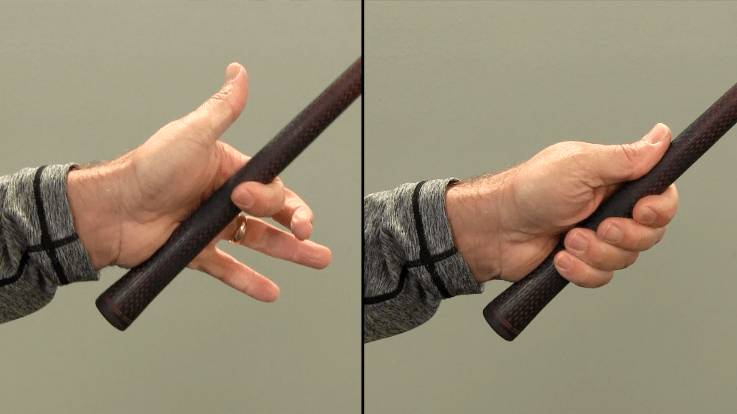
To ensure a good grip:
- Hold the club out in front of you with your trail hand so you can see the handle clearly. The club shaft should be at a 45-degree angle.
- Grip the handle with your dominant hand. You want the handle to run at a diagonal across your palm.
- Hold your lead thumb snug against the club.
- Position the trail hand farther up the shaft. Grip the club with your fingers, then slide the trail hand down to meet the lead hand.
- Overlap or interlock your lead index finger and trail pinky finger.
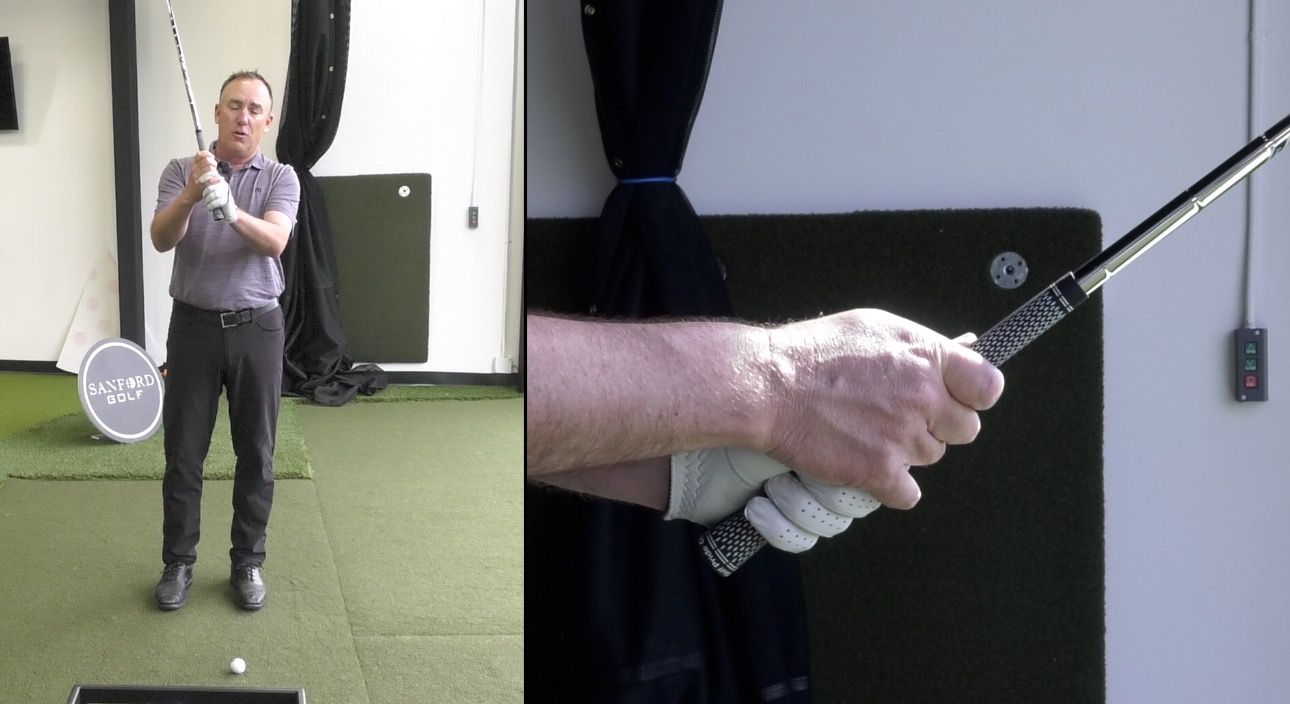
This is the foundation of a proper golf grip.
What is the Best Grip for You?
If anyone has ever offered you advice on proper golf grip, you know grip tips go well beyond how to place your hands on the handle.
Do you need a strong grip? A weak grip? Maybe a neutral grip is best?
As it turns out, there is no easy answer. While there are pitfalls to having a grip that’s too weak or too strong, grip is a somewhat personal matter. There are several golfers who have excelled with a grip that would ruin most other golfers’ forms.
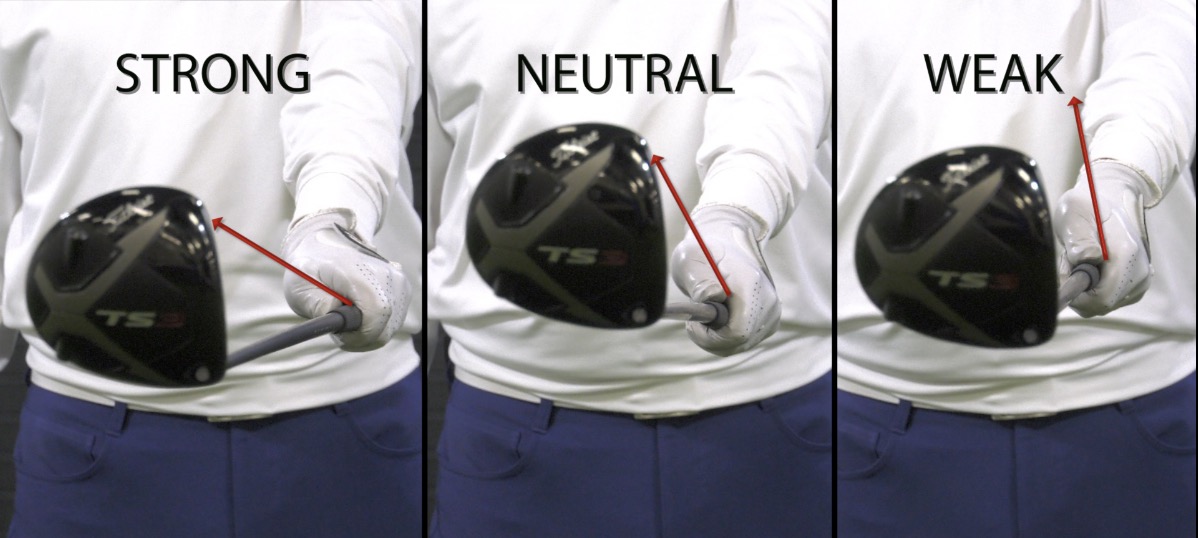
Your preferred style of golf grip is also largely up to you. While the interlocking grip might work great for your buddy, you might do better with a ten-finger grip or overlap grip. It really depends on your body and preference.
If you want to dig into this subject a bit more, here’s a guide to selecting the best golf grip for you.
This article helps break down a ten finger, overlapping and interlocking grip, as well as who typically benefits from each style. In the meantime, let’s move on.
Step-by-Step Guide for How to Swing a Golf Club
You’ve mastered your stance. You’ve got the grip down. Now I’m going to walk you through the perfect golf swing step by step.
Right now, we’re focusing on golf swing basics. Your first goal is to master these three elements of your technique:
- The set up
- The top of the backswing
- The finish position
But just in case you could use a little more insight, I’m going to supply some advanced golf swing tips, as well.
Ready to dig in?
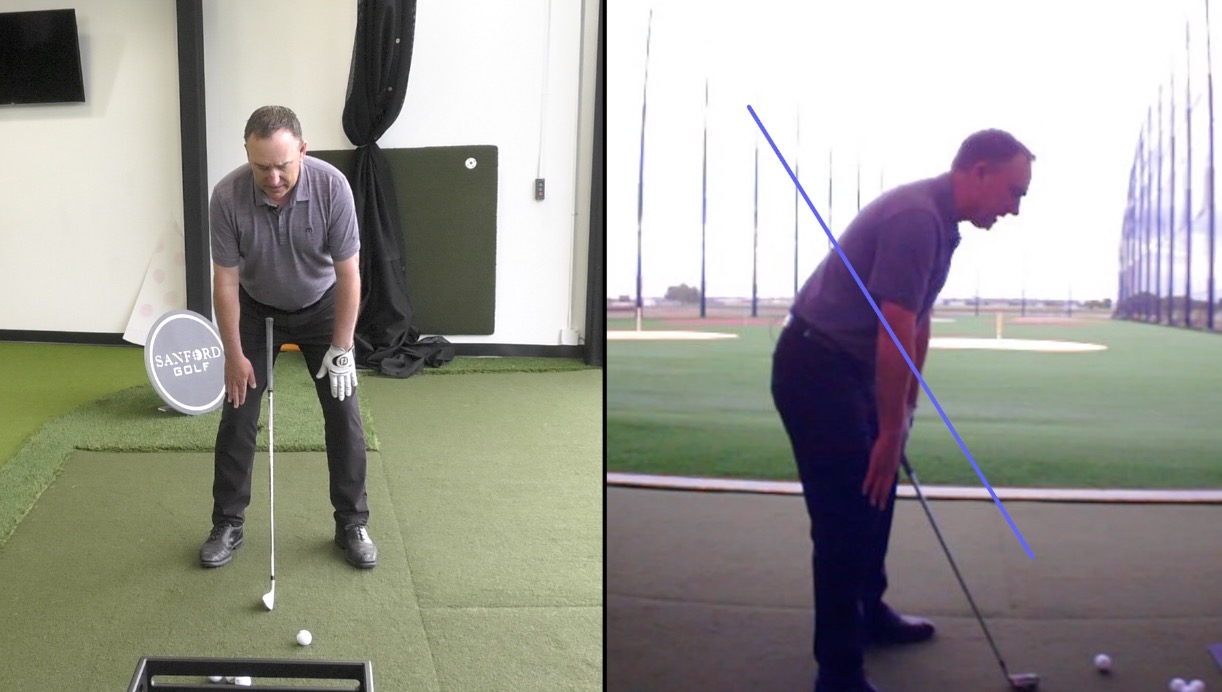
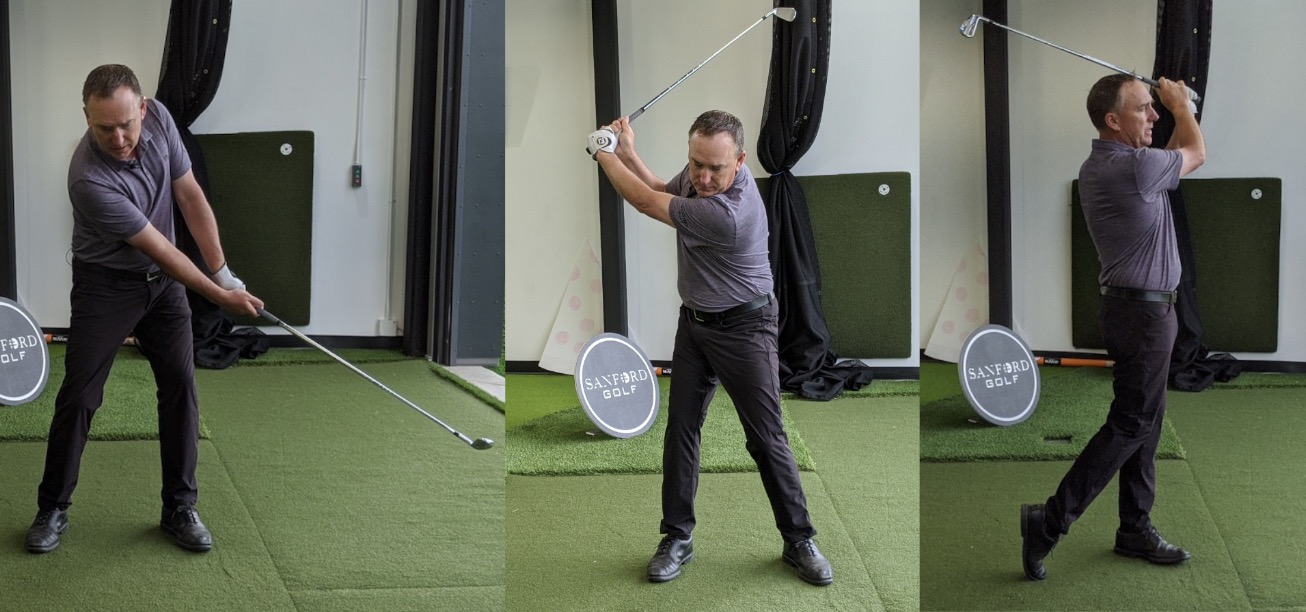
Setup
If you want to know how to swing a golf club properly, you need to begin with your setup.
Now, a lot of people make the setup more complicated than it needs to be. The main thing to remember is that this is a sport. As such, golf requires an athletic posture. You know what I’m talking about. Knees slightly bent, a hinge at the hips, feet shoulder-width apart.
Here’s an exact breakdown of how you should set up your golf posture on your next golf swing.
- Position your feet shoulder width apart. (Remember to adjust golf ball position based on which club you’re using.)
- Flare toes out slightly.
- Allow a little bend in the knees.
- Bend at the hips so your hands naturally fall below your shoulders. To find the right amount of hip hinge:
- Bend your knees slightly.
- Place your hands on the tops of your thighs.
- As you bend from the hips, allow your hands to naturally slide down your legs.
- When your hands reach your knees, you’ve gone far enough.
Now for the backswing.
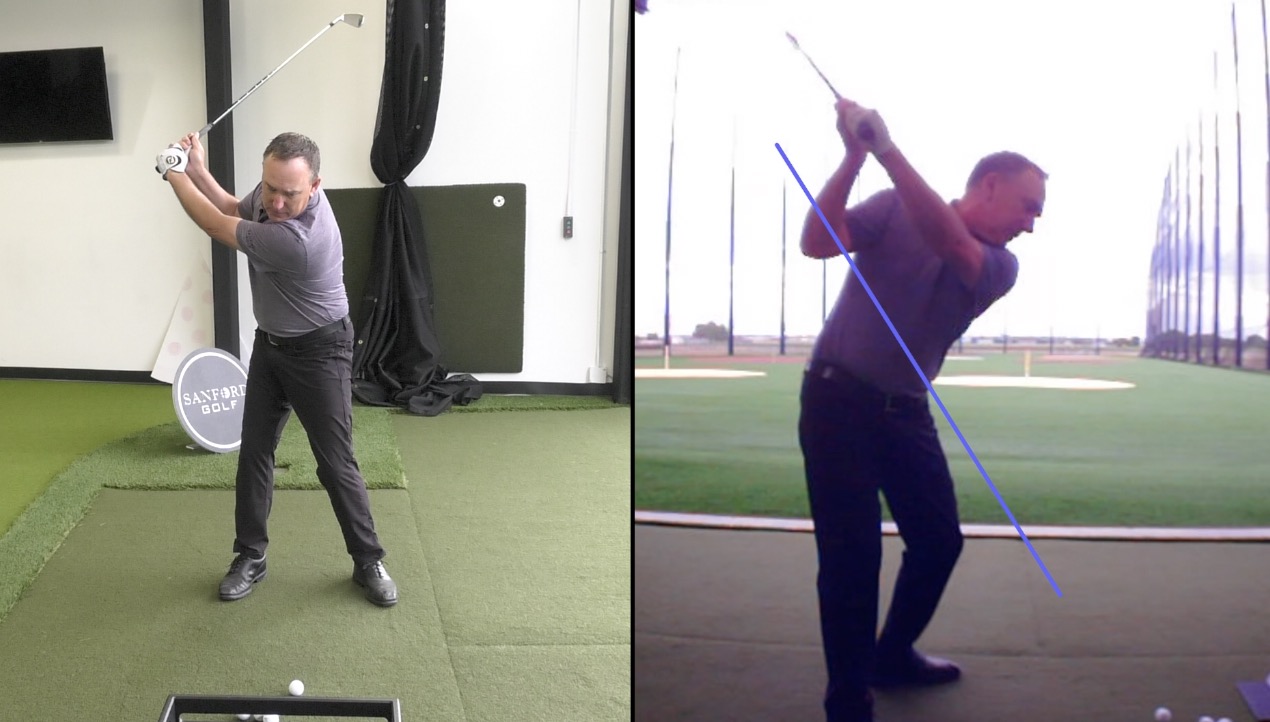
Top of the Backswing
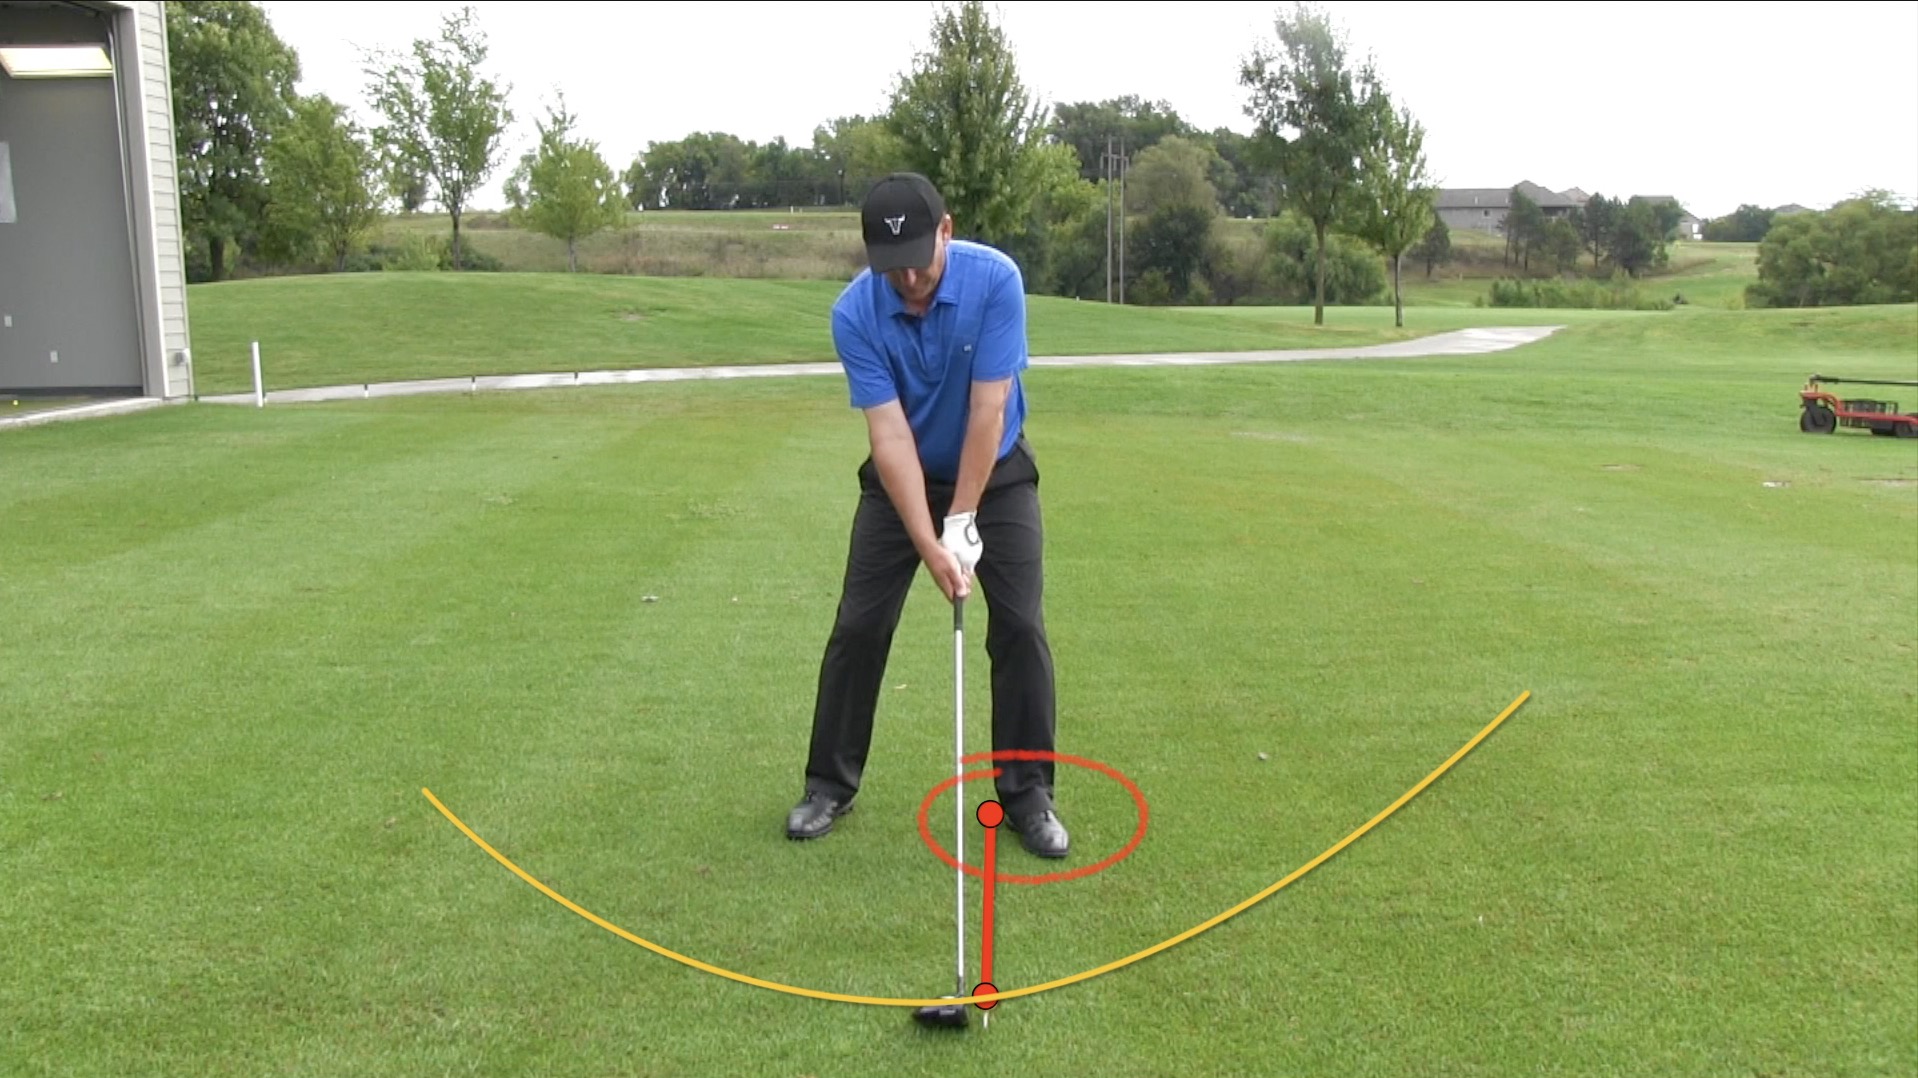
In order to understand my advice on both the top of the backswing and the finish position, you need to understand one basic concept.
Your golf swing is a circle.
At the top of your backswing, your arms, club, and hands reach up above your trail shoulder. As you swing through to the finish, your club head traces a circle all the way around until it ends above your left shoulder.
Assuming your swing is balanced and steady, you create a smooth circle in the air. This is your swing plane.
As a side note: Some golfers use the idea of a pane of glass to illustrate the idea of swing plane. Imagine you’re surrounded by a pane of glass with the glass tilted so your club head runs along the surface throughout your swing.
That surface is your swing plane. Your goal is to maintain the integrity of that plane, without dipping your swing path below or rising above.
If you’re not ready for an extensive lesson in the physics of golf, don’t worry. It ends there. The first thing I want you to focus on is closing that circle at the top of your backswing and at the finish.
As you take your backswing, your goal is to find this position at the top of your swing:
- Your hands should be up and above your trail shoulder.
- Hips should rotate back slightly.
- Your weight should be on your trail foot.
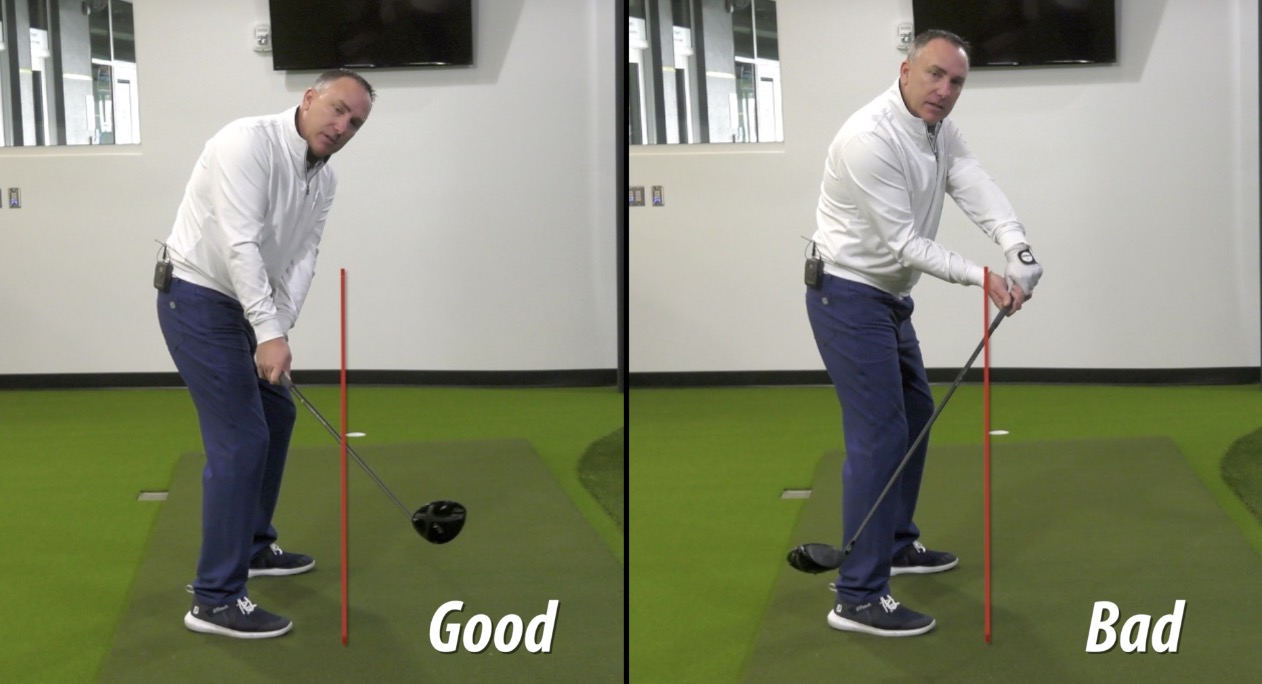
Advanced Tip: Watch Your Hands on the Takeaway
If you’ve already nailed the top of your backswing and could use a higher level insight, here’a tip for the takeaway:
Check your hands as you swing back from the ball. The club head should be outside your hands.
If you hinge your wrists on the takeaway, working the club head closer to your body than your hands are, you set yourself up for a tricky transition.
To avoid this, note where your hands are in relation to the club head when your club shaft is parallel to the ground on the takeaway. If your hands are closer than your club head is to the plane your body is on, you’re doing great.
Finish Position
The key on how to swing a golf club is mastering your finish position.
Feel like we skipped something important?
When I share these tips with students, I get a lot of confused looks. Why aren’t we talking about impact? The entire point of learning how to swing a golf club is to learn how to hit the ball. So why are we skipping it?
Think of it this way. Your entire golf swing happens in a snap of the fingers. The moment of impact happens in a fraction of that snap. It’s hard to control and nearly impossible to feel.
In fact, when people tell me they can feel what happens at impact, I don’t really buy it. Some golfers may have that kind of hyper-sensitivity, but most of us don’t. That means most of us won’t get very far trying to master the moment of impact . . . master a nanosecond we can’t feel.
But if you master setup, the top of your backswing, and your finish position, all these components work together to ensure solid impact. That is how to swing a golf club effectively.
As you swing through, your goal is to end up in the following position:
- Your chest faces the target.
- Your club is back and above your lead shoulder. The club head is well behind your head, closing off that circle.
- Your trail foot is up with only your toe touching the ground. (If you’ve been using your LiveView camera to catch a profile angle of your swing, you should be able to see the bottom of your shoe at the finish.)
- Your knees are together.

When you build toward this finish position, you are going to have a great swing and a solid golf shot.
Advanced Tip: Beware the Chicken Wing
Once you’ve got your setup, top of backswing, and finish position down, you might benefit from taking a close look at your transition.
By “transition,” I mean the transition between the backswing and downswing. This is the moment when many golfers allow their elbows to separate. This is known as “chicken wing,” and it can kill your swing.
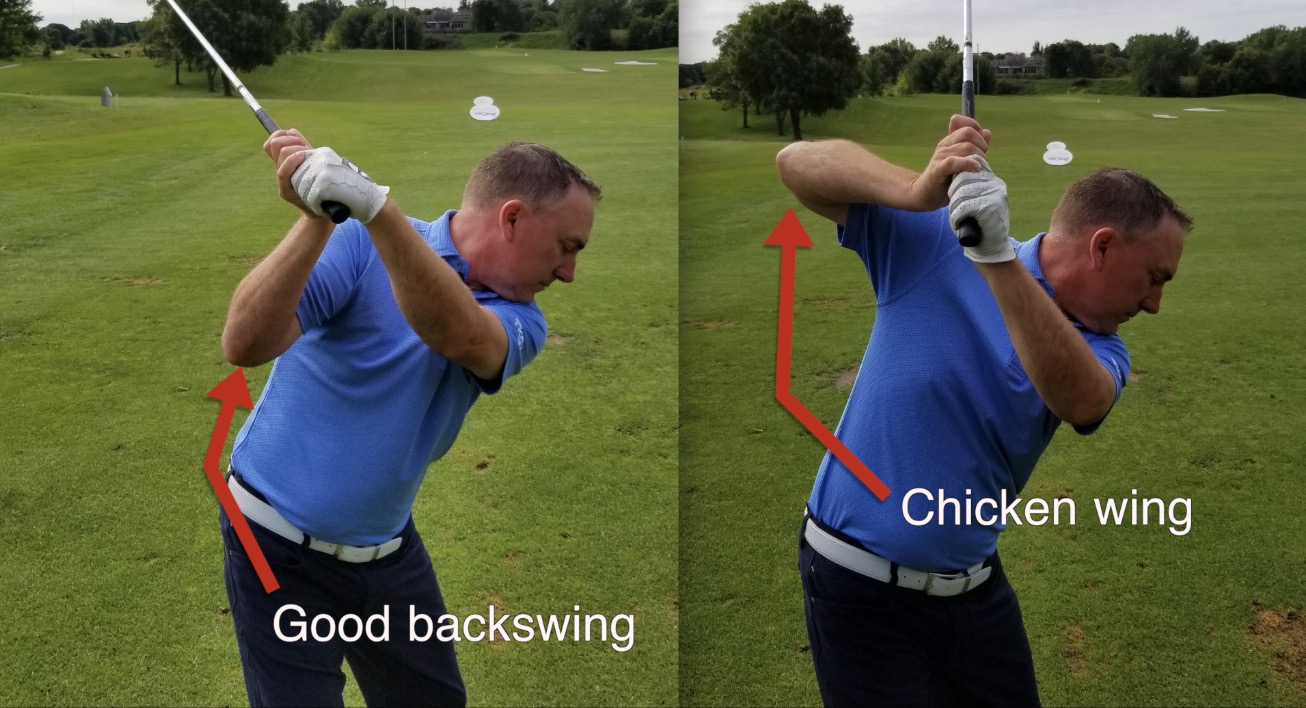
Now, when most golfers observe chicken wing, they’re pointing it out in the finish. But this affliction starts well before the finish. Chicken wing usually first appears in the transition, before you even make your downswing.
The trick to preventing this problem is to simply think about keeping your elbows together as you work towards the top of your backswing.
I find it’s particularly useful to run drills with a training aid like the Tour Striker Smart Ball. It’s always easier to train the body to adapt a new habit than to ask the brain to remember one.
Either way, keep an eye out for chicken wing. If you notice it in your golf swing, you can make major improvements by dropping the habit.
How to Swing a Golf Club Better Than You Have Been
As always, I don’t want to just leave you with a lot of thoughts about how to swing a golf club. I want to share some great drills that will help you get used to these changes in your body.
Take a little time to run each of these swing exercises until they feel natural. Soon, you’ll notice these changes in your swing.
A Drill for Finding the Top of Your Backswing
A lot of golfers struggle to find the right spot at the top of their backswing simply because it’s hard to get started from zero.
As they draw the club back from set up position, they wind up dragging the club or making similar errors. They don’t build the momentum, and they don’t quite make it to the top of that circle.
This incredibly simple drill helps you build the momentum so you can reach that perfect high point. Practice this enough, and you’ll be able to make the same thing happen with your regular golf swing.
Here’s the drill:
- Take your regular setup without the golf ball.
- Hold your club about 2-3 feet out in front of you (towards the target).
- Swing all the way back to the top of your backswing and all the way through to the finish.
Do this several times in a row, and you’ll start to feel the momentum come naturally.
A Drill for Reaching Your Finish Position
Similar to the previous drill, this one is all about building momentum so you can follow through on the finish and complete the circle of your swing motion.
This drill has exactly one step:
- Take three continuous swings in a row without a golf ball.
That’s it. You’re just building momentum. Let that momentum carry the club. As you do, you’ll feel your arms and body relax so you can hit the high points on both ends of your swing.
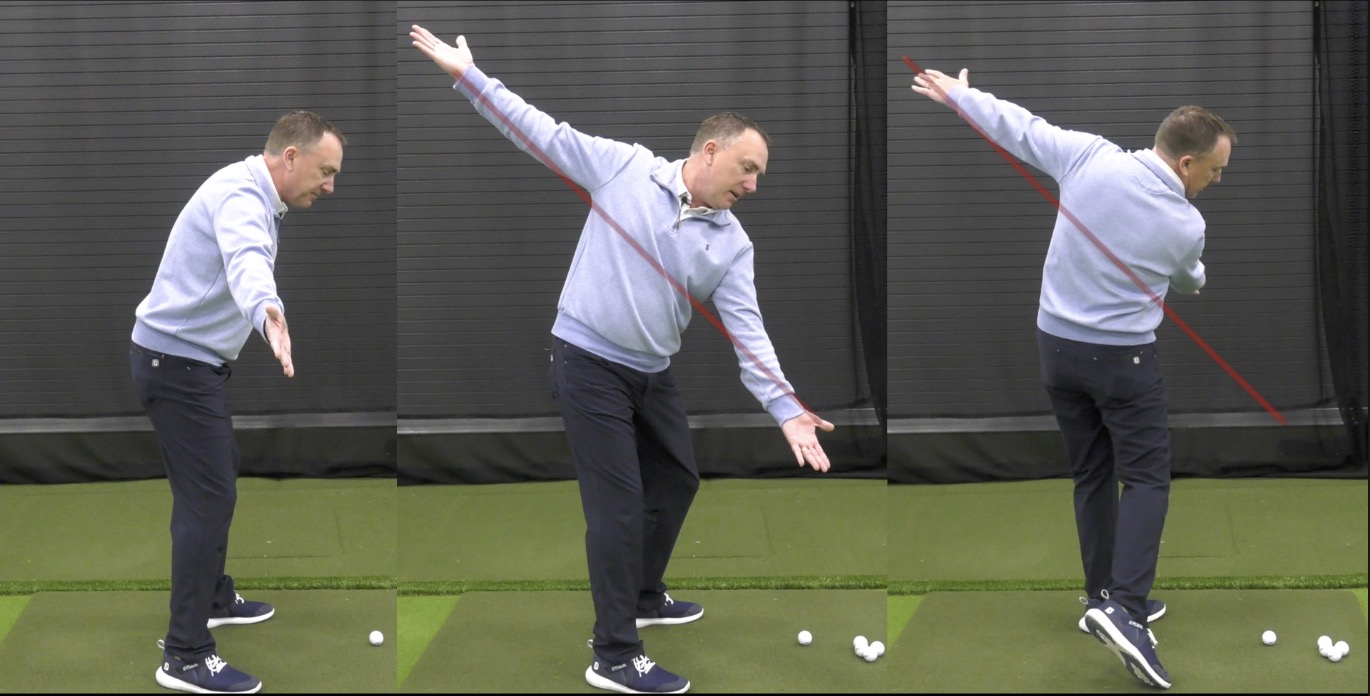
A Drill to Get Familiar with Your Swing Plane
Remember that swing plane concept I introduced while discussing the circle shape of your swing? The pane of glass metaphor?
I happen to have a drill to help you get a better grip on that concept and help you maintain your swing plane better. This is helpful insight to have because veering away from swing plane can lead to the dreaded shank and other nightmares.
This is a simple warmup drill, and it goes like this:
- Stand with your arms straight out to the side at the same height as your shoulders, palms up.
- Take your regular golf stance.
- Rotate back as if you were taking your backswing.
- Rotate forward as if you were swinging through your golf shots to your finish.
The goal is to feel your arms remaining on the same neutral plane throughout the rotation.
If you find yourself bringing your arms higher as you “swing” through or dipping below your swing plane, you have a problem to address.
Do this warmup as often as you need to in order to get the feel for proper form in your body.
If you ever feel overwhelmed by all this information, just take a step back and return to these drills. The more you practice these concepts physically, the better your chances of making the perfect golf swing.
And remember, we’re always here if you have any questions. Join us in the comments to request clarification, present a difference of opinion, or let us know if these tips helped.
For more in-depth golf tips, visit us at GreatGolfTipsNow.com. This golf instruction is completely free and packed with detailed advice to help you play better golf!
Thank you 🙏
Easy to remember and reproduce at the driving range
Im going back over everything and it’s making such a difference
Just need the guts to do it on the course
Best regards
John Taylor
Thanks for taking the time to read and leave a comment John; here’s to the confidence your golf game deserves! Be sure to let us know how it goes!
John, you got it! Trust it and let it happen my man…keep us posted.
Can’t thank you enough for this post. I have been trying to swing and trying to do it as perfectly as possible but it seems like I was doing something wrong. But thanks for this article and all the in-depth information for a better swing, I think I will be doing it perfectly from now on. Thanks for this article.
John, our pleasure! Thank you for taking time to read and post…more great content to come.
Can’t thank you enough for this post. I have been trying to swing and trying to do it as perfectly as possible but it seems like I was doing something wrong. But thanks for this article and all the in-depth information for a better swing, I think I will be doing it perfectly from now on. Thanks for this article.
Our pleasure! We are doing our best to provide good solid advice for our fellow golfers….anytime we get a comment like yours it makes our day! More great content to come…be sure to check out our YouTube channel as well
This is good stuff. I tried your senior set up for the driver and I am hitting it down the middle with a baby draw. Love these instructions. Todd does a great job of explaining everything.
It really very good and more informative and, more necessary resources, I will share this in my social network if you agree?
You bet Felin, we encourage you to share our content! Be sure to subscribe to our YouTube channel too if you haven’t already!
Here’s a link: https://www.youtube.com/channel/UCgz5-3igA0IfsyWGKTr6YKA?sub_confirmation=1