The Perfect Driver Setup for Longer Drives
Fix Your Driver Setup for More Control, Longer Distances, and Your Best Round Yet.
If you’re hitting great iron shots but constantly slicing it off the tee, it might be time to change your driver setup.
Every golfer knows the fundamental differences between drives and iron shots. When you hit your driver, you hit the ball off the tee, essentially hitting it in the air. For your iron shots, you hit the golf ball off the ground.
You can even look at your driver and iron and see that these are wildly different clubs designed to fulfill different purposes.
And yet, I’ve seen so many golfers use the exact same setup for both types of shots.
If you’re struggling to get good distance off the tee no matter how fast your swing speed is, the problem may be your setup. Fortunately, it’s easy to fix your driver setup. You just need to learn how.
I’m going to provide step-by-step instructions for creating the perfect driver setup. You’ll learn how to find the perfect stance, how to master golf position, what to do with your hands, and how to position the club.
But before we get into all that, there’s something you should understand.
The Goal of Your Driver Setup
The advice that follows will help you make solid contact with the golf ball, control your club face, manage your aim, and generate swing speed. But the setup I am about to teach you also helps you do something an iron setup would never do.
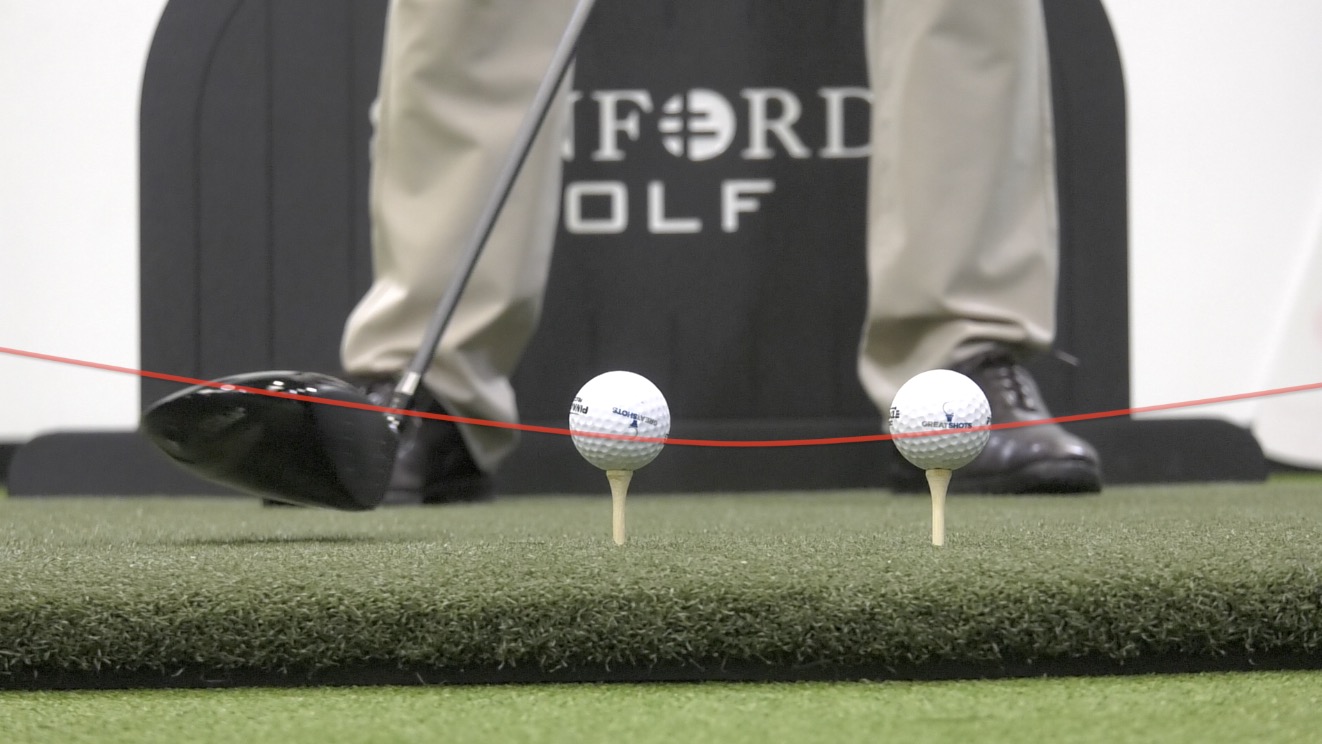
It helps you hit up on the golf ball.

This is the most important difference between your irons and your driver. When you hit your irons, you want to make contact with the ball on a descending motion. But with your driver, you want to make contact as the club head is arcing back upward.
This means you need to hit the low point of your golf swing before the moment of impact. When you swing your irons, you want to hit the low point after you’ve connected with the golf ball. This is why the two setups are not interchangeable.
Keep that in mind as you read on.
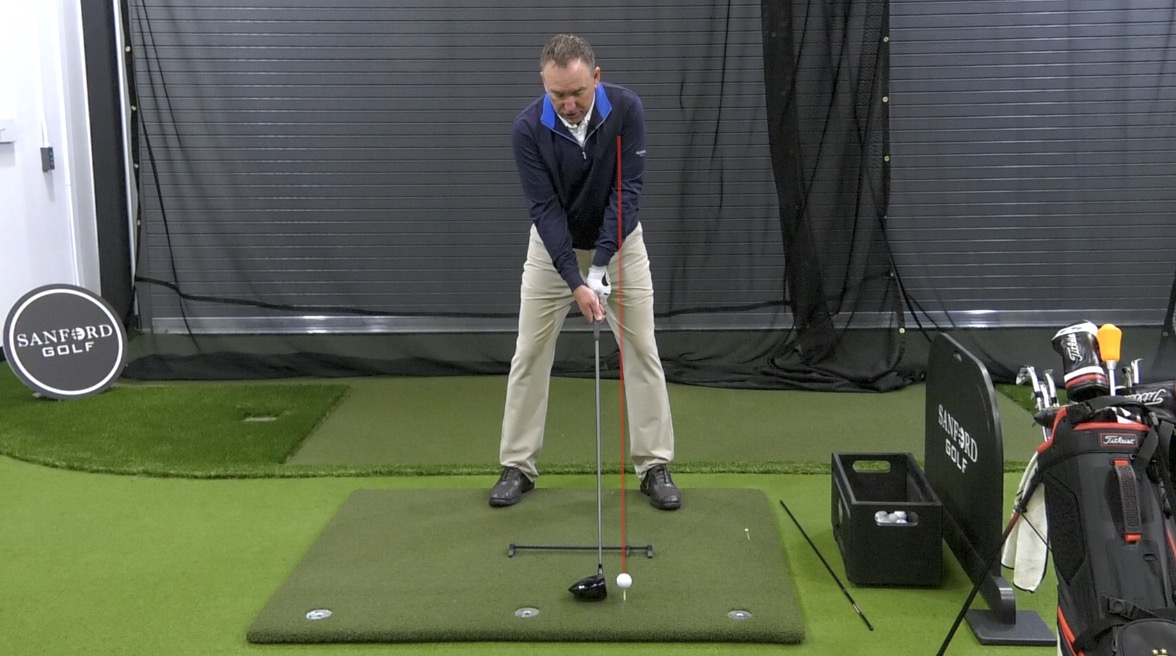
Proper Club Position for a Driver Setup
The perfect driver setup helps you get clean, centered contact.
When you start with the club in the right place, you’re more likely to find that perfect position again at the moment of impact. With this in mind, check your driver setup for these two important details.
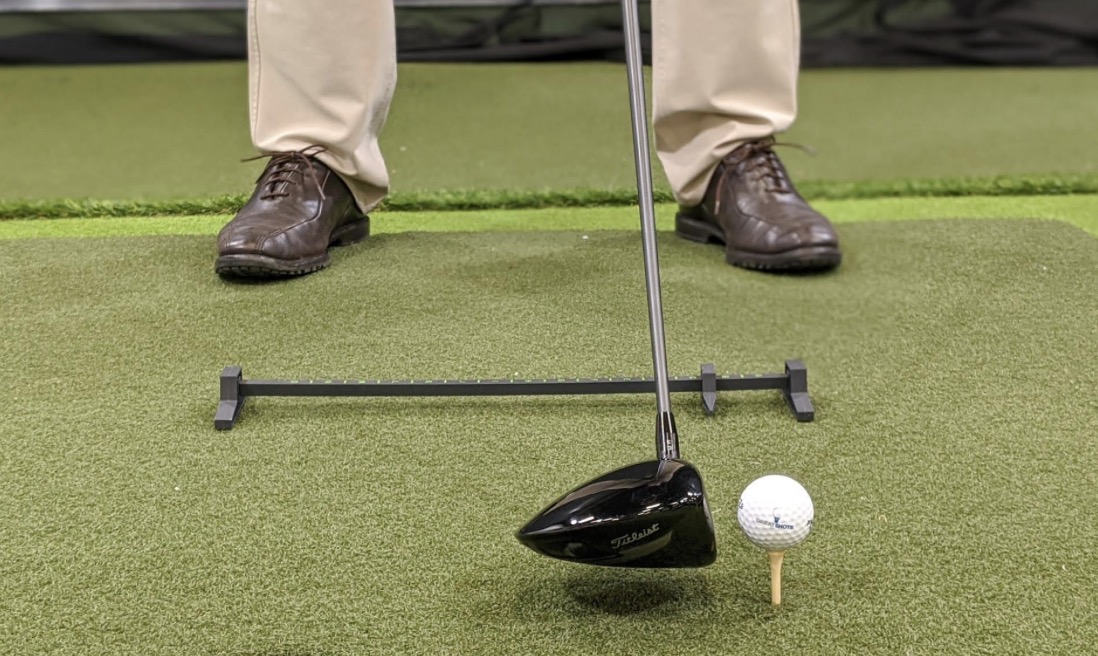
Square the Club Face
In order to control the shot, you have to control the club face.
Generally speaking, you want to deliver a square club face to the golf ball at impact. A square face helps prevent a slice and keeps you from hooking your driver. Fortunately, it’s pretty easy to make sure your club face is square in your driver setup.
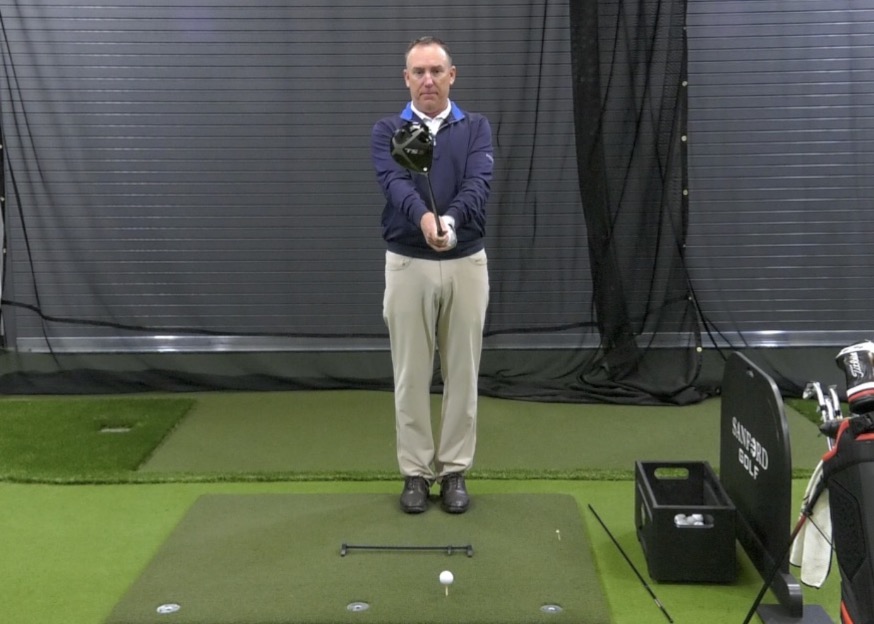
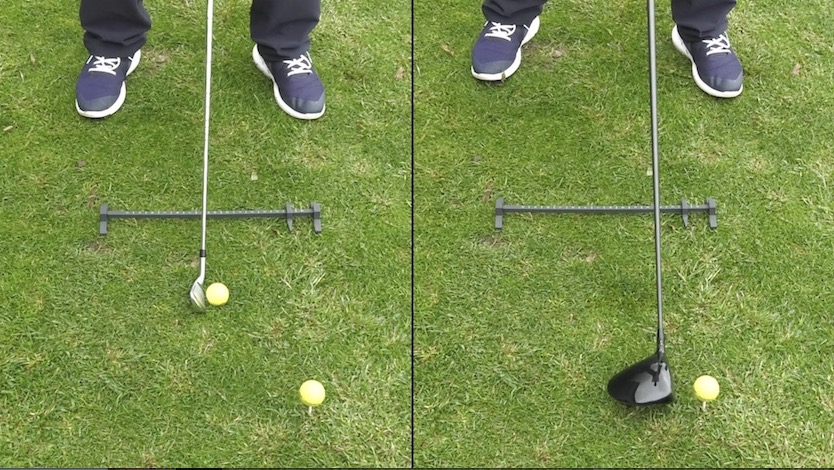
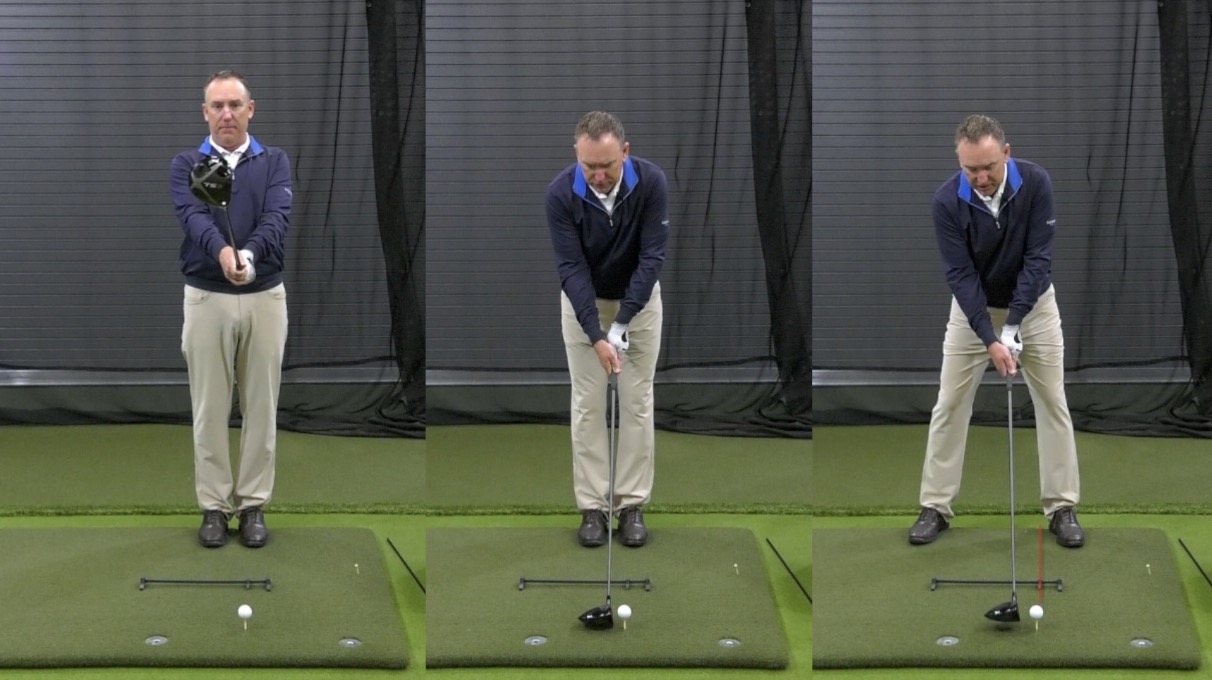
When you take your driver stance, tilt your wrists upward, pulling the club head up off the ground so it’s out in front of you. From this angle, you can clearly see whether the club face is square to the target.
Adjust as you need to, then lower the club head back down behind your golf ball.
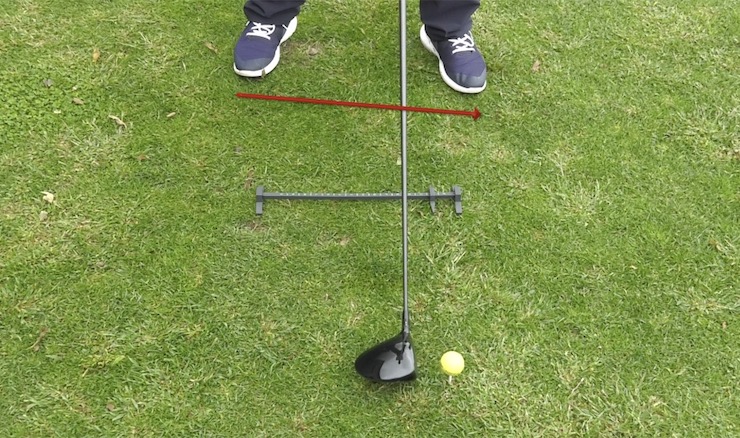
Hover the Club Head
I can’t articulate the scientific reasons for why this works, I only know that it does. I have seen many a golfer get better shots and longer drives by following this one simple trick.
When you take your driver setup, don’t rest the club head on the ground. Instead, hover the club head above the ground behind your ball.
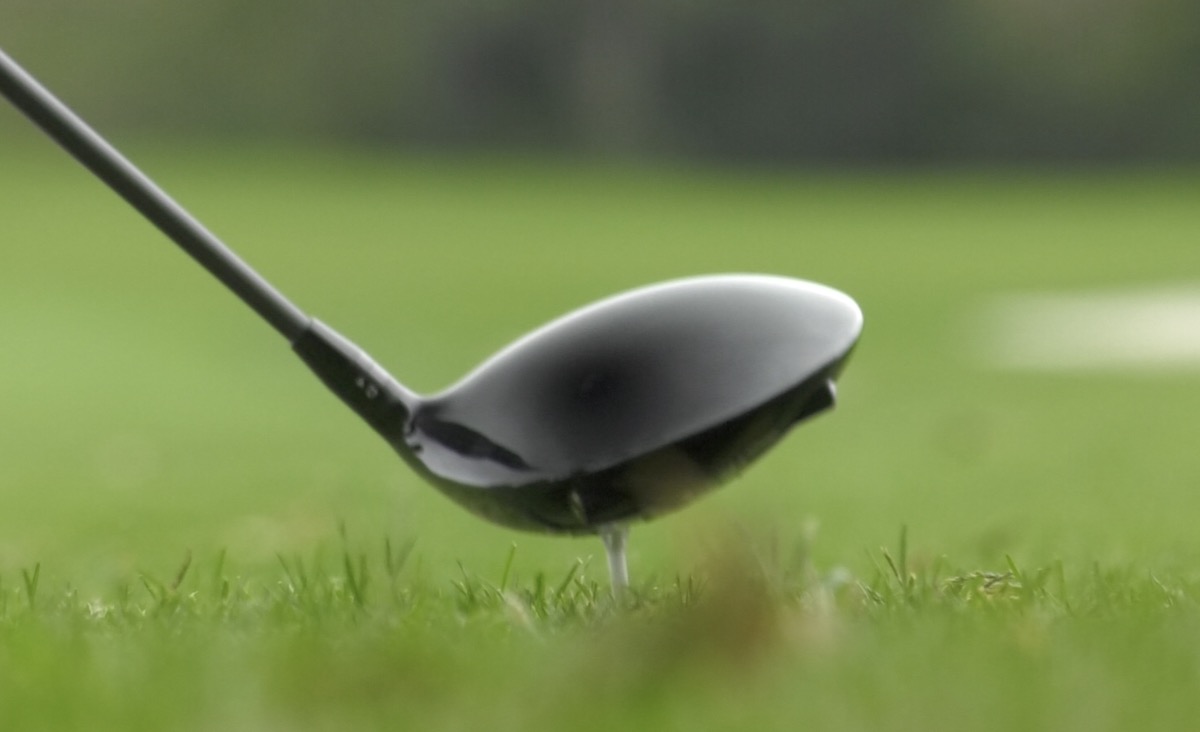
This technique helps you in two ways.
First, it improves swing rhythm and tempo. You see, when you rest the club head on the ground, you have to pick up the weight of the club head to make your backswing.
You probably never think about the weight of the club head. Not consciously, anyway. But subconsciously, you know you have to pump a little more energy into the takeaway to get the club head off the turf.
As a result, you start your golf swing by snapping the club head up. You are much quicker in the takeaway than you will be in the backswing or downswing. This creates a lopsided rhythm and ruins your golf swing.
On the other hand, if you start with the club head already off the ground, you’re already bearing the weight of the club head yourself. This allows for an even swing tempo back and through.
The second benefit to hovering is that it sets you up to swing through the ball, maintaining swing speed and getting a nice, long drive.
How to Position Your Hands for a Driver Setup
The average golfer does not give much thought to hand position once they learn how to grip the golf club. But proper hand position is actually pretty important for your driver setup.
The right hand position and grip strength help you make solid contact and ensure face control. The wrong hand position can cause you to slice it, hook it, or hit it off the toe or heel.
Here’s how your hands should look for your driver setup.
Proper Hand Position
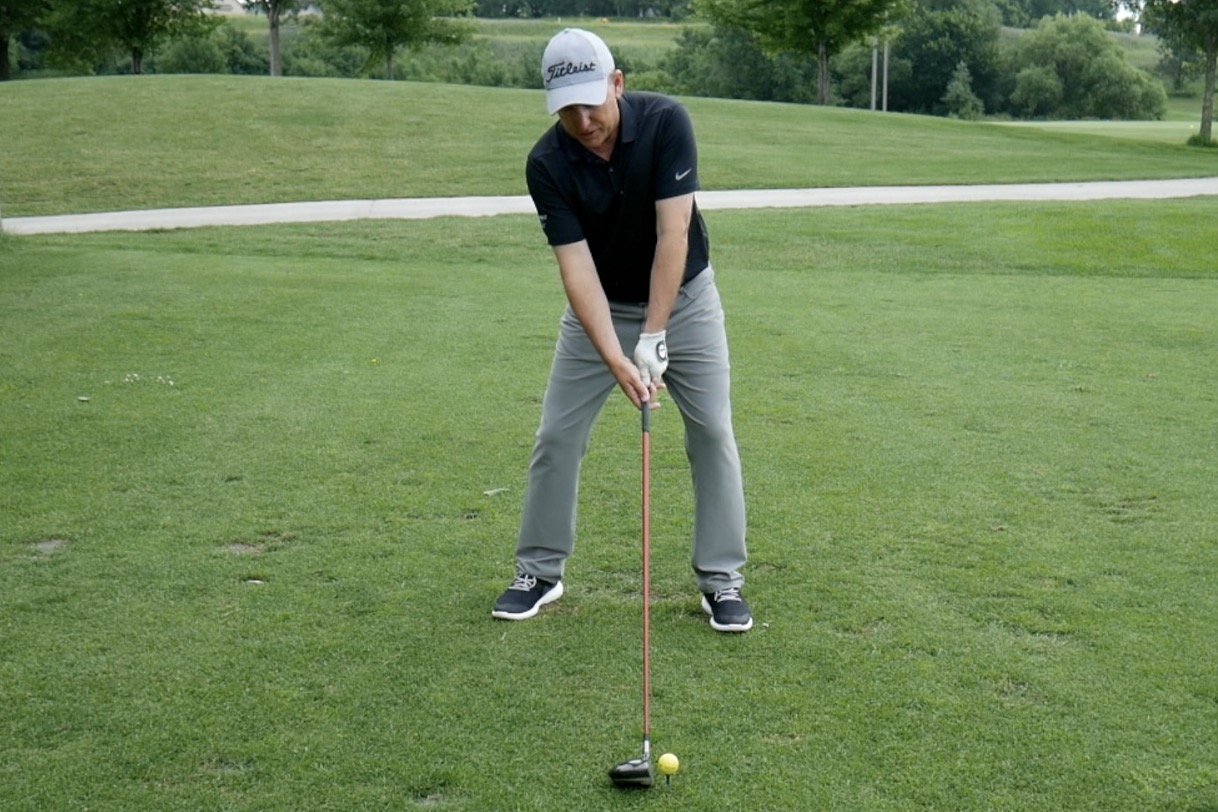
This one is super simple. When you take your driver setup, where are your hands in relation to the golf ball?
They should be perfectly aligned with your ball. This creates a neutral to slight forward lean in the driver shaft.
Proper Golf Grip
You may already be concerned that you don’t have the right grip for your driver. That’s the kind of advice golf buddies love to give each other. Many golfers have been told they either need to strengthen their grip or loosen it.
But how do you know if that’s true . . . or what that even means?
We have other articles that go more in-depth on proper golf grip. For now, we’ll just go over the basics.
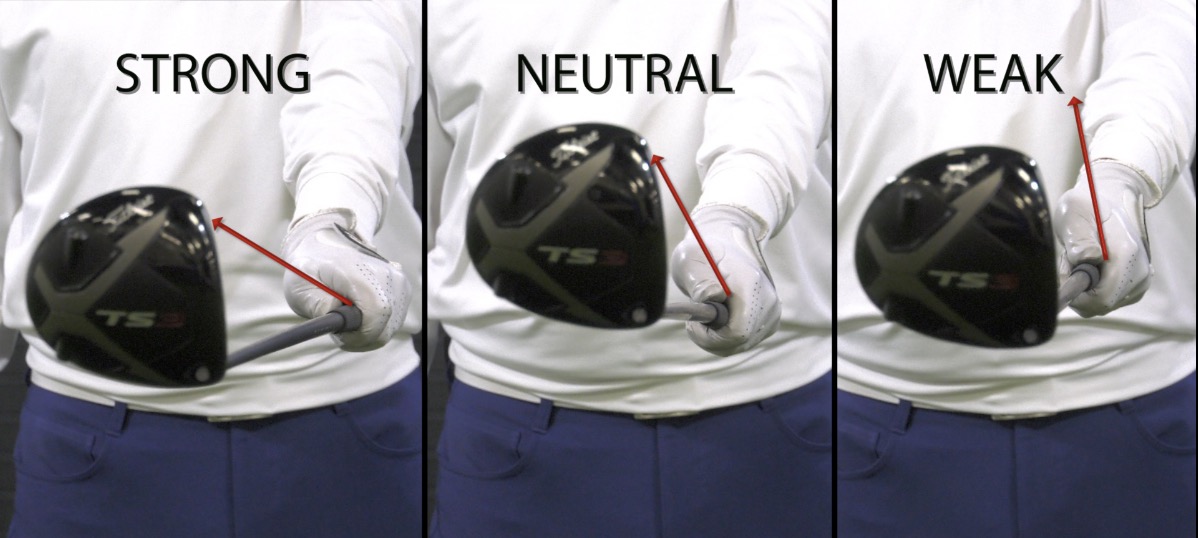
Take your regular setup and look down at your lead hand. From this position, how many knuckles do you see? This will tell you whether you have a strong, weak, or neutral grip.
- If you can’t see any knuckles, you have a weak grip.
- When you see 2-2 ½ knuckles, you know you have a neutral grip.
- And if you’re looking at a lot of knuckles, that means your grip is strong.
Now, it is possible to control your club face with any one of these grips. In fact, golf history is full of world famous players with widely varying golf grips. But these pros all know how to make other adjustments in their swing to maintain face control.
The easiest way to ensure a square face is with a neutral grip. If your grip is usually strong or weak, try adjusting the next time you’re at the driving range. If you can swing comfortably with a neutral grip, you’ll probably have a much easier time controlling your drives.
Now, let’s dig into golf stance, body position, golf posture, and spine angle.
Importance of Your Stance in a Driver Setup
This is where it starts to get interesting. The right golf stance and posture help you hit up on the ball, achieve a wider range of mobility, and even fix that horrifying golf slice.
And the great news is, it really couldn’t be easier to perfect your stance. Now, understanding the why behind some of these concepts requires some awareness of golf physics. But you don’t even have to go that deep. No calculations needed to put these tips to work.
Finding the Right Stance Width
First, you want to make sure your feet are in the right place. For your driver setup, you want a stance that’s slightly wider than shoulder distance.
Also take a moment to look at your feet. Where are your toes pointing?
If you’re like a lot of golfers, you’re getting set up with both toes square to the golf ball. That is to say, they’re pointing straight ahead. Believe it or not, that’s not the ideal position. When your toes point straight ahead, you can’t get as much rotation in your backswing.
Instead, flare both toes outward. This helps you get more mobility for better rotation, which then allows you to generate more club head speed.
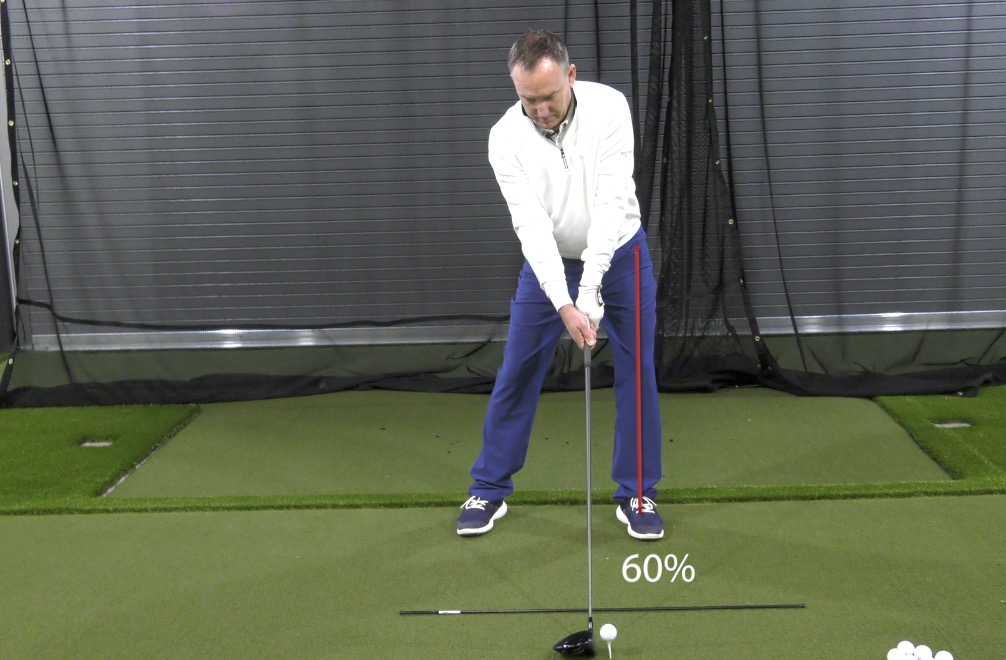
Foot Pressure
Next, notice where you hold your weight in your driver setup. Do you feel most of your weight pressing through the left foot? The right foot? Or is it about even?
To support the rhythm and momentum of your golf swing, you want to feel a little more pressure in your lead foot than in your trail foot. Think of it as a 60/40 weight distribution.
This sets you up to shift pressure to the trail foot at the top of your backswing and bring it back to the lead foot as you swing through.
Body Angle
Now let’s talk golf posture.
When you take your driver setup, think about making three specific adjustments to your body angles.
- First, bump your lead hip forward, towards the target.
- Second, lift your lead shoulder slightly higher than your trail shoulder and tilt your torso away from the target.
- Third, check the position of your head to make sure it’s a little behind the ball.
Now, without changing the shape of your posture, check to see if you need to adjust your aim.
Perfecting Your Aim
When my students step up to the tee, I encourage them to aim for a draw, not for a straight shot. A nice, high draw gets great distance. And when you know how to draw the ball, you know how to control the ball.
Hitting a draw requires an adjustment in your aim. Most likely, you’re used to taking your driver setup with your entire body aimed towards the target. Your feet, shoulders, and hips are all parallel to the target line. This makes sense.
But it’s not how you hit a draw.
To hit a draw, you need a slight rightward aim. That’s assuming you’re right-handed. If you’re left-handed, reverse these directions.
When you take your driver setup, pull your right foot slightly back from the ball so the line of your toes aims about 8-10 yards to the right of the target. Check your shoulders and hips to make sure they also aim to the right.
This setup ensures a rightward angle for your swing path. Combined with proper face control, this is the perfect formula for hitting a draw.
Now let’s dive into the final element of a perfect driver setup: golf ball position.
The Best Golf Ball Position for a Driver Setup
Ball position is so much more important than many golfers realize. Even a minor adjustment to your golf ball position can help you get better contact, better distance, and even fix that miserable driver slice.
Here’s how you find the perfect ball position for your driver setup.
The Distance Between You and the Ball
First, make sure you have the right amount of distance between your body and the golf ball. To do this:
- Stand holding your club out in front of you so the shaft is parallel to the ground.
- Hinge at the hips until the club head touches the ground. That’s where the ball should be.
An added benefit to finding proper distance this way is that you also find proper golf posture for your driver setup.
Golf Ball Position
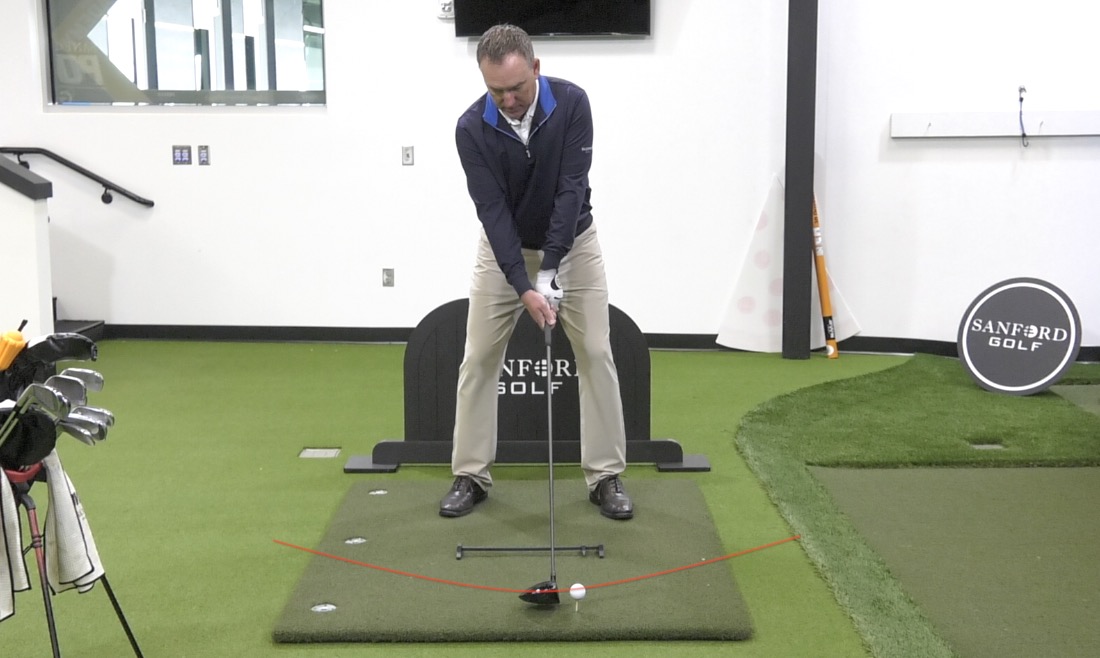
When it comes to your driver setup, proper ball position is key for making sure you hit up on the ball every single time.
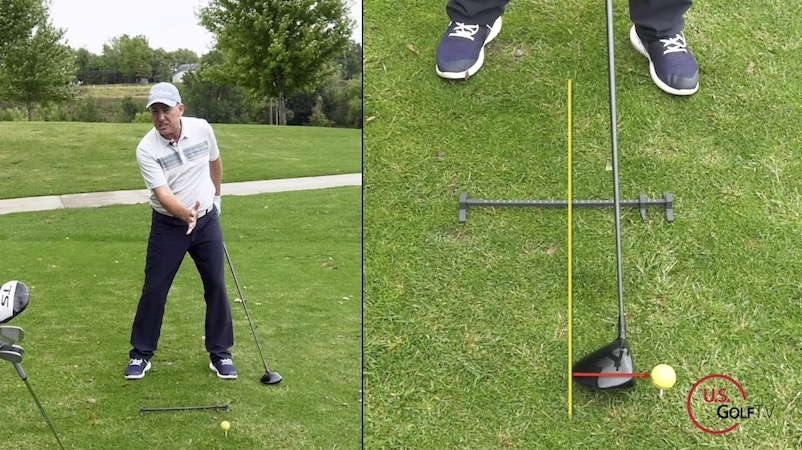
In order to make impact at an upward angle, you need to hit the low point of your swing before you make contact. Generally speaking, the club head reaches the low point at about the center of your stance, at the midpoint between your lead foot and your trail foot.
So naturally, you need the ball to be forward of this position if you’re going to catch it on an upward motion.
There are a couple ways to find the ideal spot.
One option is to use a Rimer Short Game Trainer. This is a great training aid I love to use when working on ball position with my students. It’s essentially an alignment ruler with a slider that helps you visualize proper ball position.
If you have a Rimer, you can find the ideal driver setup by positioning the slider at the “B” mark. Then, set the golf ball at the slider. Place your lead foot at the “A” end of the ruler and your trail foot at the opposite end. That’s it. You’ve got the perfect ball position for a driver setup.
If you don’t have a Rimer, follow these easy steps:
- Stand with your feet together and the golf ball aligned with the crack between your feet.
- Step your lead foot towards the target just slightly. This step should only be about an inch or two.
- Take a much bigger step back (away from the target) with your trail foot. This step should be as big as it has to be achieve a stance that’s slightly wider than shoulder width.
Now you have the ball right where you want it.
Putting It All Together
This may seem like way too much information to remember the next time you’re at the tee box. Don’t worry. Now that you understand what makes a great driver setup great, all you really need is a simple checklist to help you hit all your checkpoints.
And I have that checklist right here.
For the best chance at hitting long, solid drives, make sure:
- The ball is forward in your stance.
- Your stance is slightly wider than shoulder width.
- Your toes are flared to ensure a greater range of rotation.
- There’s more pressure in your lead foot than your trail foot (60/40).
- Your aim is slightly closed to the target. (If you’re right-handed, aim to the right. If you’re left-handed, aim to the left.)
- You have a neutral grip.
- Your hands are in line with the ball.
- You’ve bumped your lead hip towards the target.
- The upper body tilts away from the target.
- Your left shoulder is higher than your right shoulder.
- Your head is slightly behind the ball.
- You are hovering the club head above the ground instead of resting it on the turf.
This checklist may be too long to memorize at first. But keep it handy for the next round of golf, and I guarantee most of these checkpoints will be habit after 18 rounds.
More importantly, you’ll be hitting longer drives than ever before.
Was This Helpful?
Have I answered all your questions about driver setup? If not, leave a note in the comments. Let me know what’s on your mind, and I’ll do my best to help.
If you’re ready to take your game to the next level with customized coaching or one-on-one instruction, visit us at VLSCoaching.com. Or drop us an email at Info@VLSGolf.com and put COACHING in the subject line. We’ll get back to you right away.
I have tried it all and i am just getting worse. Lol and it’s no laughing matter.
Very Clear, and very informative.
Thank you , Claude
Much prefer this approach for explanation and instruction.
Informative, simple to understand pictures, terminology, etc.
Mark, thanks for reading and taking time to comment. What part of the set up did you find the most helpful?
Thanks Claude! Did you see and pick up in your distance?
Darryl, sorry to hear this. Are you struggling with contact?
It appears by presetting the weight to the left you are not using your legs to initiate the downswing but are starting down with the arms and allowing them to pull the body through.
By presetting to the left are you losing initial momentum created by stepping into the left to generate additional speed over the arm swing alone?
Hello and thank you for your instruction.
1) with the driver, is the driver path along the target line or the aim like me?
2) You talk about hovering, should I do that for other shot as well ?
3) I am 72, and my driver is the Cleveland launcher turbo 10.5 degree, draw model. I had fitting with a Cleveland and this the club they recommended. Could I still follow your set up guidelines? I am probably a 25plus handicapper.
Peter,
Great to hear from you…appreciate the questions. The path of the driver ideally is along the aim line. We like to hover all clubs but for sure the driver. Yes, the suggestions here can be used with all clubs including your Cleveland. Hope that helps!
Dennis,
Good question, they key is to start with more weight on the lead foot and then early, very early in the takeaway move your pressure to the trail foot. It is this weight/pressure movement which improves tempo/timing and increases clubhead speed. Make sense?
I understand all the set-up details but I am not understanding the swing path.
When I square up the face to the target line while adjusting my feet and shoulders to aim right, it feels like I am putting some torque on my forearms. Should my swing path go down the target line to match the face or parallel to my shoulders which are aimed right? Logically, my brain says swing parallel to the shoulders and if the club face starts square to the target, it should return there. But boy does that feel awkward. Is that something that will go away in time the more swings I make?
Now about my iron set ups I have habit of hitting out towards the toe and pulling my shots badly at times
Todd your explanation and instruction is great. It makes a lot of sense and clear to understand .Perhaps a lesson on balance may be beneficial to all golfers I know I found it very helpful
Regards Mike
Thanks Mike! Appreciate the kind words. Other topics you would like to see us cover? Check out our YouTube channel for more content!
James, check out our YouTube channel for some great content on your questions.
Jeff, good question! The key is to get the club swing to the right of the target while the clubface is relatively square. This combination will help you draw the ball and produce the longest shots. Stick with it….it will pay off!
Just wanted to thank you for your common sense advice. For the past two seasons my game continued to go south, and I couldn’t get out if my head.
Paying attention to your advice really helped this senior golfer get back on track
The hip bump forward consistently gave my driver trajectory a lift and also helped me to get my weight shifted back to my left side during impact. thanks for all the instruction – I think the video on backswing and club position for the downswing path has been key. I would like to see how tempo and swing speed can be practiced to achieve consistency as well as distance. I seem to get distance but at the expense of consistency. I slowed my tempo but sacrificed some distance for accuracy and consistency.
Todd,
When I look at the face on picture with the live view line, your hands are not in alignment with the ball. They are about 2 inches behind it promoting a slight backward lean to the shaft. The ball is inside your left heel and your hands are at the middle of your stance. Can you clarify for me?
Hi Todd, I am 80 ex navyseal living downunder , have been following your emails for many years I hit driver about 195M adam-eric and Brian mogg sent me emails but once I got use to dropping it in the slot your version gave me the draw. keep the good ones coming Todd I enjoy the read.
regards
Rick.
P.S. will your answer come via email or some other site.
Thanks Todd for the tremendous instruction videos.
Had left knee replacement and having some problems. Having problems on downswing .
Any suggestions on what to work on? Am 80 years old and love to play golf.
Glen,
Thanks for the kind words. Love that at 80 years old you are still working on the game…awesome!
Watch this video https://youtu.be/dx-H4ntMcGs
Check out our new Vertical Line Swing System built specifically for “experienced” golfers https://www.verticallinegolf.com/landing-page1620850340667
Rick,
First off, thank you for your service to our country! You are a patriot! Love the USA! Brian Mogg is a great instructor and to be mentioned with him is an honor. We will keep sending information out via email…great stuff coming. Drop me a not at todd@t-interactive.com and I will send you a free version of our online program my friend.
John,
Great question. This could be camera angle. The hands should be equal with the ball providing a slight forward shaft lean. Make sense?
Michael,
Thanks for posting and asking. This video will help, check it out https://youtu.be/dx-H4ntMcGs
John,
Thanks for the kind words. It is a total team effort on our side…we will keep putting out great content to help our fellow golfers. Where you located?
Great easy to follow lesson that covered all the key points.
Stu,
Thanks. Be sure to check out our YouTube channel also for great information. https://youtu.be/2DWbcR0MACw
Hey Todd,
I hit my driver fairly straight consistently. Every time I try to hit a draw by aiming right with my feet and my shoulders, I hit the ball straight to the right. If everything is aimed right, what is different in my normal swing that would tell the ball to draw, instead of going straight like it usually does?
I have worked hard to use this method and to eliminate the slice but I tend to hit my driver towards the heel which isn’t good for distance. What is my issue? B.
Bob,
Thanks for asking and watching. Here is a good place to start https://youtu.be/C-w2AepJNoo
Joe,
Good question. Make sure the clubface is square to the target line not your feet line. Make sense?
Okay. Thanks Todd! Big fan of your instructional videos, they have helped me a great deal!
Joe,
Thanks for the kind words! Hope the information is helping your game…be sure to join our email list, more great content there.
wow you make it sound so simple. Have one question.. Does the height of ball on tee make a difference?
Love your ideas and I am trying to use the vertical line swing for older golfers 81 yrs old like it except on occasion I tend to pop up the drive like maybe I am to steep any suggestions
HI Todd thank you for all the great videos. Have them all and even though I am older find them very helpful!
Does height of ball on tee for driver make a difference? Notice in videos it looks as if you tee quite high from what
I was taught years ago.
.
Glenn,
Thanks for asking, the answer is yes. You want to tee the ball up so that 1/2 the ball is above the top of the clubhead…this is a general guideline.
Jerry,
Try this, when addressing the ball, keep the clubhead slightly elevated. This will promote a motion more through the ball vs down.
Yes, tee it up so that 1/2 the ball is above the top of the clubhead. This is a good guide…
I must be an outlier. I am an older golfer. I have experimented with the drawing the ball for years, The only way I can do it is from an open stance. Closed or neutral stance do not work for me. I think the open stance allows me to flatten the shaft better in the transition. From a neutral stance I hit the ball fairly straight, but from a closed stance pulls and blocks are the order for the day. Confusing? Enjoy your site it is full of common sense.
Thanks Todd for these great instructions. Even this 80 year old dude understands. I just had a left knee replaced and
starting to learn all over again. Your instructions have done more for me than i can ever imagine. I have saved all the videos you have sent and watch them over and over. See doc next week to see if i can start actual practice..
Problem now is I need new lighter weight clubs and not sure where to start.
Best to you and keep up the great work!
Just wanted to say that I really prefer this text & photo format over the videos. It allows me to go at my speed (often faster than following somewhat verbose video) and also go back and review some sections which I may not have fully comprehended. Thanks Todd
George,
Thanks for taking time to comment. You are spot on, some of our players prefer video and other text. We like to provide both…hope the information is improving your game!
Glenn,
You just made our day! Thanks for the kind words. To provide good information specifically for our older golfer, or “experienced” as I like to call them, is very rewarding. This is the great thing about golf, we can always improve no matter our age. More great content to come….
I’ve followed your set up directions to a tee. Hovering the club is a great tip. However I still have a tendency to pop it up and hit down on the ball at times … what else can I do to stop this awful practice?
Cheryl,
Thanks for the kind words. Here you go https://youtu.be/bMO1UVR8Yqw
Works for me … Hitting much better.. Great advice.
Hi there Todd,
I follow you on a daily basis and appareciate the way you give your tips.
In addition to your tips I tee up the ball a little bit lower. The result is a better, consistant ballflight. Also I use a bit less thumppressure.
Can you comment on these things.
Rob,
Appreciate the kind words. Great to hear our information is helping your game. We like to tee the driver a little lower when there is need for more control. You are on track!
Todd, This is not something I’ve asked before. I have watched all of your last 2 years of lessons and learned something new each time. I’ve also taken advantage of some of the deals on great equipment from US Golf TV. (My Maxvert1 and some other clubs came as gifts from family and friends.) If I add all the clubs you have demoed, I’d have to throw out some of my favorites. I would like to know your advise on the best 14 clubs for my bag. Pleased help.
Mel,
Thanks for the note and kind words. Hope you are enjoying our content and it is helping your game. Typically I like to see a driver, 5 wood, three hybrids, putter LW, SW, PW, 9, 8, 7, 6, 5. Hope that helps.