Hit a Draw with Your Driver in Three Easy Steps
Know How to Hit a Draw with Driver? Discover These 3 1/2 Simple Tips and Have Way More Fun at the Tee.
What golfer isn’t looking for the secret of how to hit a draw with driver?
If you’re not hitting consistent draws on those driver shots, you’re losing valuable distance. A nice, high draw off the tee is one of the best (and most satisfying) ways to minimize the number of strokes between you and the cup.
And the good news is, it’s actually not that difficult to achieve that kind of shot. You just need the right information.

I am going to share all the insights you need to unlock that perfect draw with your driver. We’ll take a look at:
- Setup
- Takeaway
- Finish
I’ll also share a key tip for a perfect transition and wrap it all up with a drill to help you tie these concepts all together.
Every one of these tips is easy to understand and easy to do. In fact, you can start applying this advice to your golf game today. It’s worth it to take a few extra minutes to learn how to set up your golf shots for the perfect draw.
If you can get the ball to turn over, you’re going to get incredible distance and have a lot more fun at the tee.
Before we dive into the how-to’s, let’s talk about why drawing the ball is a little trickier with your driver shots.
The Fundamentals of How to Hit a Draw with Driver
If you’re like a lot of golfers who struggle to draw the ball with their driver, you probably find yourself frustrated by one constant question:
“Why is it so much harder to draw my driver versus my 3-wood, hybrid, or 7-iron?”
Well, it all comes down to the fundamental difference between drivers vs. irons. In fact, your drives are unique from every other shot you make on the golf course.
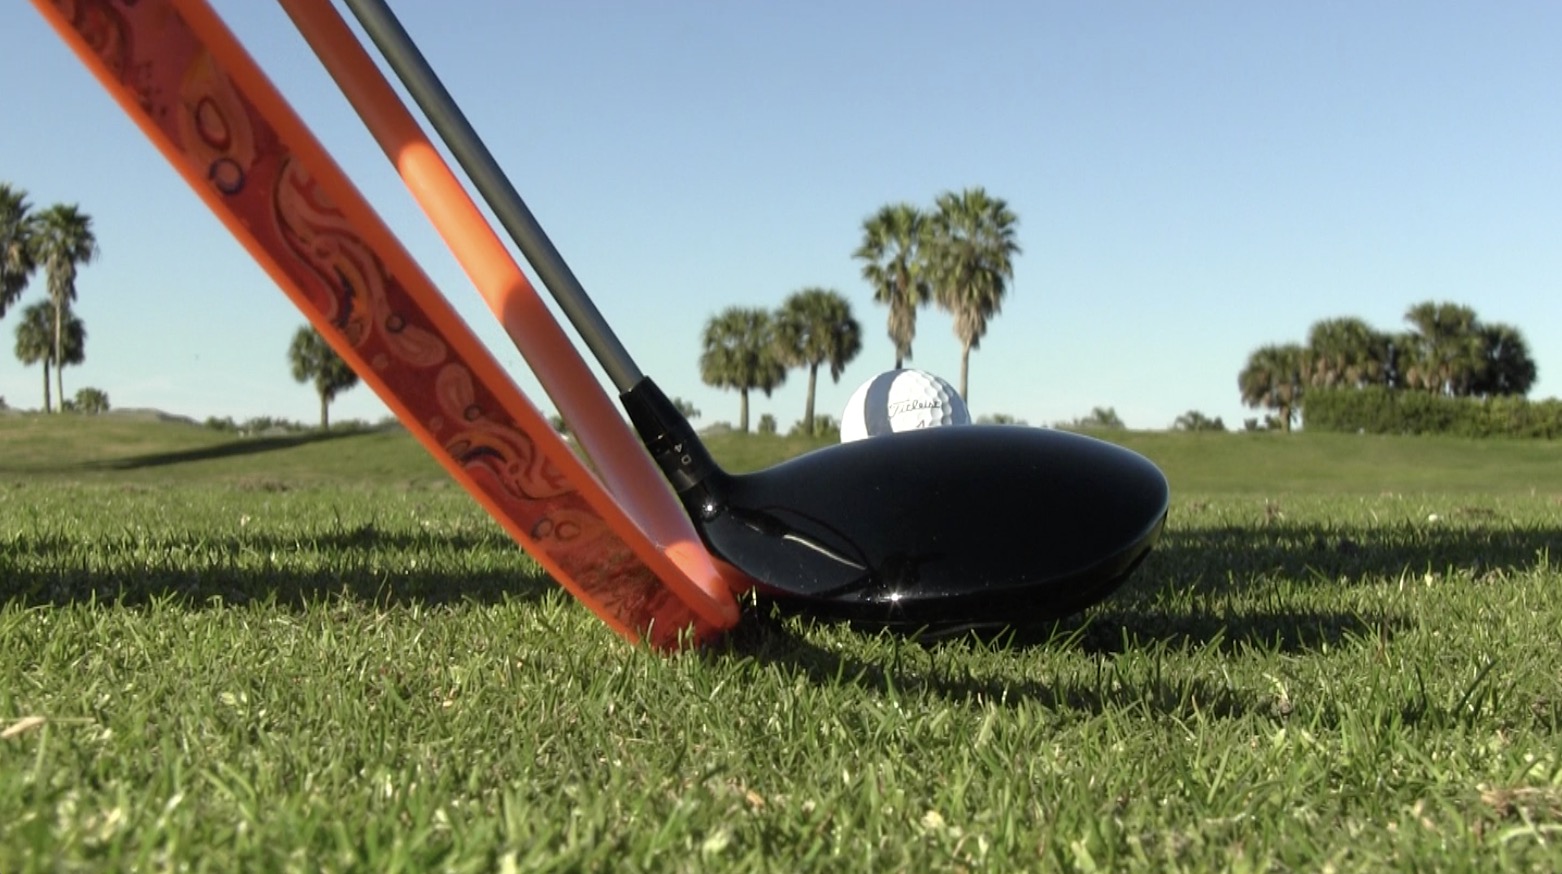
When you hit your driver, you have to hit slightly up on the golf club. This means you want to make contact with the ball just after the low point of your swing, when the clubhead is traveling upward. We tee the golf ball up for this exact reason.
This is also why the ideal driver ball position is always more forward in your stance. That’s how you ensure contact occurs after the low point.

Now, here’s why that matters.
Imagine the path of your clubhead throughout your swing as a hula hoop. That hoop is not perfectly perpendicular to the ground, because you have to hold the club at angle between your hands and the golf ball.
So the hula hoop is at a tilt. And that tilt means that even if your clubhead is traveling slightly to the right on the downswing, it’s going to travel more towards the left as it ascends after the low point.
If you want to dive deep into the physics of this, you can check out our free ebook, Science of the Slice. But for now just know this:
Hitting up on the golf ball causes the clubhead to travel in and up at the moment of impact. This is the opposite of what happens when you hit down on the ball.
So if you want to know how to draw with your driver, you need to account for this difference.
Here’s how:
Start with the Setup
First, you want a perfect driver setup.
What does that look like?
Generally speaking, a great driver setup accomplishes two things.
- It helps you hit up on the ball.
- A good setup also directs your swing path to compensate for the reversal in path direction after the low point of your swing.
Now, here’s how to draw with your driver from the standpoint of setup.
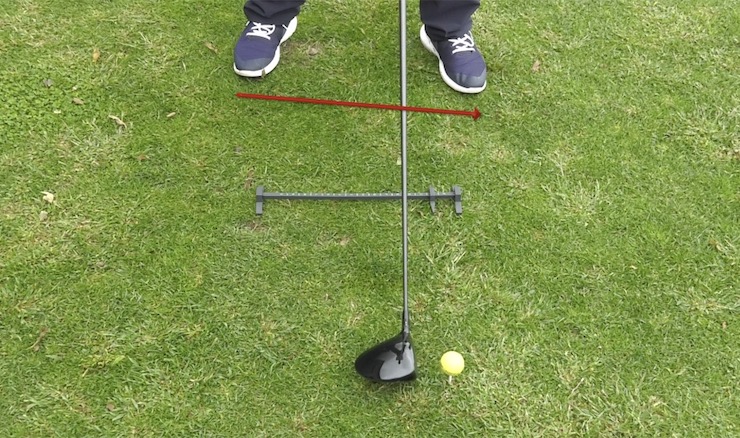
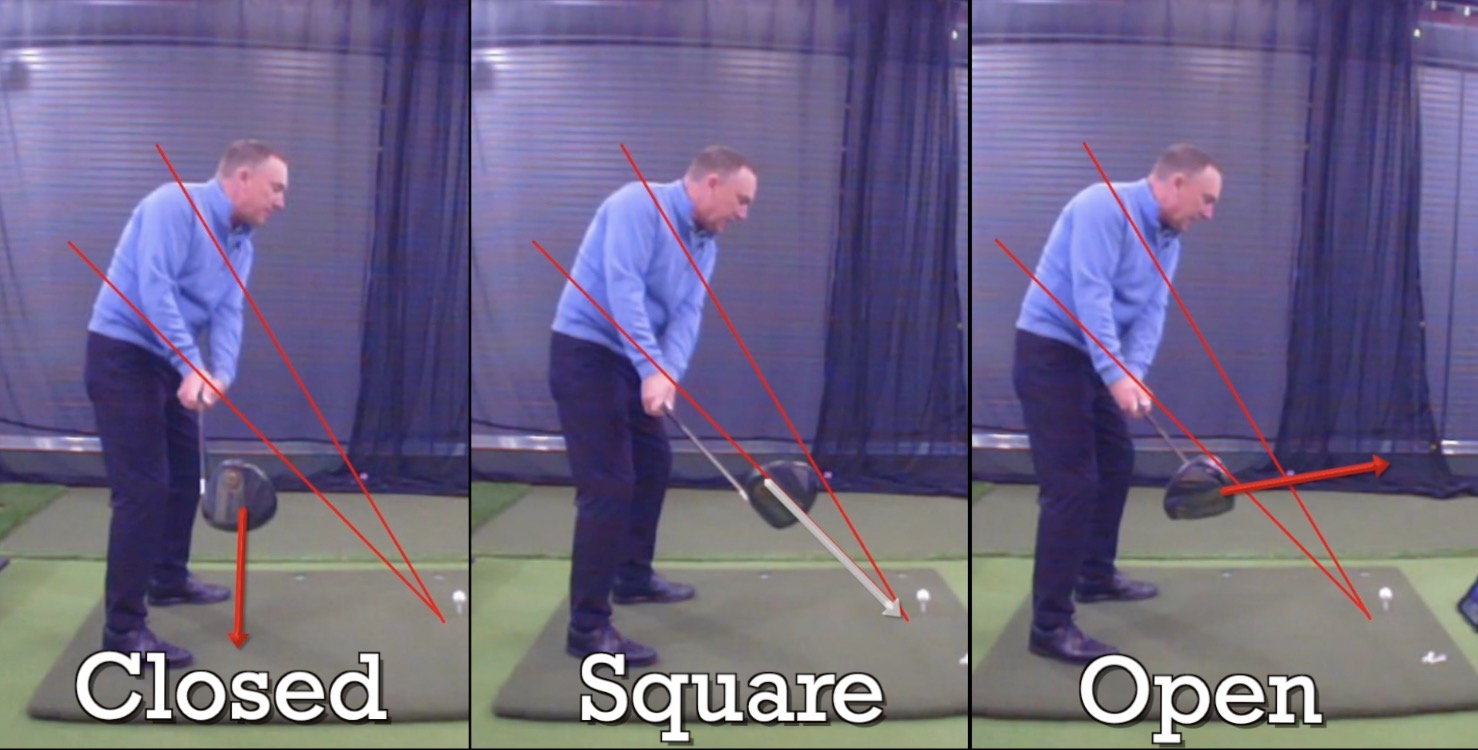
Close Your Stance
First, you want to close your stance. This means your lead foot should be slightly forward (closer to the ball) compared to your trail foot.
To put that another way, right-handed golfers will want to step their left foot more towards the golf ball. When you draw an imaginary line across the toes of your shoes, that line should be aiming to the right of the target.
Left-handed golfers do the opposite. Step your right foot slightly forward. The imaginary line from toe-to-toe should aim a little to the left of the target.
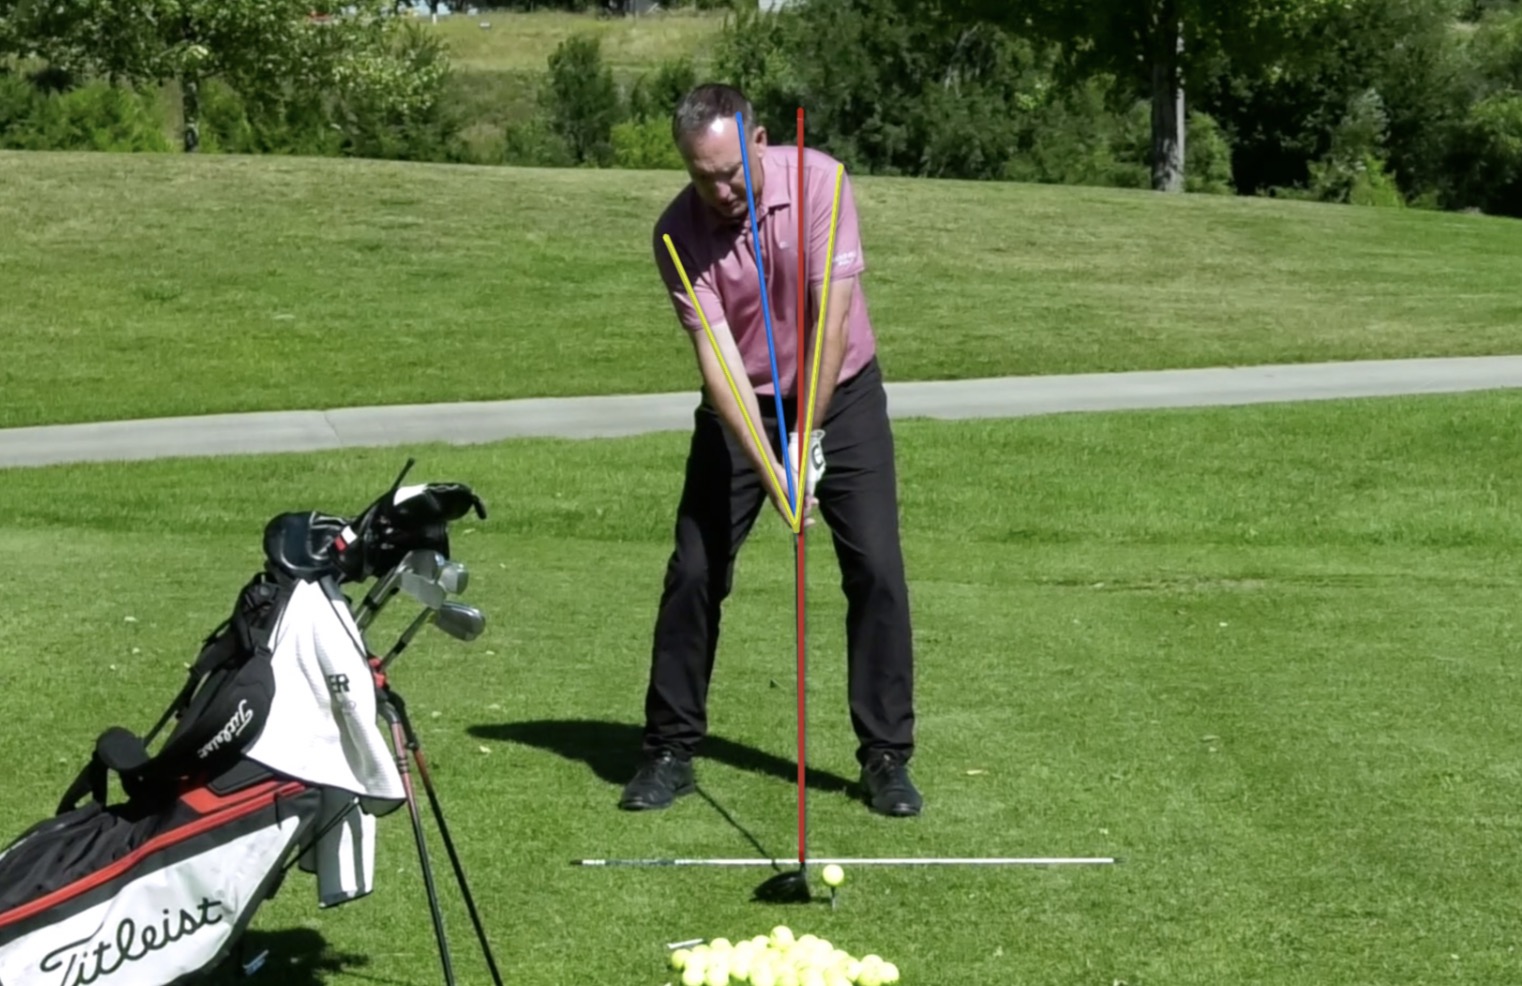
Raise Your Lead Arm
Once you set up your closed stance, raise your lead arm just a bit higher than your trail arm. This should also cause you to raise your lead shoulder and club handle.
From this position, you’re able to get the upward angle of attack you want.
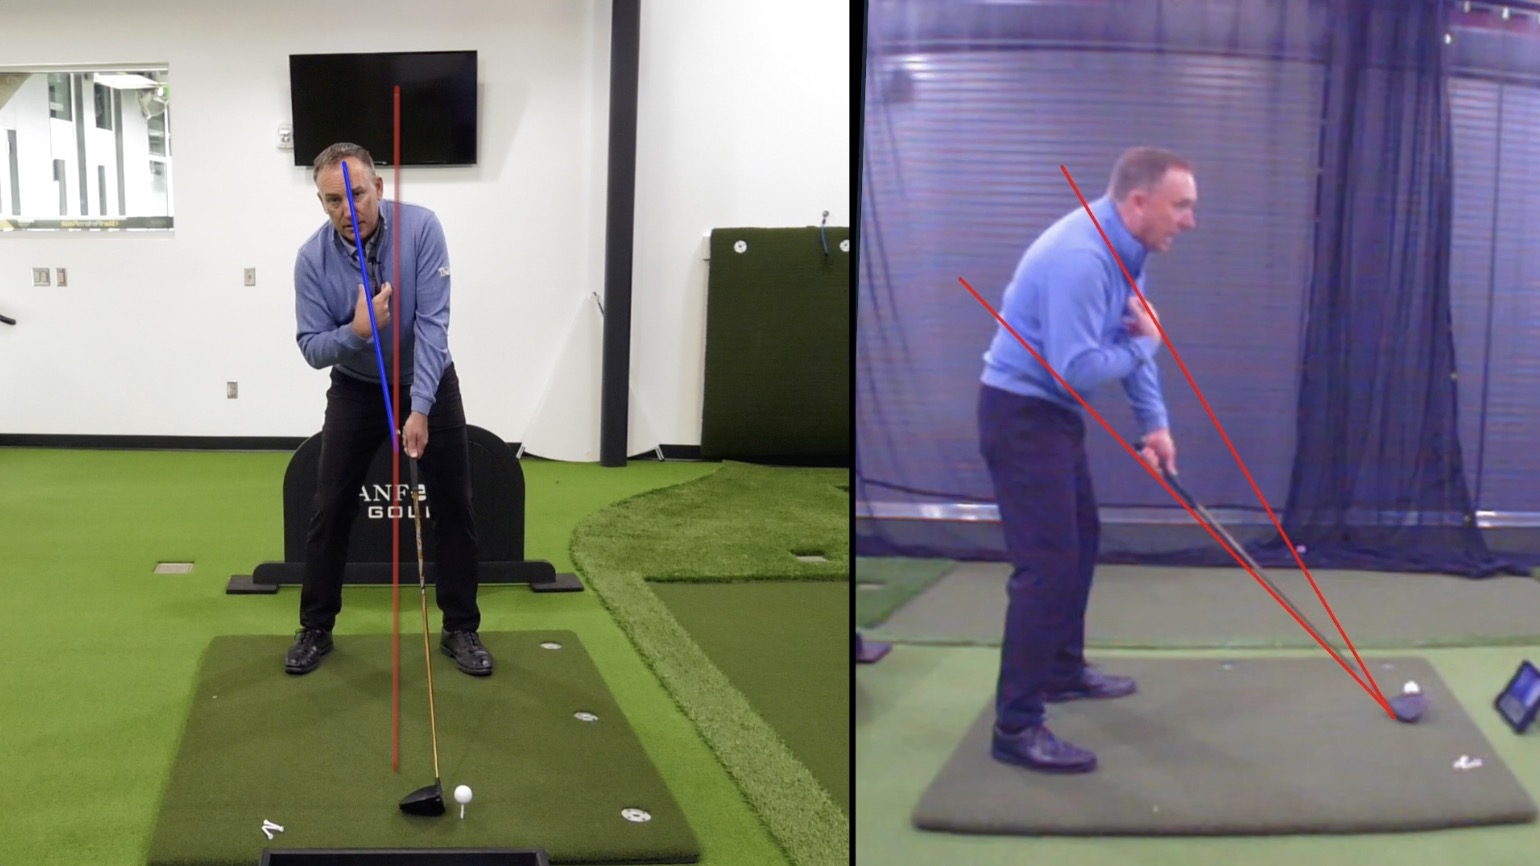
Tilt Your Upper Body
Finally, tilt your upper body back away from the target.
If you’re not sure how far back to tilt, here’s a really easy way to measure it:
- Hold your golf club against your body with the handle running vertically up your chest.
- Bend your knees slightly as you usually would at setup.
- Tilt your torso away from the target until the clubhead hits your lead knee or thigh. That’s the perfect upper body position.
Just like raising your lead arm, this adjustment prepares you to hit up on the golf ball and get that perfect draw.
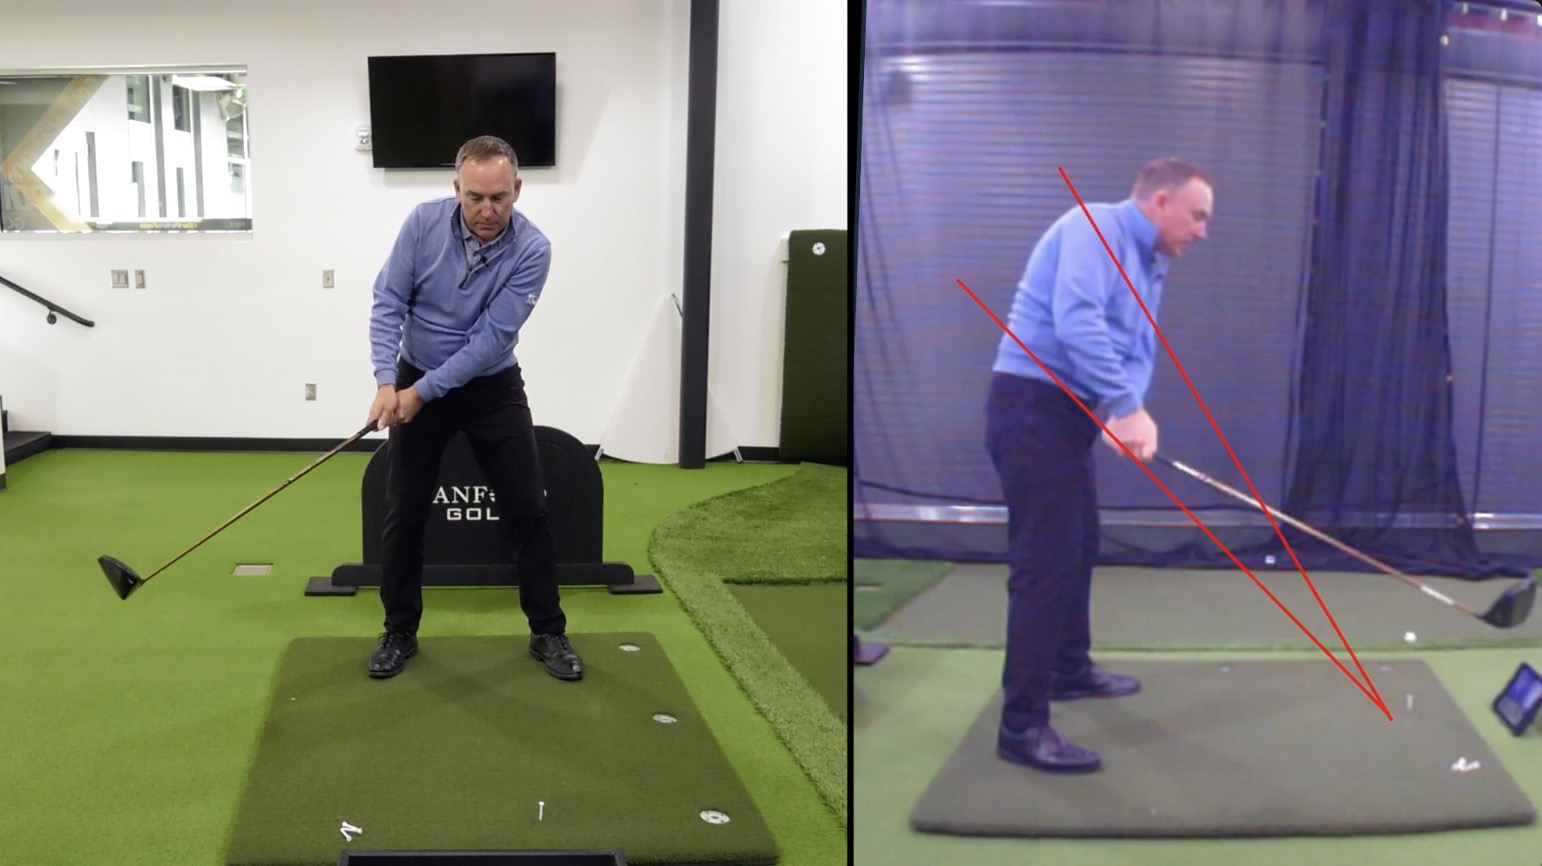
Fix the Takeaway
There are two aspects of the takeaway you need to master in order to draw the ball on driver shots.
Now, when I teach my students how to draw with driver, I like to use the LiveView camera. This device provides real-time video of your swing from any angle. You can also draw lines on the screen to help you evaluate your own technique more clearly.
If you happen to have a LiveView camera, I recommend drawing two lines as your practice your driver shots.
- Draw one straight line from the golf ball through the hips.
- Direct the second line from the ball through the shoulder.
If you do not have a LiveView, imagining these lines will do the trick for now.
On the takeaway, strive to make two things happen.
First, feel your hands work in as the clubhead stays on that line between the ball and your hip. This helps you get the clubhead slightly outside your hands, which pays off big in the transition.
Second, make sure your clubhead is nice and square. Try not to let the clubface rotate open or closed. (Open means the toe looks upward. Closed means the club face points down towards the ground.)
Aim for the Perfect Finish
Now, let’s talk about how the perfect driver swing motion ends.
If you want to draw the golf ball, plan to finish with your trail shoulder lower than the lead shoulder.
Remember the line we drew on the LiveView—the one that travels from the ball and passes through the shoulder?
You should finish with your shoulders on that line. The trail shoulder should be low, and your torso should be tilted along the angle of the line so that the lead shoulder touches the line higher up.
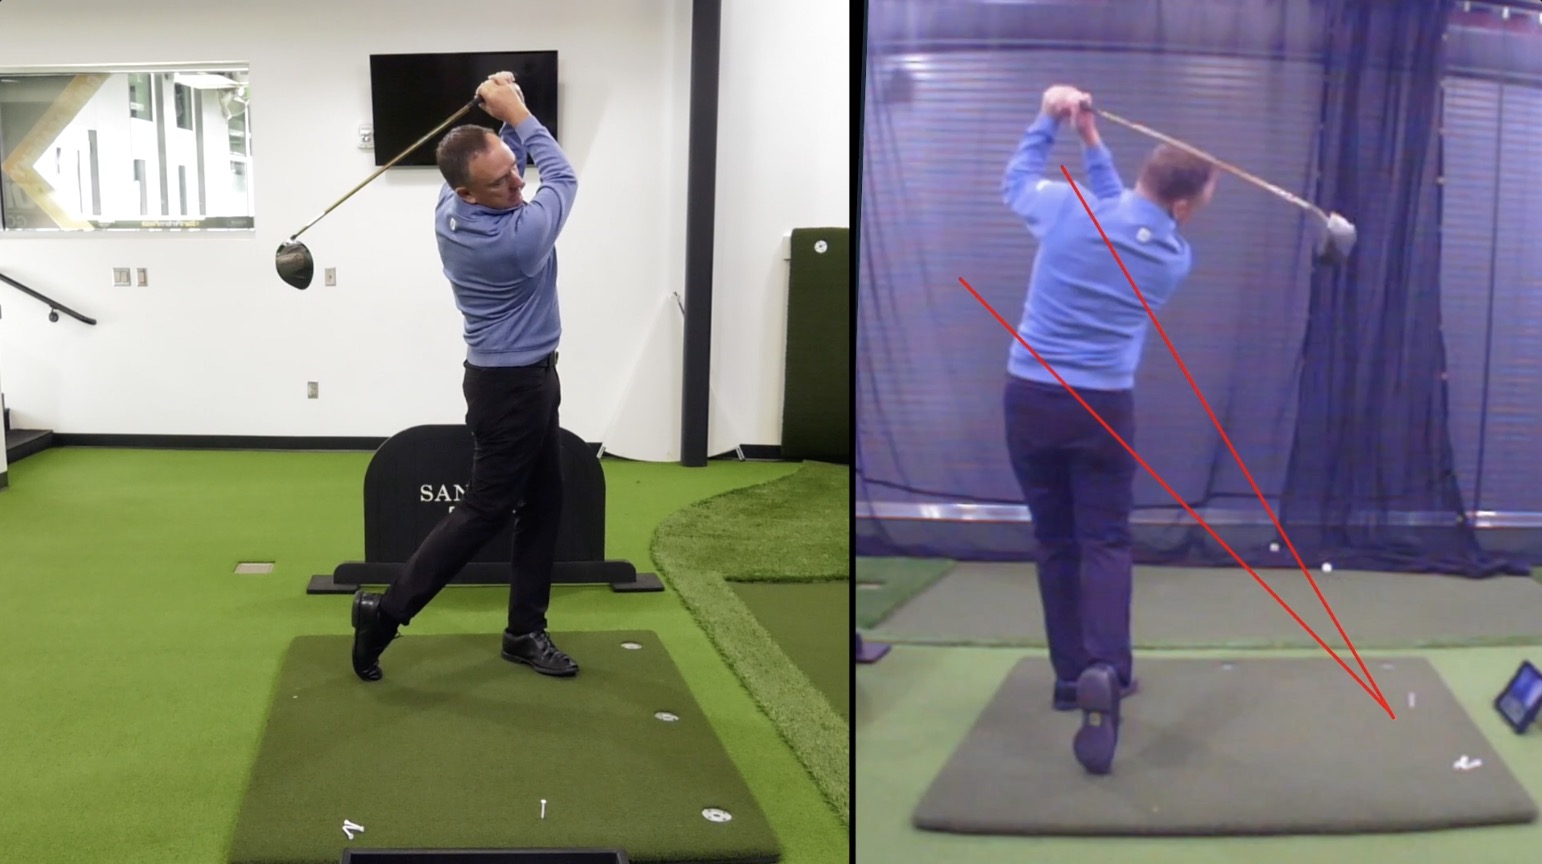
The next time you hit your driver, try to notice your shoulders at the finish . . . especially if you hit a slice instead of a draw. If you’re making these nightmare shots regularly, odds are good your shoulders are even with each other.
From here on out, I want you to think about ending with that trail shoulder low.
Now, for the big question that might be on your mind:
What About the Transition?
If you’ve spent any time studying your golf swing sequence, you know the transition is a common problem area.
The transition is the segment of your swing motion where you make change direction, moving into the down swing from the top of your backswing. That fast reversal can kill your speed and your form if you do not do it correctly.
So, why haven’t we covered this major problem area yet?
Well, it’s because controlling the transition as it happens is extremely difficult. But if you master the easier aspects of your swing first—the setup, takeaway, and finish—your transition often fixes itself.
Remember how I told you to arc your hands to the inside and work the clubhead outside on the takeaway? This is the big secret of how to hit a draw with your driver. No one talks about this, but it makes all the difference.
You see, it all comes down to managing weight in your swing. Your hands create weight on one end of your club and the clubhead creates weight on the other. Through the transition, your body naturally wants to rebalance the weight distribution you established on the takeaway.
So, if you carried the clubhead outside your hands, your clubhead will naturally travel from the inside in the transition. This helps you hit up on the ball and creates that shoulder drop. You don’t have to think about it or try to control it. It just happens.
![]()
If you watch a lot of slicers closely, you’ll see that they do the exact opposite. On the takeaway, they pull the weight of the clubhead in as they work their hands out. As a result, they reverse that weight distribution in the transition.
All this to say, the transition is a key element in how to hit a draw with driver. But if you do everything else right, you don’t actually have to think about the transition at all.
Quick Recap
Now, I promised you this would be simple. And when it comes to actually executing this advice on how to draw with driver, it is astoundingly easy. I just wanted to make sure you had some foundational knowledge so you understood the “why” behind all these tips.
But now let’s take a step back and look at the bare essentials. What do you actually need to do the next time you’re at the golf course or the driving range?
Here’s your checklist:
- On the setup:
- Close your stance by stepping your lead foot slightly closer to the ball.
- Raise your lead arm slightly higher than your trail arm.
- Tilt your upper body away from the target.
- On the takeaway:
- Work the clubhead outside your hands.
- Keep the club face square.
- On the finish:
- End with your trail shoulder lower than your lead shoulder.
Now, if all else fails, this next drill is a failsafe technique for how to hit a draw with your driver.
The Perfect Drill for Learning How to Hit a Draw with Driver
The tips I’ve already given you will help you get the nice, high draw you’ve been dreaming of. But sometimes you just want a quick trick for getting better results.
And if your goal is to draw the ball with your driver, I suggest this astoundingly simple routine.
The TV Drill
This is one of my favorite drills to teach to students because it’s so easy and so effective.
How easy is it?
Well, you only have to remember two steps:
- Take your golf swing.
- Finish with the butt end of the club pointing to the right of the target if you’re right-handed. If you’re left-handed, finish with the butt end pointing to the left of the target.
That’s it.
I even recommend taking three swings like this before you actually hit the ball. That helps you get the feel for good form in your body before you step up to the tee.
Now, how could something this simple possibly help?
Well, you might be shocked at how much you can improve your golf swing just by focusing on where you want to be at the end of it. If you’re maneuvering to reach that goal, you’re going to find the correct motion naturally.
Full disclosure: something so simple will not be the perfect long-term solution for banishing your driver slice and getting incredible distance consistently.
So if you’re super serious about optimizing your golf swing technique, give yourself extra time to practice the other concepts in this article. Browse our blog and videos for additional tips on improving your distance and mastering your drives.
But if you’re looking for an easy way to play better and have more fun as a casual golfer, the TV Drill is a great option.
What Do You Think?
Did this advice help you think differently about the way you approach your driver shots? Do you have your own tips on how to draw with driver? Is there anything here you disagree with or need further clarification on?
Whatever is on your mind, share it with us in the comments. We love hearing from you, and we welcome any opportunity to talk golf!
If you’re ready to take your game to the next level with customized coaching or one-on-one instruction, visit us at VLSCoaching.com. Or drop us an email at Info@VLSGolf.com and put COACHING in the subject line. We’ll get back to you right away.
I tend to finish with my hands to high and vertical rather than around the body. I know that causes a power loss. Any suggestions how to finish with hands thru. I know my butt end will not point outside target because of high vertical finish
Other short query – do you line ball up in Center of club or closer to toe
Ken, thanks for posting. You want to line the ball up in the center of the face. Here is a good video to watch https://youtu.be/k0NoR3epIBs
Is there a place where we can upload videos of our swings and get comments of each other?
Andrew,
Sorry we do not have that as an option at this time.
Hi Todd many thanks for the interesting tips , in terms of drawing the ball , i normally hit straight drives unless blocked etc , i only try to draw the Driver on our last hole which is a dog leg left long par4 , sometimes it works for me using this method , i try to hit up on the ball between centre and toe and throw the club back over my shoulders etc but i certainly will practice your drill as it should be more consistent.
Many thanks again for helping out.
Frank.
Frank,
Awesome! It sounds like you have a clear plan of action in place…this is key!
Hi Todd, thanks for all the tips to help us amateurs get better.
When I click on the link to download the science of the slice, this is what I get.
Your connection is not private
Attackers might be trying to steal your information from yourtourdraw.com (for example, passwords, messages, or credit cards). Learn more
and I cannot get the download
Hi Todd. I’ve been golfing for many years but until recently didn’t actually have the time or the money to take lessons. One of my biggest problems is a lack of depth perception. I only have a left eye. When I set up for a drive and the clubhead looks like it is at 90 degrees from the target line I usually end up hooking the ball. Are you aware of any golf instruction for people with poor depth perception. Every little bit helps, lol. Len Snyder
Todd, if I want to hit a draw with my Fairway Wood and irons, do you recommend that I also incorporate the following as part of this Swing:
Keep my head behind the ball prior to the takeaway?
Have my trail shoulder low?
Great and very clear content with the Driver draw video, got it right away.
Leaves me with 1 key concern, I tend to hit the ground before the ball with the driver which is very destructive, please could you help to solve this issue.
Regards,
Ronnie.
Ronnie,
Thanks for asking. Here is a good video on the driver that may help https://youtu.be/UFvl5FtLJl8
Gerard,
Yes, your suggestions are solid. Be careful with the trail shoulder going low as it can change the low point or where the club hits the ground. Otherwise, I like your ideas. Hope that helps.
Lynne,
Great to see you playing the game…awesome! Take a look at this video most notably around the 3:00 minute mark where we discuss the hands falling below the shoulders. This will help! https://youtu.be/iyfVd4AXTi8
John,
Thanks for the heads up….we are on it and will send you a direct link. Appreciate you brining this forward.
John, thank you for the heads up! We are currently working on the issue and should have it resolved shortly, but here is the direct link to download in the meantime:
https://tinteractive.clickfunnels.com/thank-you12761515
Love this explanation on where your body and club should be to hit the high draw. Thank you Todd. Love all your videos and please keep them coming.
Gil,
Appreciate your kind words and taking time to post. We have more great content coming for our fellow golfer. Have you seen our YouTube channel https://youtu.be/wh_-0tVAMNM
Great videos. Clear and simpple
I really love your lessons. I am a senior and have played since 1979 and you really help us
a bit older to find our way back to a much better golfgame. Thank you Todd, you are the best.
Stig,
Appreciate those kind words. We are doing our best to make the game fun, simple and enjoyable. Have you watched any of our chipping videos https://youtu.be/e48zeG7d1Mk
One thing I did not get was the face at set-up is it square to the target when your stance is sightly closed or is it square to your stance
Todd – It is obvious that you posted this draw drill before. I do not remember it and I watch all your email lessons. In any case this really hit home this time. It is the best lesson on the take away through the finish! Thank you so very much.
Dick H
It works! Watched the video. Took notes. Went to the range. By the 5th swing the ball was going straight or slight draw. Big improvement over the fade/slice with the pull mixed in. Finally fell like I know what to do. Hope I can duplicate it on the course. The same approach seems to work for the 3 wood and 4 hybrid.
Hi Todd, I like many struggled with drawing the driver. Everything you emphasized in this video is spot on and in my opinion indisputable. The 1 nugget that finally connected this all for me was when my local golf pro told me that “you must swing along you body lines only”. That did it! I set up as you say, raised the handle, kept the rear shoulder low and back BUT I would inadvertently swing down the target line rather than my body line. Once he pointed this out and I did it I began hitting gorgeous high draws that would run out 30-40yds after landing. It was a life changer. Stay on your body line throughout the swing and let the wrists roll over in that direction. It was immediate and amazing. I encourage you to consider adding that to this already terrific lesson. Thanks so much for all you do Todd! Keep those great tips coming brother.
Great question, Jerry. You will want to keep the face square to the target line, rather than your stance.
Thanks!
Thanks for watching Dick, it’s one of our favorite lessons so we’ve posted it a few times…always gets a great response! Thanks for following our content, more great info on the way!
Tom, thanks for watching and taking the time to share! We try to provide the best information we can to help our fellow golfers. Glad the info helps!
Todd: Thank you for the series. I enjoy your videos very much. I am almost 70 years old and have a a 40% amputated right foot ( am a righty). Its hard for me to get in the finish position with the right foot. Question. I can only rotate my hips about 45 degrees either way. If l close my stance, I limit my rotation on follow-thru. If I open my stance, I limit my rotation on the backswing. For the normal swing, which rotation should I favor? Thanks for your attention.
Regards,
ghp
George,
Thank you for asking. Based on what you have said, our suggestion would be to keep the stance in the closed position and feel more arm rotation on the follow through. This combination will give us the best chance to hit solid shots with some clubhead speed. Hope that helps.
Hi Todd
Thank you for the info
I have one question on the high draw. I always thought a “key” was making sure the club face was slightly closed relative to the swing path. I note that the advice here seems to be a neutral face square to the path. Is this a case where square to the inside path is actually delivering the head slightly closed?? Or is the theory of “closed relative to the swing path actually misinformation??
Todd,
I have a friend who has a 5.5 index, good player. This past season, he and I both noticed that his practice swing is very smooth and he gets his club to parallel on his back swing. As soon as he steps up to hit his ball, suddenly he can barely get the club past vertical. It is costing him much distance. We both know, or at least think, that this is being caused by tension. He has tried concentrating on turning his chest back for a fuller swing, same result. Can you think of any drills that might free him up?
Mike,
Thanks for asking. Here is a good place to start https://youtu.be/EBB0SoqzGbU
John,
Good question. You are correct, the key to hitting a draw is for the clubface to be slightly closed relative to the path. The ideal situation is an inside to out swing with a slight open face. This combination will produce a nice high draw.