How Can You Make Ball-First Contact in Golf?
Want to Learn How to Make Ball-First Contact? Pick Up More Yards? Stop Hitting It High and Weak? Level-Up Your Golf Swing Overnight With These 3 Tips.
Jeff drove to South Dakota all the way from Michigan just to learn how to make ball-first contact.
Actually, that’s not entirely true. He came to my lesson tee in search of an answer to the question that would motivate any golfer to drive 900 miles:
How could he get better contact and more distance?
But as a golf instructor of 25+ years, I knew that what he really needed to know was how to make ball-first contact… at least when it came to his irons.
By “ball-first contact”…
…I mean the clubhead needs to come into contact with the golf ball before it reaches the ground.
We’re essentially saying the same thing when we talk about hitting down on your irons. You want to hit the ball just before the low point of your golf swing, while the clubhead is still traveling downward.
This is the secret to solid contact and serious distance with your irons.
If you’re not making ball-first contact, nothing else will help you. Increasing your swing speed is pointless. The perfect clubface orientation won’t do you much good if you’re chunking it.
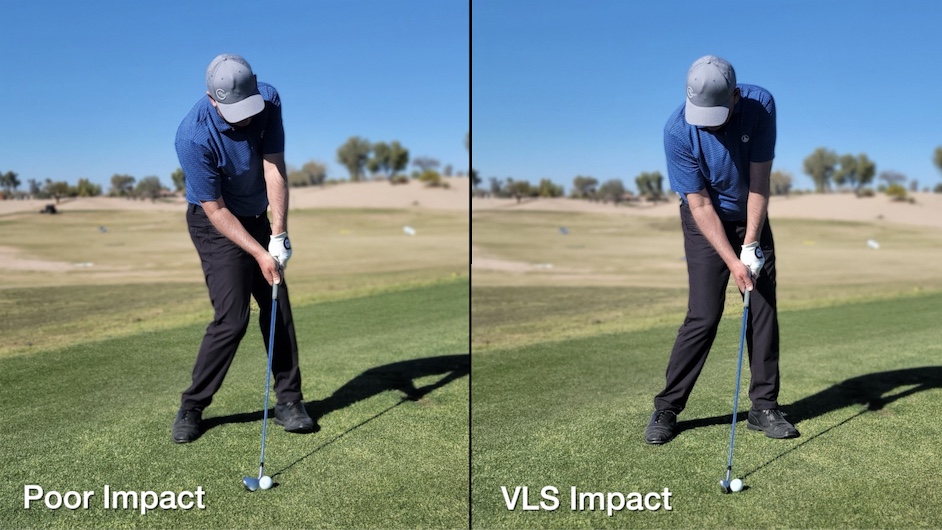
So I taught Jeff the secret to getting ball-first contact with a solution that had him hitting down on the ball consistently in a matter of minutes. That left us plenty of time to cover two more simple strategies for mastering precision contact and adding power to his golf swing.
In this article, I’m inviting you into this lesson so you can reap the same benefits as Jeff… without the time-consuming road trip.
You’ll learn how to make ball-first contact every time, plus two bonus tips that are guaranteed to level-up your game overnight.
Let’s get into it.
Lesson #1: Ball Position
I gotta tell you, interacting with students—in person and online—is my favorite part of the job. It’s why I do what I do. And I had such a great time working with Jeff, a golfer who’s definitely serious about playing a better game.
This guy showed up on my lesson tee with evidence that he was doing everything he could to unlock his full potential on the course. He was equipped with the senior-friendly Maxvert driver and had his own VLS Stacker for working on connection and contact.
But he still managed to miss the most basic element of improving contact: ball position.
The fact is, it’s not just Jeff. Most golfers learn where to position their feet from the first person who takes them out for a round and never revisit the issue again. After all, no one really talks about ball position, so who would assume it’s such a big deal?
But if you haven’t been able to figure out how to make ball-first contact, incorrect ball position is probably the problem.
As I mentioned before, you want to catch the golf ball just before the clubhead reaches the low point of your swing. If you’re constantly hitting behind the ball, that means the low part of your swing is also behind the ball. The solution? Move the ball.
How to Fix Your Ball Position
For iron shots, the golf ball should be in about the middle of your stance. I tell my students to make sure it lines up somewhere between the logo and buttons of their golf shirt.
To really get the feel for the correct position, I recommend using an alignment rod.
If you don’t have one, you can get a set of collapsible alignment rods from VLS Golf. I love these because they bend, which means they’re not just easy to transport; they’re also more versatile training aids than standard rods.
To find proper ball position with an alignment rod:
- Position the rod on the ground so it runs between your feet and points directly at the golf ball.
- Place your feet on either side of the alignment rod.
- Step your lead foot towards the target.
- Step your trail foot an equal distance away from the target. (Adjust the size of these steps to ensure you end up with your typical stance width. The important part is that the steps are equal to one another in size.)
- Both the alignment rod and the ball should now be in the center of your stance.
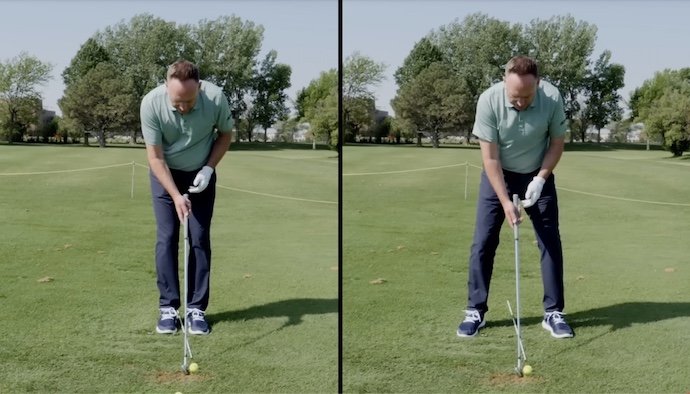
Make a golf swing from this position, and I guarantee you’ll get better contact instantly.
Lesson #2: Manage the Clubface
Once we fixed Jeff’s ball position problem, we were able to address another issue I saw in his golf swing. He kept hitting high and weak because he was turning his 7-iron into a pitching wedge on the takeaway.
That is to say, he kept rotating the club way open as he swung away from the ball. Doing this added serious loft to the clubface, so that even when he hit it solid, he wasn’t getting the kind of carry he wanted.
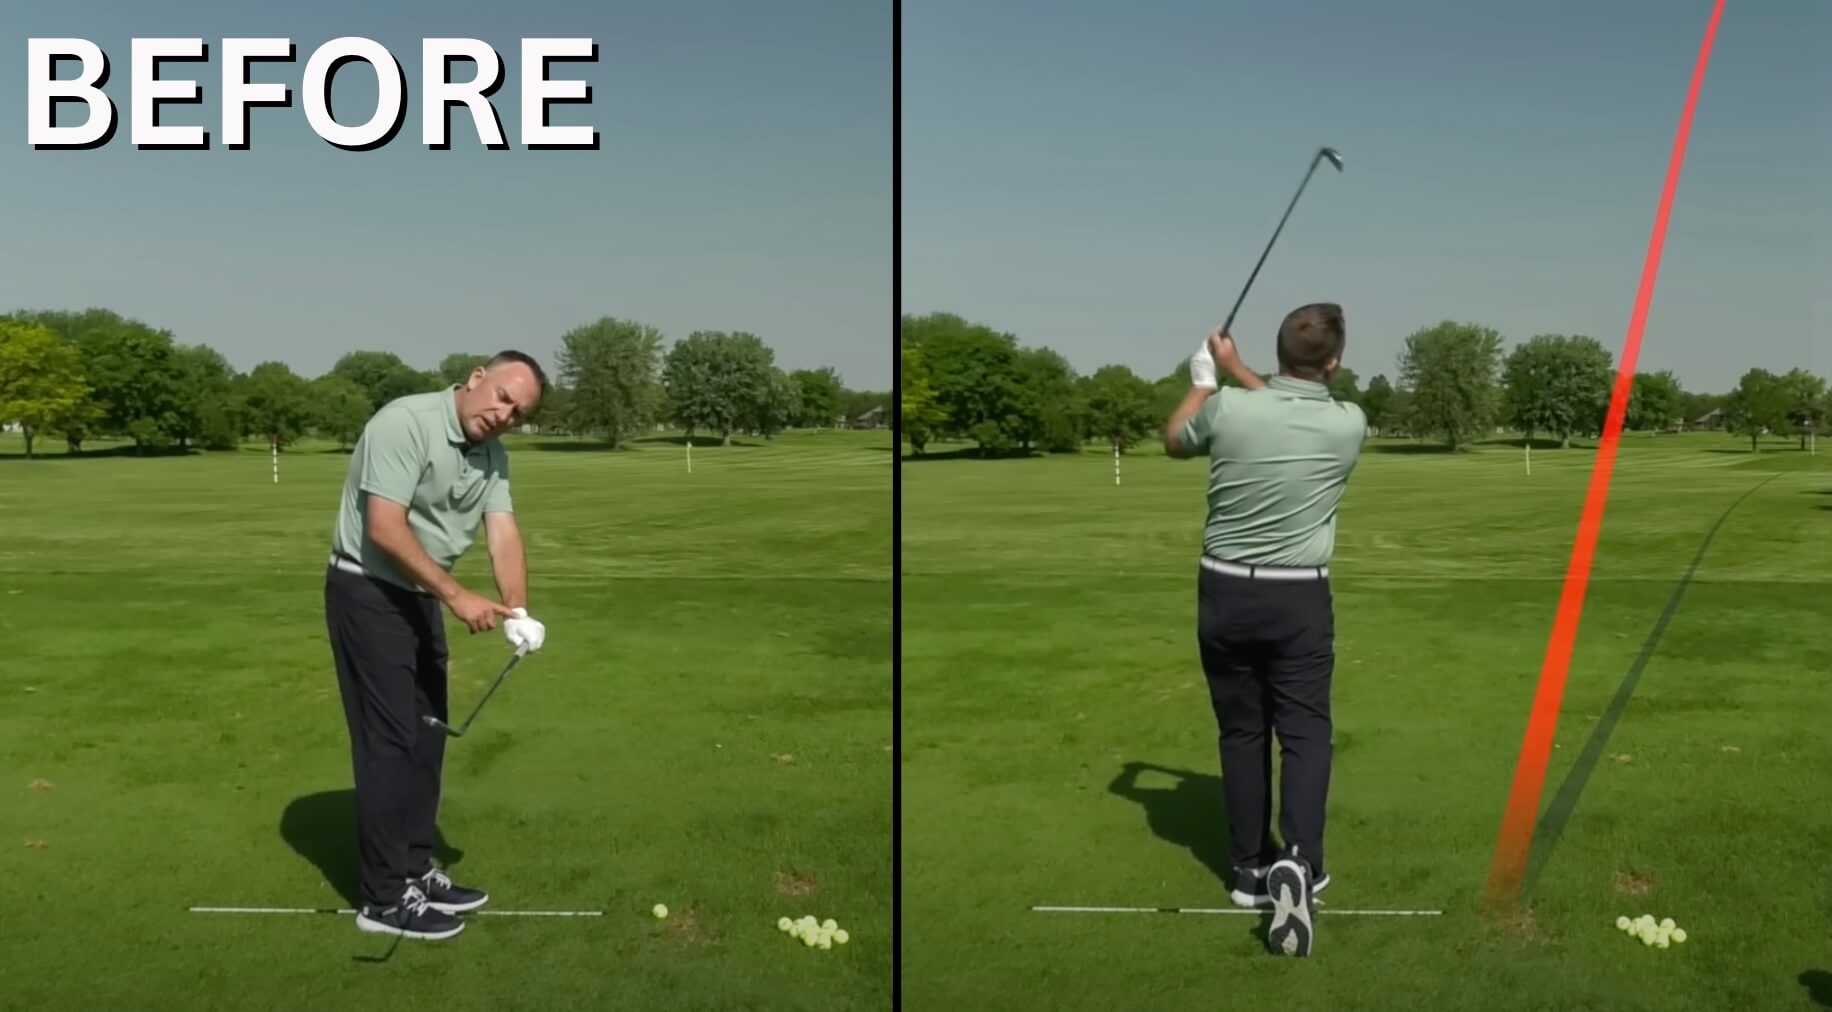
Now, I’ll be the first to admit it’s not easy to notice what your clubface is doing on the takeaway—or any part of the swing following address. There’s too much movement packed into one second, and the last thing you want to do is keep your eyes on your clubhead.
Fortunately, I have a fix for that. Instead of thinking about the clubface, think about the logo on your golf glove.
When you rotate open, like Jeff did, that logo shifts toward the sky. What you want to do instead is rotate the logo of your glove down towards the ground on your takeaway.
This keeps the clubface in a clean position so you can get solid contact and stellar distance without having to make corrections on the downswing.
Just Be Aware…
You might hit a few hooks when you try this tip, especially if opening the face has become an ingrained habit for you. Don’t let the hooks discourage you. Take it as a sign that you’re making progress. With a little more practice, you’ll start hitting the shots you want.
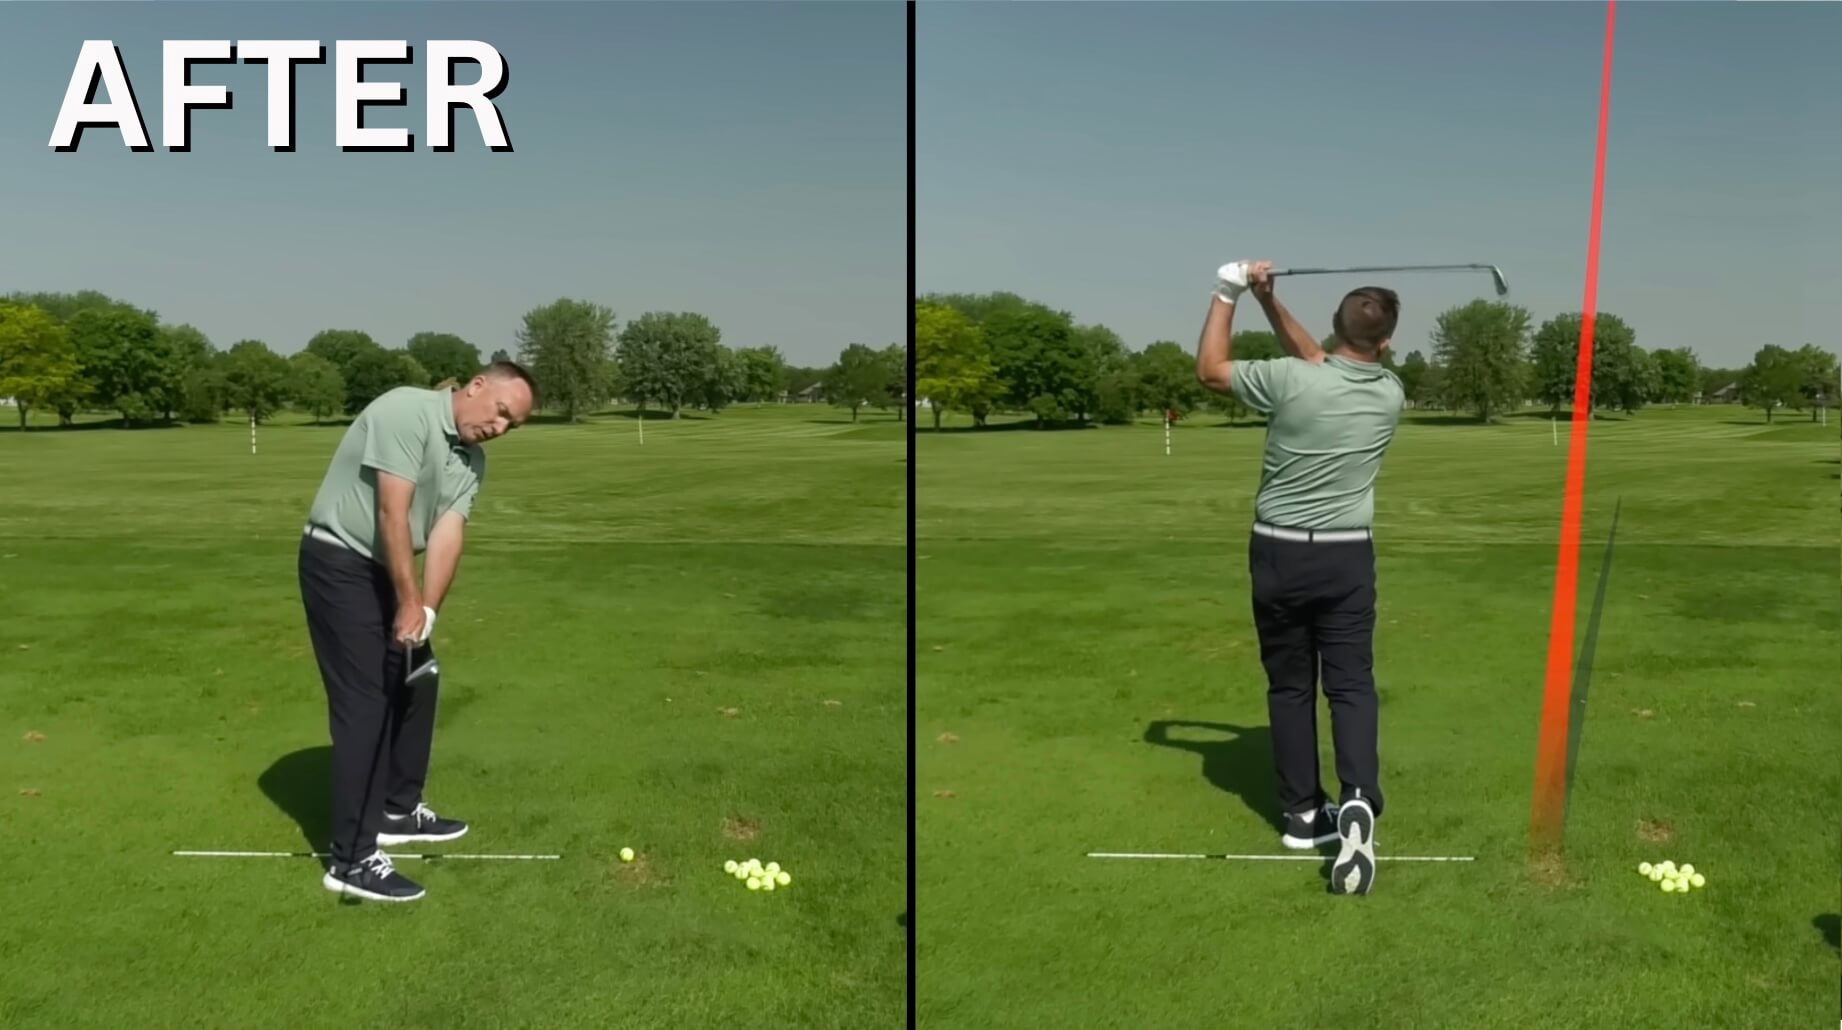
It’s definitely worth giving it a try. Jeff improved his distance immediately when I taught him the logo technique.
Lesson #3: The Arnold Palmer Finish
If you’re anything like me—and anywhere near my age—Arnold Palmer is The Golfer as far as you’re concerned. A legend, the GOAT, an all-around cool guy.
And one of my favorite things to teach my students is what I call the Arnold Palmer Finish.
You can probably picture it even without me describing it: his hands high and away from his body, the club overhead, maybe even waggling a bit.
He got to this position by slashing it. He had a long, power-packed swing that rocketed the ball down the fairway. And that’s why I teach his finish position. You can only get there by way of a long, strong golf swing.
Jeff was doing the opposite. He had what I call an Alligator Arms Finish. He finished with his arms bent in close to his body, the club down by his lead shoulder.
I encouraged him to change it up—swing with the single goal of achieving an Arnold Palmer Finish.
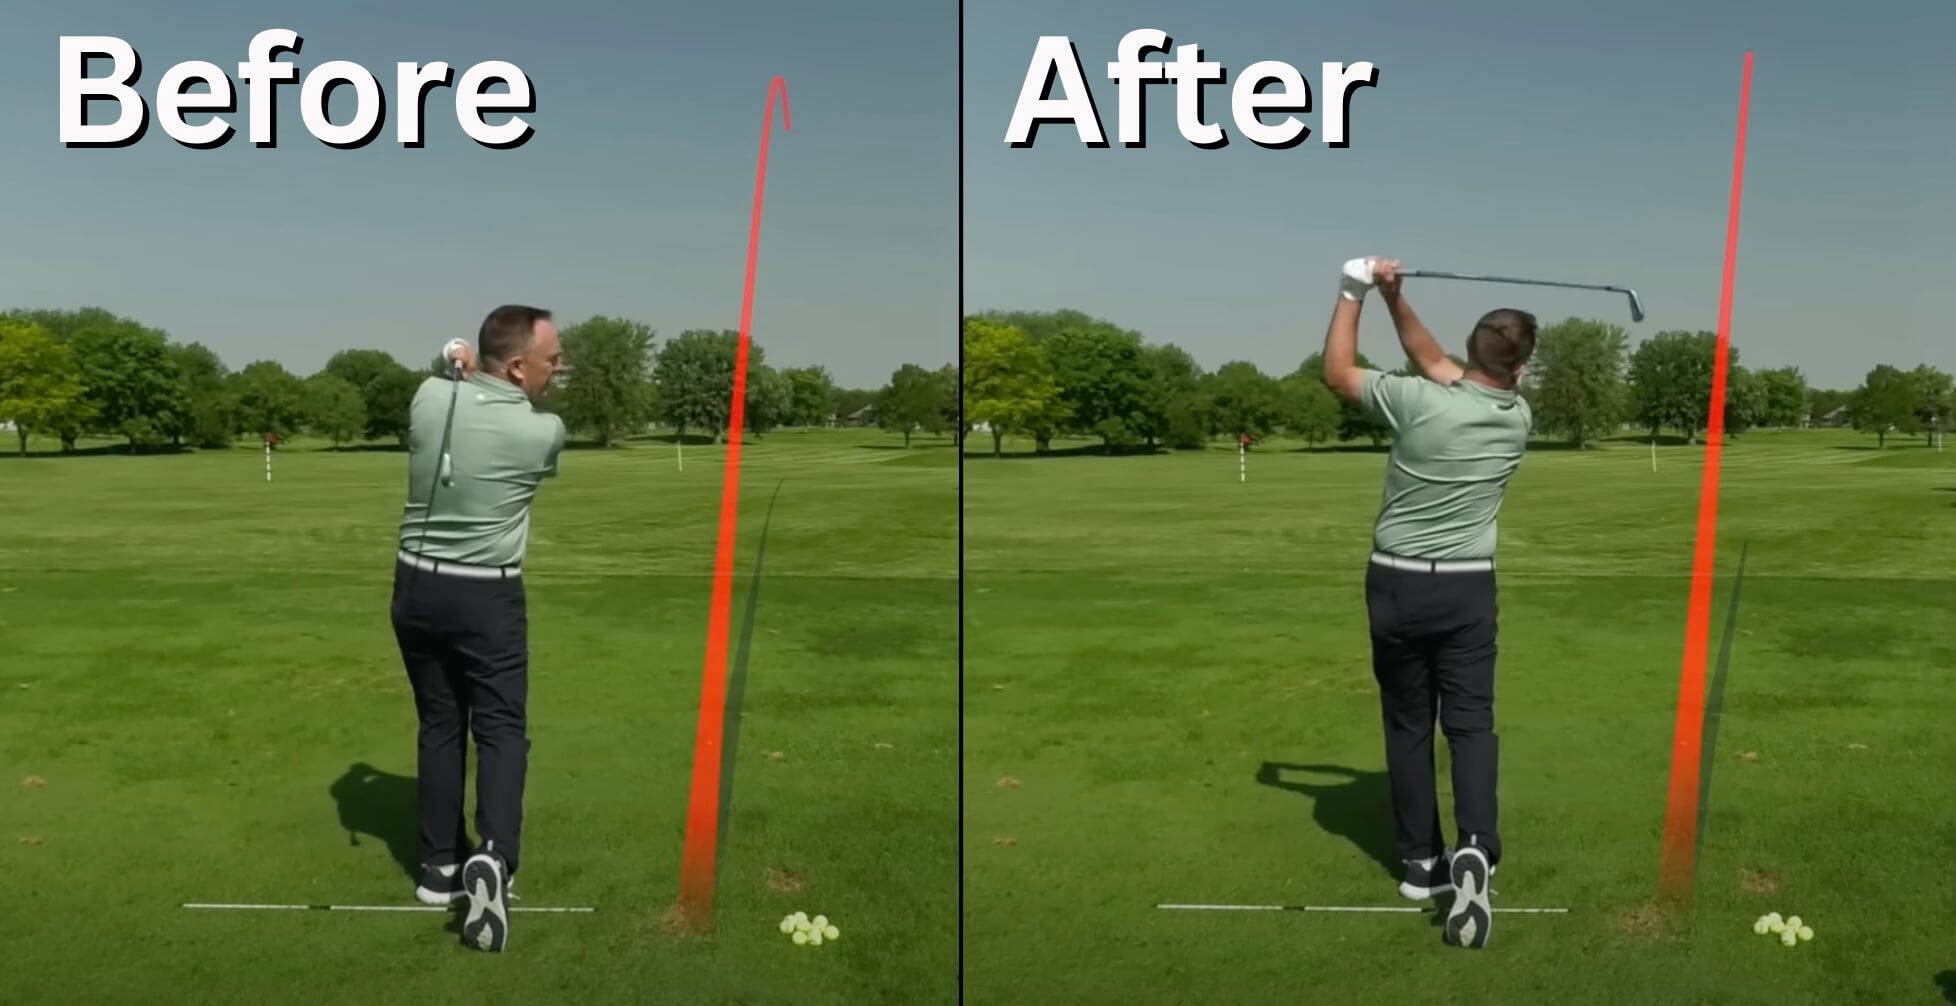
Let me tell you, this guy saw results. So will you.
Time to swap that alligator for an Arnie.
How to Make Ball-First Contact (and Other Quick Tips)
That’s the overview of my lesson with Jeff. Now here’s a quick checklist for future reference.
To see quick-but-massive improvement in your golf shots:
- Position the ball in the center of your stance.
- Rotate the logo of your glove towards the ground on the takeaway.
- Finish like Arnie with your hands high and away from your body.
Pretty simple tips, right? Try them for yourself and you’ll see why something so easy was well-worth a long Midwestern road trip.
Thoughts? Questions?
Join us in the comments! Let us know where you’re from and what’s on your mind. I meant it when I said interacting with golfers like you is my favorite part of the job. I’m always happy to answer your questions, hear your suggestions, or learn why you might disagree with me.
Looking for more tips and products to simplify the game and have more fun on the golf course? Check out VLSGolf.com. We’re constantly adding new instruction and gear designed specifically for experienced, casual golfers.
 |
|
