How to Release the Driver and Hit More Fairways
Discover How to Release the Driver the Amateur Way… and Why You’re Wasting Your Time Trying to Copy the Pros.
Learning how to release the driver through impact is one of the most effective things you can do to hit more fairways.
A lot of amateur golfers get caught up in analyzing their backswing, trying to find the solution to their wayward drives there. Now, I’d be the last person to tell you that the backswing doesn’t matter. Of course it does!
But I’m also here to remind you that the moment of impact is the moment of truth.
And if you know how to release the driver as you come into contact with the golf ball, you know how to get longer straighter drives.
Every time.
I’m going to lay it all out for you. You’re about to learn the two key elements of this skill:
- Controlling the path of the club shaft
- Releasing the clubhead at the right moment
I’ll also share a drill that helps you get this advice out of your head and into your body.
If you know an amateur who’s always hitting it straight and long, I guarantee you that person is using these exact same techniques.
So stick with me if you want to start sailing down the fairway with ease, too.
Tracing the Path of the Club Shaft
Okay, this will require a little visualization.
Typically, when I teach my students how to release the driver, I use the LiveView camera. This allows them to watch their own swing live as it happens with a literal guideline on the screen so they can check their form.
If you’re serious about improving your golf game faster, I highly recommend checking out this camera. LiveView just released the newest model—the LVPro 2—and the processing speeds are incredible. I’m talking instant instant replay.
But if you’re not in the market for new golf tech, your own imagination will help you plenty.
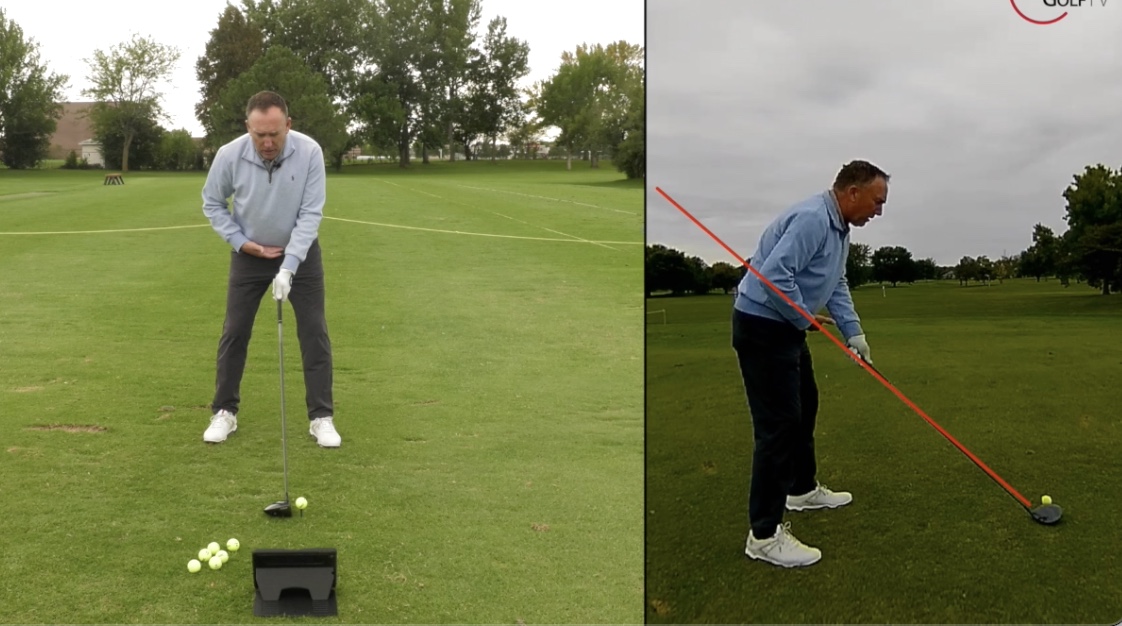
To find the proper path for your driver shaft, I want you to visualize a diagonal line that falls along the angle of your club shaft at setup and continues on through your belt buckle.

Do you “see” it?
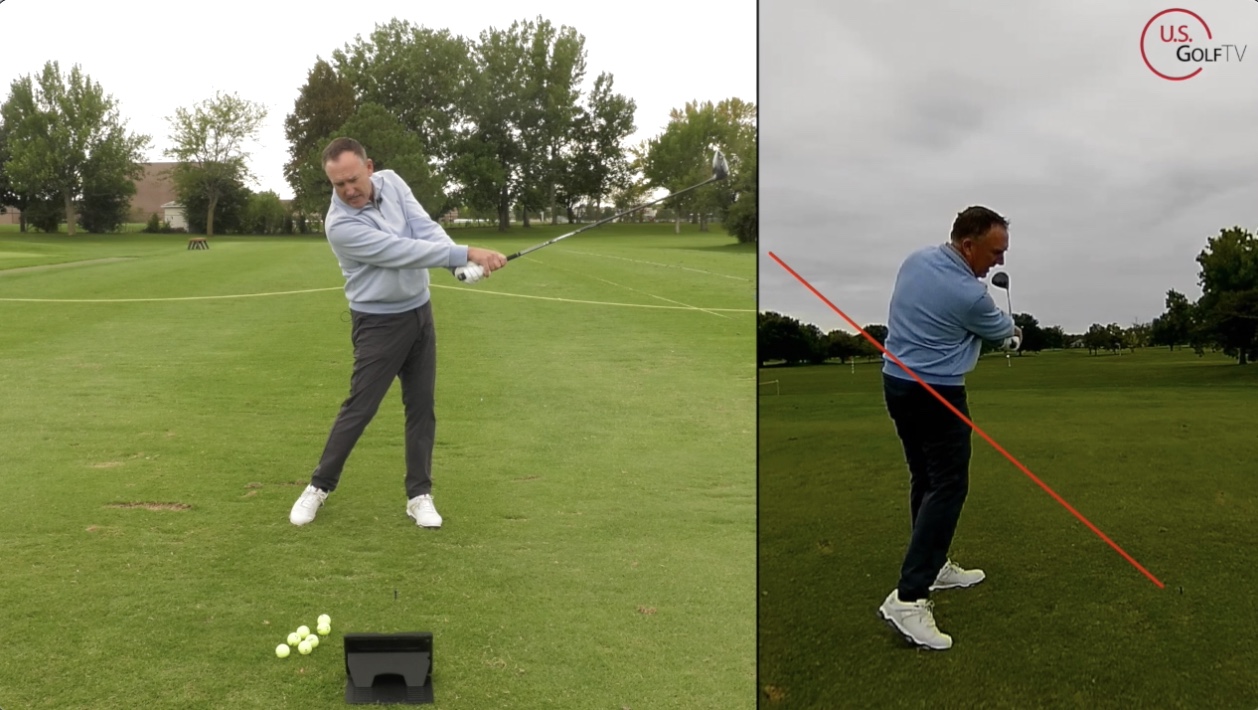
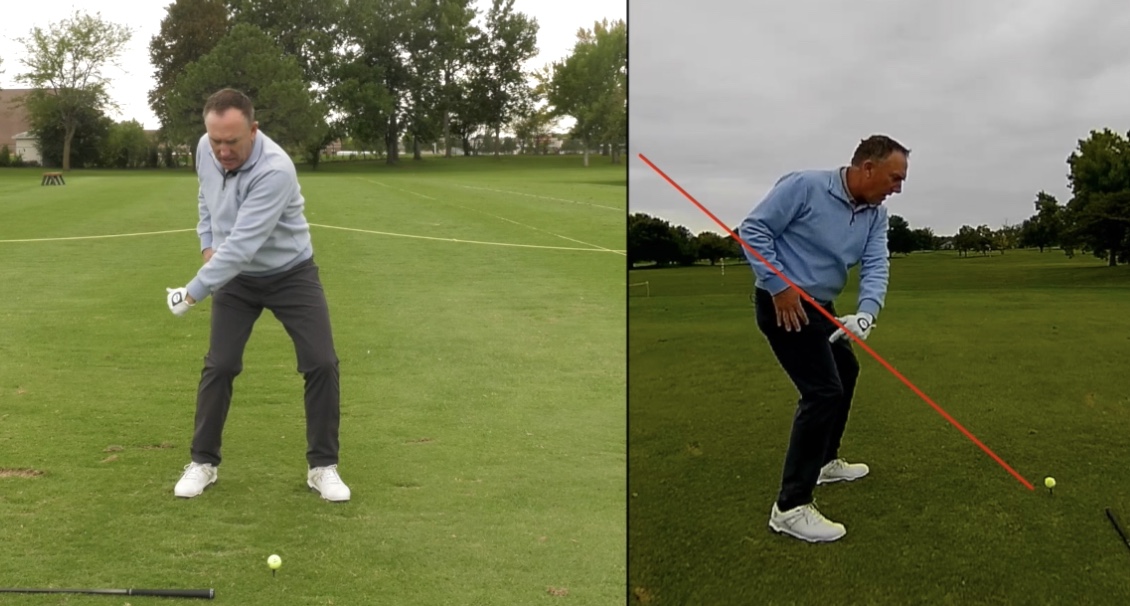
Now, as you make your downswing, make sure the club shaft falls underneath that imaginary line. You may hear this move referred to as “shallowing.” This is key for getting the clubhead in the right position to release through impact and hit a nice, high draw.
If you feel the club shaft straying over that line in the downswing, that means you’re coming over the top. No doubt, someone has already warned you that coming over the top is a death move. When you do that, you’re cruisin’ for a slice and it’s not even worth talking about this next part.
Releasing the Clubhead
When we talk about how to release the driver, we’re talking about turning over the clubhead at the perfect moment to transfer maximum energy into the golf ball.
For the amateur golfer, releasing the driver looks like this:
The clubhead comes through under the red line along with the club shaft. As the clubhead approaches the golf ball, it works from open to square, then releases a little bit just before impact.
One error a lot of casual golfers make is attempting to emulate the strategy of world class golfers. High level players often hold off on the release. They keep the clubhead square or almost open as they swing through.
That technique works great if you’re getting professional-level clubhead speed or you’re trying to hit a fade.
But if you’re a weekend golfer trying to learn how to release the driver, your goal is to release the clubhead through impact.

Now, allow me to address the question that’s probably nagging at you.
Won’t I hook it if I let the clubhead turn over that early?
You might. Like any other aspect of your swing, if you overdo the release, you’ll end up with a shot you don’t want.
But after spending three decades working with golfers of all levels, I’ve learned a lot about the typical swing of an amateur golfer. And I can say with total confidence that the vast majority of guys and gals reading this article aren’t battling a bad hooking habit.
At least give this method a try and see what you get. I’m willing to bet what you’ll get is a straighter drive.
Now, both of the concepts I’ve just shared with you might put you in your head a little bit. You’ve gotta do some visualizing, you’ve got to think about timing… it’s hard to apply these ideas in the moment.
But you know how we overcome that challenge here at USGolfTV. I’m going to give you a drill to turn head knowledge into muscle memory.
An Easy Drill for How to Release the Driver
What’s great about this drill is that you can do it without a golf club. This means you can practice right now, wherever you are, and start seeing results in your next round.
I recommend watching yourself as you do this drill. At least watch yourself the first few times. If you have a LiveView, great, but a mirror will do the trick, too.
Here’s how it works:
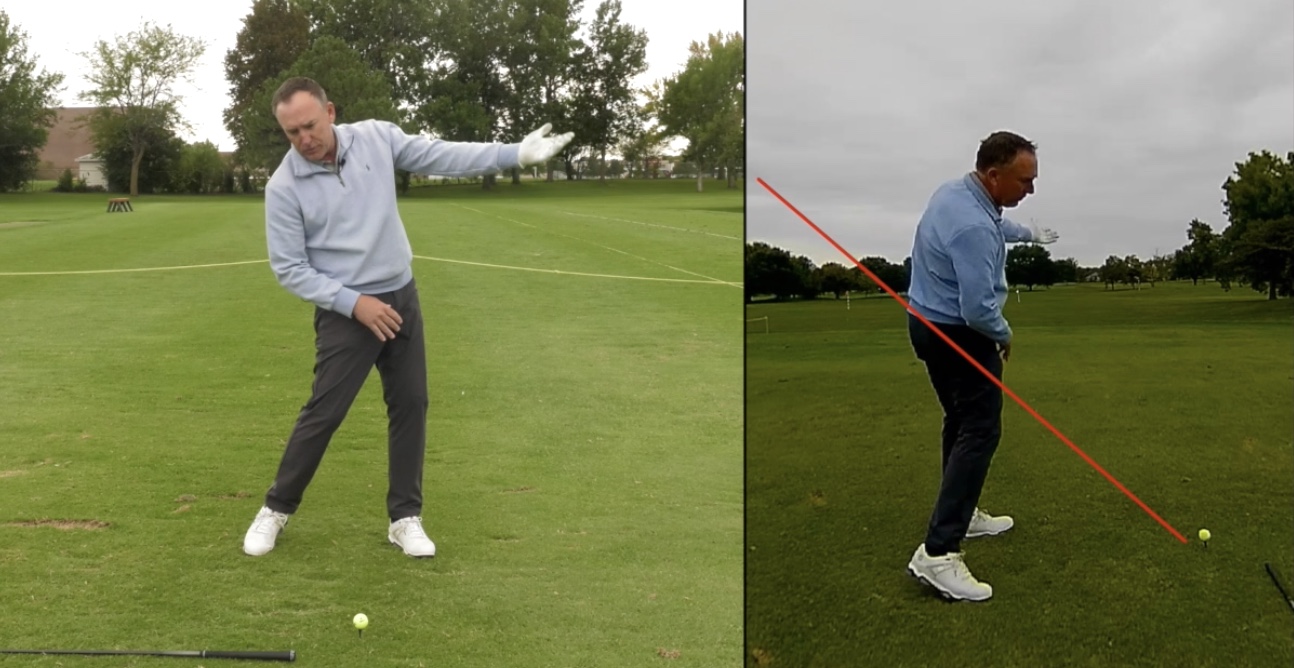
- Take an imaginary backswing.
- As your hands come down, move them along that imaginary line leading from the ball through your belt buckle.
- As you come through (imaginary) impact, let the logo on your golf glove rotate towards the ground.
Now, there are a couple things I love about this drill.

First, it’s a little easier to see and feel in control of what your hands are doing than it is to worry about the club shaft. If your hands follow that imaginary line we’ve been talking about, your club shaft will be where it needs to be.
Similarly, it’s easier to think about rotating the logo of your golf glove than it is to worry about the position of your clubhead. (In case it needs to be said, you don’t have to wear your glove to do this drill. As long as you know where that logo would be, you’ll be fine.)

Repeat this drill as many times as it takes to get the feel for proper motion in your body. Feel free to slow it down! The whole point is to find the proper motion so you can learn what that feels like. As you become more confident that you’ve got it right, you can speed it up.
I also recommend doing a quick three-setter before you take your practice shots at the driving range. Work your hands up, bring them back down on the imaginary line, and rotate the logo towards the ground. Repeat that two more times, then make a swing.
Recap: How to Release the Driver
Okay, here’s a quick checklist for you in case you need a refresher before your next round.
To release the driver through impact:
- Imagine a line from the ball through your belt buckle. (This line should be at roughly the same angle as your club shaft at setup.)
- As you swing down, keep your hands moving along that imaginary line to keep your club shaft underneath the line.
- Work the clubhead from open to square and release through impact. As a reference point, think about rotating the logo of your golf glove toward the ground.
Try it out and let me know…
Was This Helpful?
Do you feel more confident releasing the driver with these instructions? Is there anything I can clarify for you? Anything you disagree with?
Whatever’s on your mind, please share in the comments. I do my best to always respond, and I especially want to know what I can do to help you play better golf and enjoy the game more.
Want more tools and tips tailored specifically for the average golfer? Be sure to check out vlsgolf.com!


I am from Montreal, Canada. I really enjoy your sessions. I am having a problem with my launch angle of my ball with almost every club right now. I work at a golf store and have access to the GQUAD simulator. Guys are telling me that I am “ flipping “ my hands and wrists at impact. I need exercises to get me to STOP doing this. Thanks.
I find that a good drive with my driver starts from the ground up. That is there a slight shift and then turn onto my left side. The hands and arms will naturally release the club. If I concentrate on the release only, I find that I hook the ball terribly as I do not make a good backswing in order to load up the right side. Once I am loaded on the right, I can then shift and turn to release the club. Unfortunately, at age 72, my club head speed has diminished making it even more imperative to sequence my downswing. Do you agree?
Gordan,
Great to hear from you. Do you follow our YouTube channel? Are you on our email list? We provide great insights on both of these outlets.
Jim, you are spot on. As our swing speed decreases, it is important we look to other areas for distance. Proper sequence is one of those. Have you read my latest book, The Bad Lie? It provides a step by step system for the “experienced” golfer. Here is the Amazon link if you are interested https://www.badliegolfbook.com/
New to your site. Love this video. I am going to work on this today. Trying to gain distance as I am a senior and lost about 40 yards off tee.
Live in St Pete Beach, Florida
Charlie
Charlie,
Thanks for the kind words. Hope you find the information helpful to your game. Here is another good video to help https://youtu.be/AETp6WIpmSY
Hi I’m Tom from Chicago
I struggle to release club properly
I recently watched one of your videos on releasing your driver
Tried and found your last tip on where handle should point at finish to finally resonate and help me
Can’t wait to try on course
Will let u know next week
Thanx
Awesome! Good for you. Are you on our email list? We have exclusive content to the group. Drop us a note at info@vlsgolf.com
I tend to always hook my drives but iron shots much straighter. What am I doing different and what to change
Frank,
Great question. Here is a good video for you to watch https://youtu.be/EB4kLpgDN58?si=3iqo8n_E3jnkhNq6