Master Your Golf Downswing for Better Impact
Is Your Golf Downswing Sabotaging Your Moment of Impact? Uncover the Secret to a Better Downswing and Straighter, Longer Golf Shots.
The quality of your golf downswing determines the quality of your impact.
All golfers think of the moment of impact as the moment of truth. After all, what happens in that split-second determines the distance and trajectory of your ball flight. As we know, ball flight has a huge bearing on how much you’re able to enjoy that particular round.

But what happens at impact is merely a product of the moment that comes before: your golf downswing.
If you want to make cleaner contact with the ball, get better distance, and hit straighter shots, it’s time to look at your downswing.
I’m about to share everything you need to know to evaluate and improve this aspect of your golf swing. We’ll look at:
- Common mistakes in the golf downswing
- How to adjust your setup
- Where to look for problems in your takeaway
- How to improve the downswing transition
- Easy practice drills to help you make these principles a natural part of your golf game
Take the time to improve your downswing, and I promise you’ll start making better contact with a better impact position in no time.
Correct Stance for Your Golf Downswing
Just like any other aspect of your golf swing, a successful downswing begins with proper stance and setup. If you don’t have correct golf posture at the takeaway, your golf downswing is already doomed.
In a minute, I’ll explain how lower body and upper body positioning influences your downswing. First, let’s make sure we’re on the same page about what the downswing is and what you want to accomplish in this segment of your swing.
What is the Golf Downswing?
It seems like an obvious answer, right? The downswing is the part when you . . . you know . . . swing down.
However, your entire golf swing motion is more than just a backswing and a downswing. The segments of this motion include:
- Address
- Takeaway
- Top of the backswing
- Transition
- Downswing
- Moment of impact
- Finish
So, in the interest of clarity: the golf downswing is the segment that occurs when you begin your downward swing motion until the moment of impact.
The Goal of the Downswing
Now, what needs to happen in the golf downswing to ensure great impact?
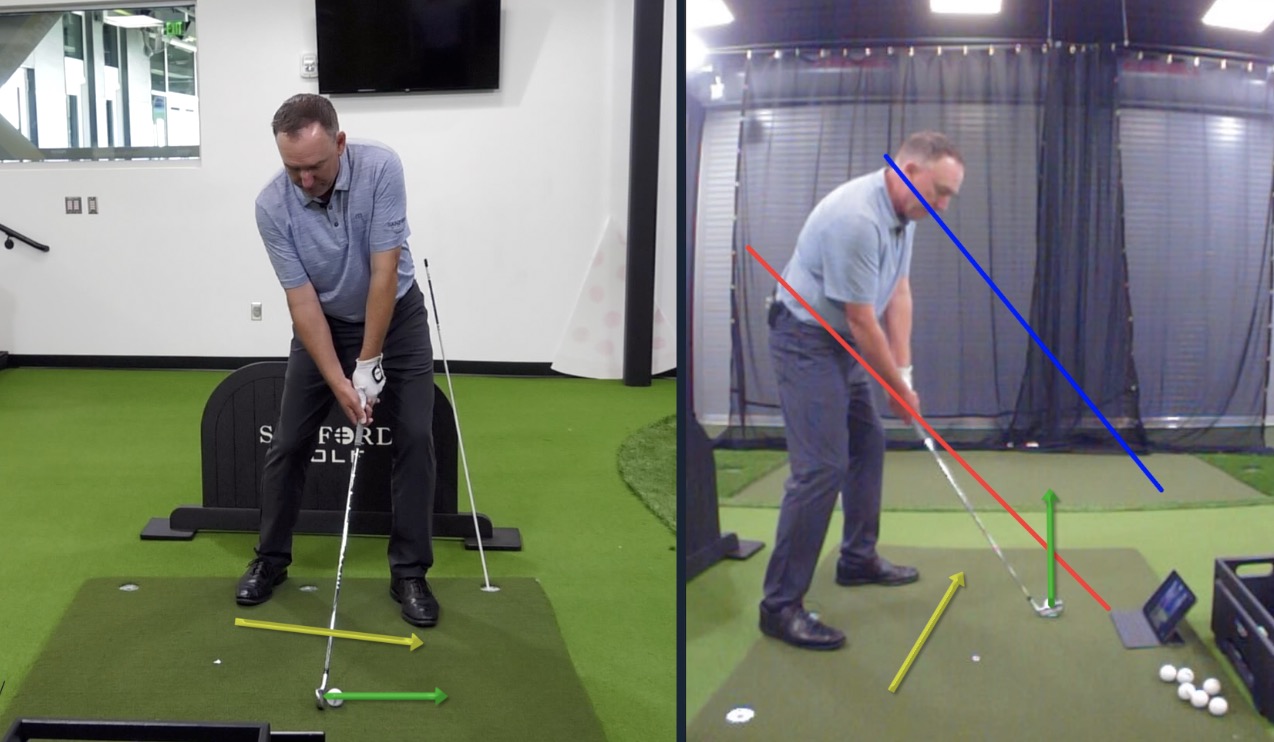
First, you want to make sure the clubface is square to the target as you bring the clubhead down.
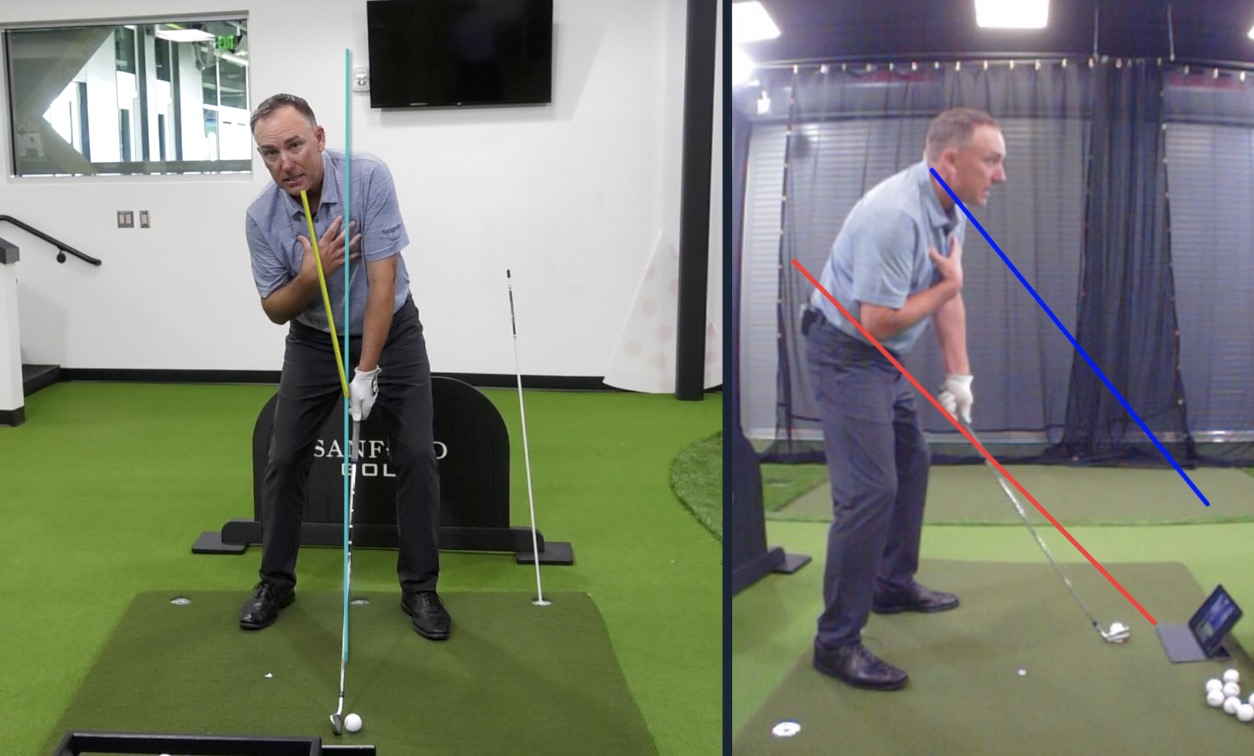
Second, you want to keep your hands, arms, and clubs moving through what I call “the Corridor of Success.” To help my students visualize the Corridor of Success, I like to use LiveView.
If you’re not familiar with this technology, LiveView is a camera designed to capture live, mirror-image video of your golf swing from any angle. The video displays on a tablet or smartphone so you can see exactly what you’re doing as you do it.
I’m going to use LiveView as an example to explain what you’re looking for, but don’t worry if you don’t have this camera. This explanation will at least give you a mental picture of what you need to visualize for your downswing.
LiveView comes with a feature that allows me to draw coaching objects on the screen. This allows my student (or me) to check in on their form and alignment.

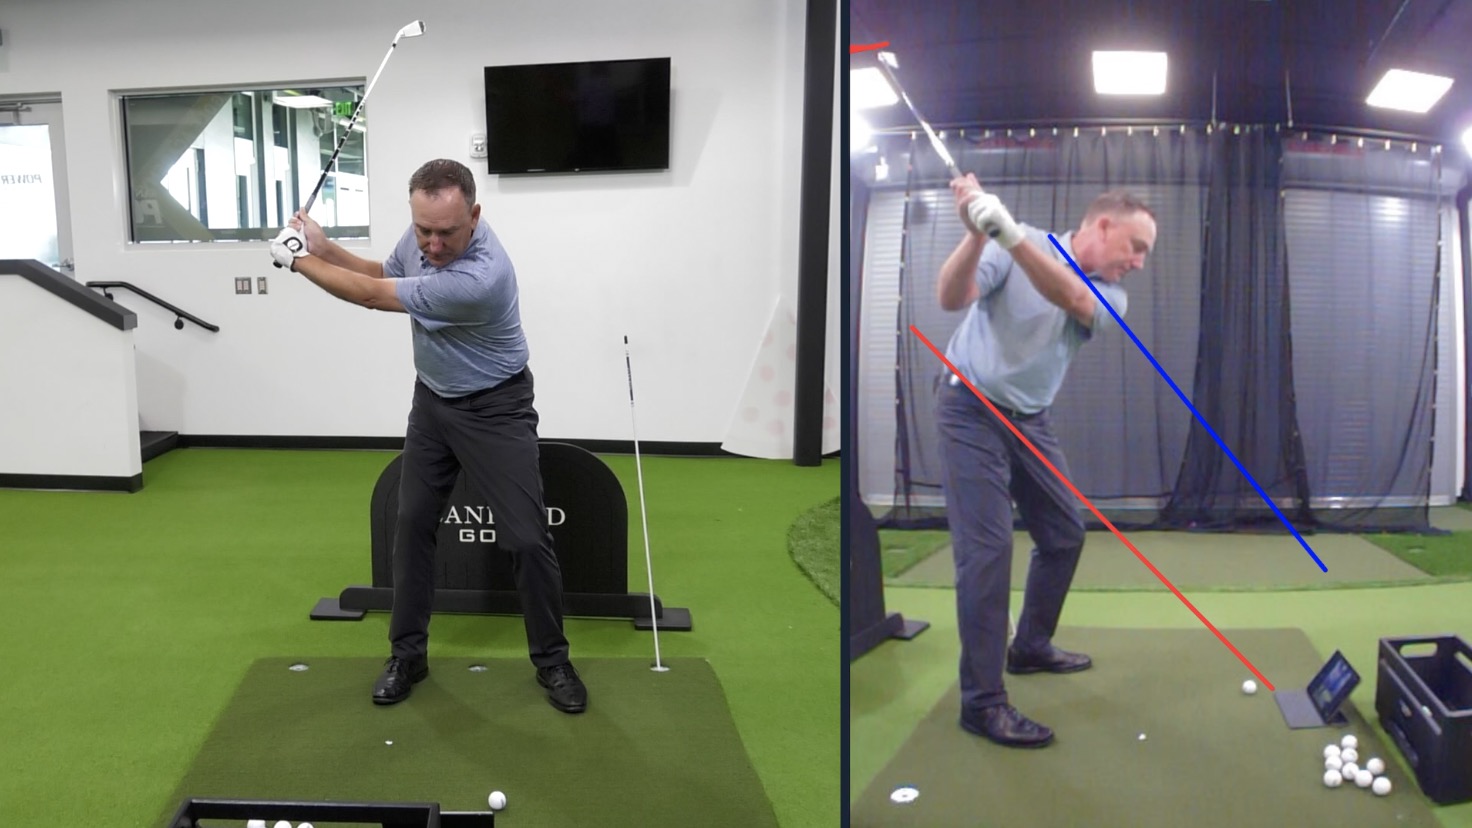
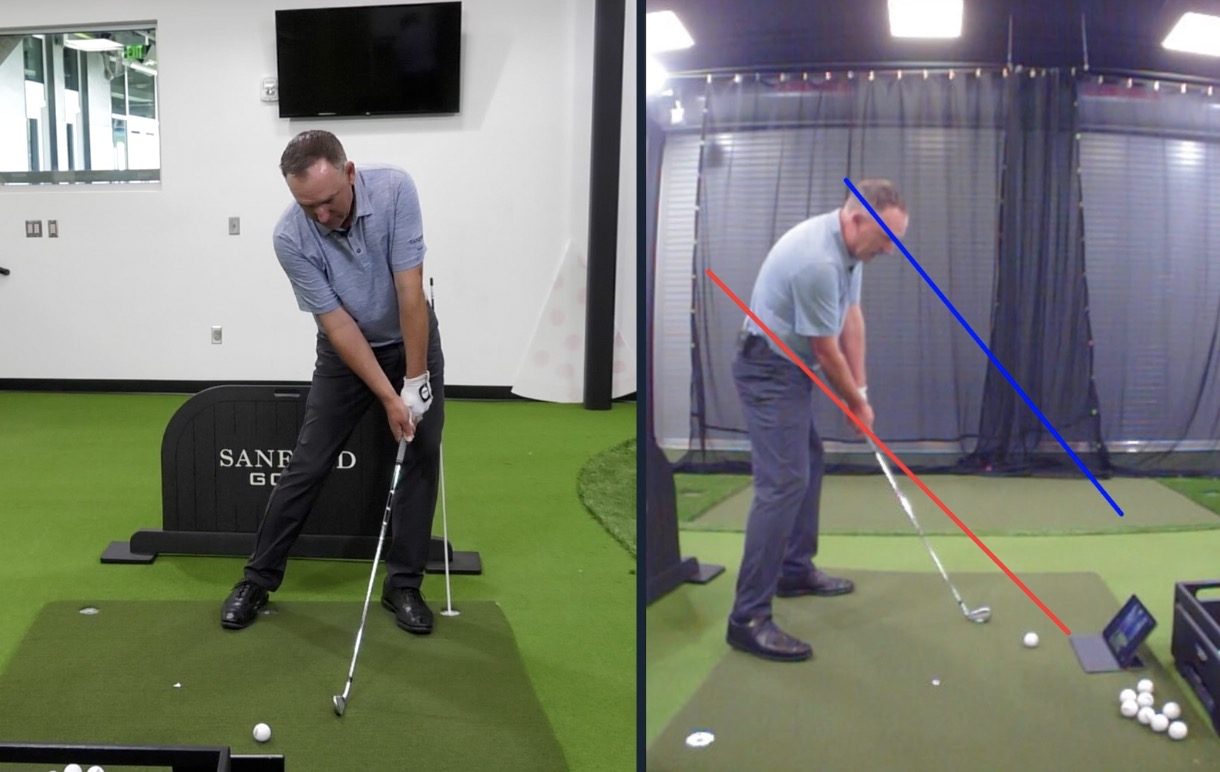
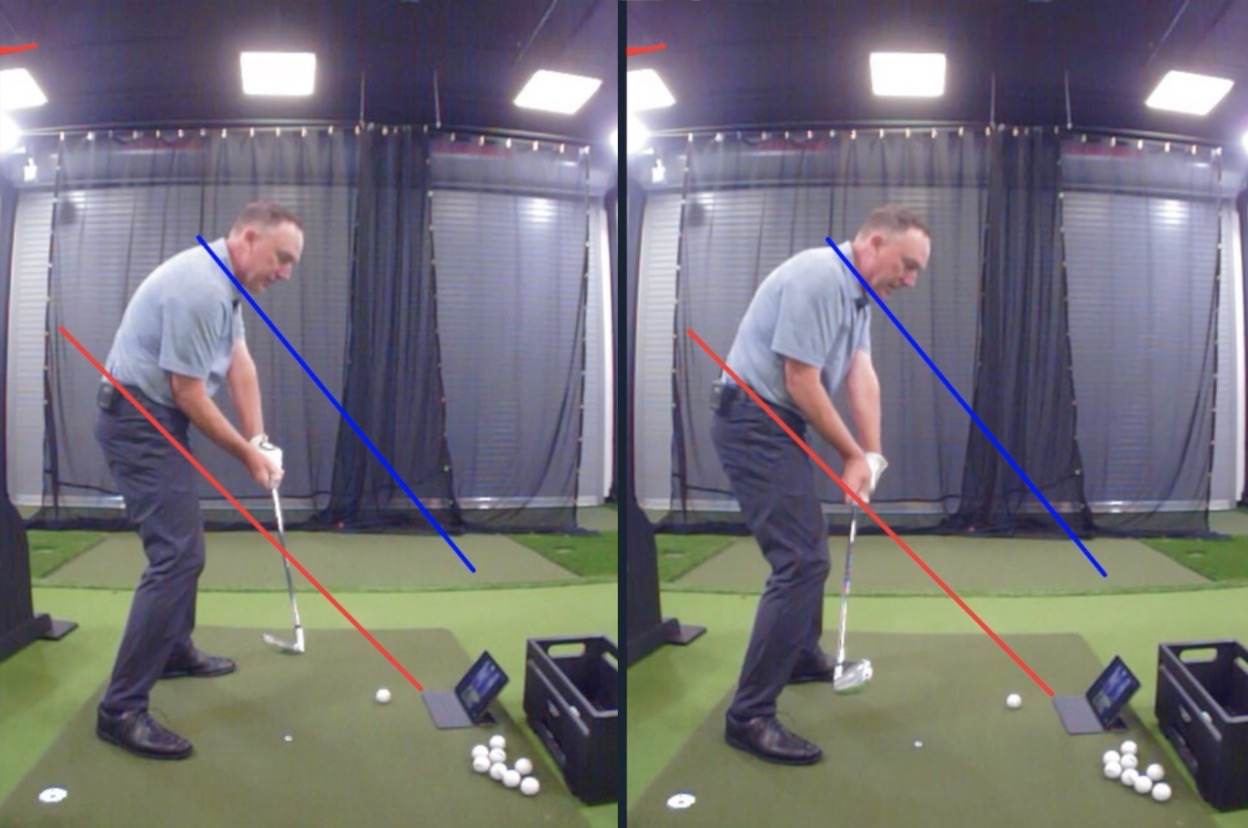
For the downswing, I draw a diagonal red line tracking along the angle of the club shaft and through the hip. Then, I draw a similar blue line that crosses through the neck.
The space between red and blue is the Corridor of Success. If you can keep your hands, arms, and club handle in that corridor throughout your downswing, you’re in great shape.
If you’re a high handicapper, you probably work too much towards or beyond the blue line. The shaft of your golf club steepens on the downswing and your hands and arms work down and to the left. This is causes you to slice the ball. I’m going to show you how to stop doing that.
All the tips that follow focus on:
- Squaring the clubface
- Staying inside the Corridor of Success
Now, let’s take a look at your body position at setup.
Lower Body Setup
A lot of problems in the golf downswing begin with the position of your lower body. If this is where your problems begin, that’s great! Lower body setup is a really easy issue to fix.
When a golfer comes to me for help with their downswing, one of the first places I look is their rhythm and timing. When your tempo is off, your swing motion is going to be off, too. In many cases, poor rhythm is an “unweighting” issue.
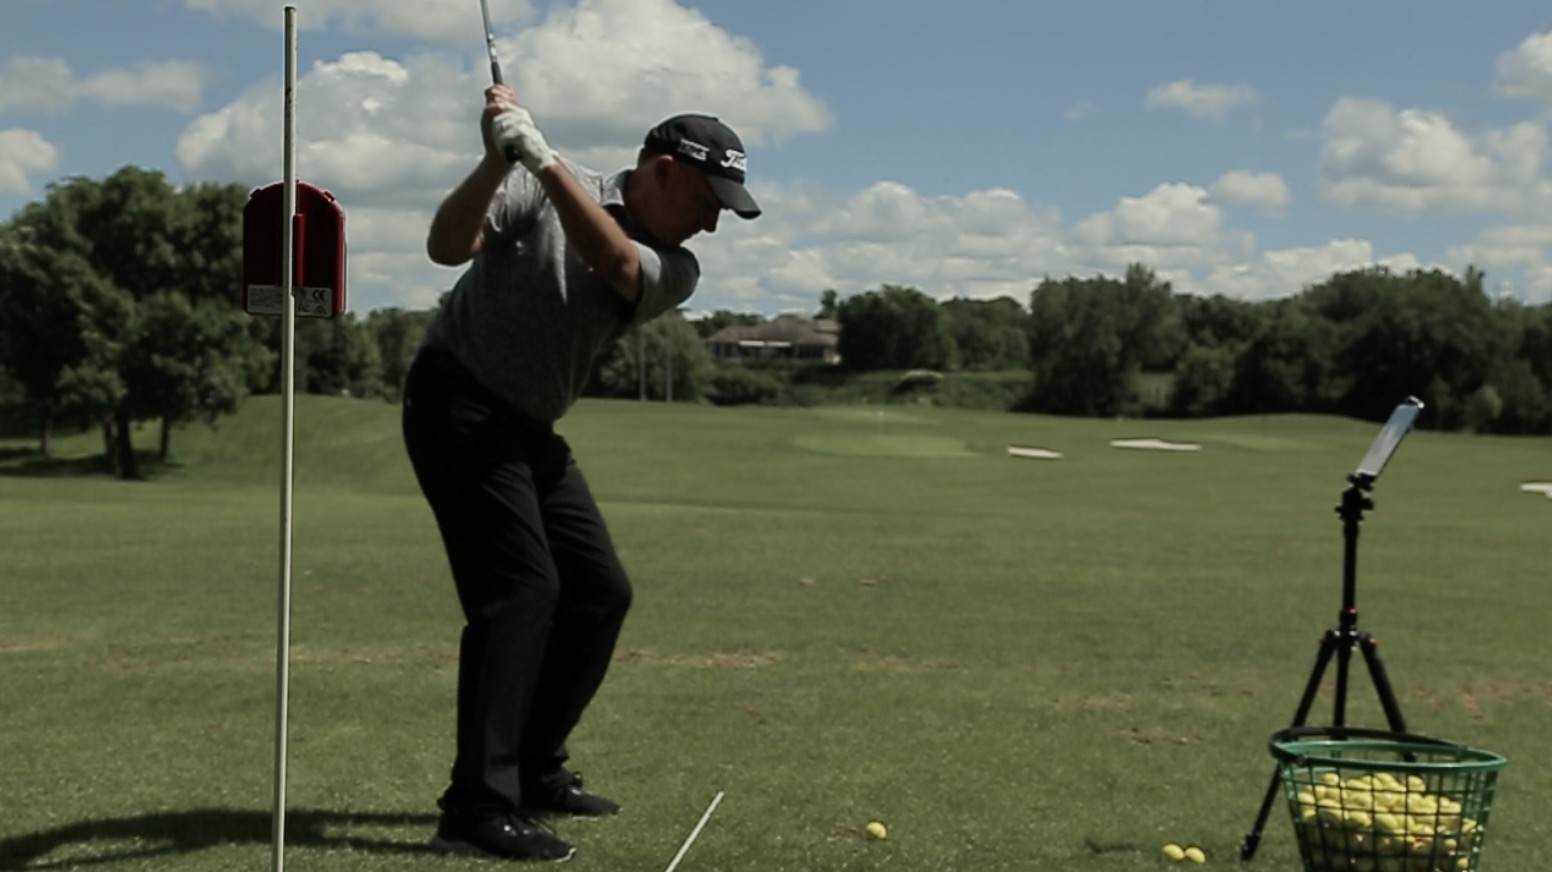
You see, you want to begin your golf swing with most of your pressure (or weight) in the lead foot. Then, as you swing back, you shift pressure from your lead foot to your trail foot. As you swing down, you shift your weight to the lead foot again.

That weight shift usually happens naturally . . . but only if you’re set up properly from the beginning.
As you step up to the golf ball, think about bumping your lead hip forward, toward the target. This helps you get your weight on that lead foot, preparing you to find the natural tempo throughout your entire golf swing.
This is how you get physics on your side.
Upper Body Setup
So, what about your upper body?
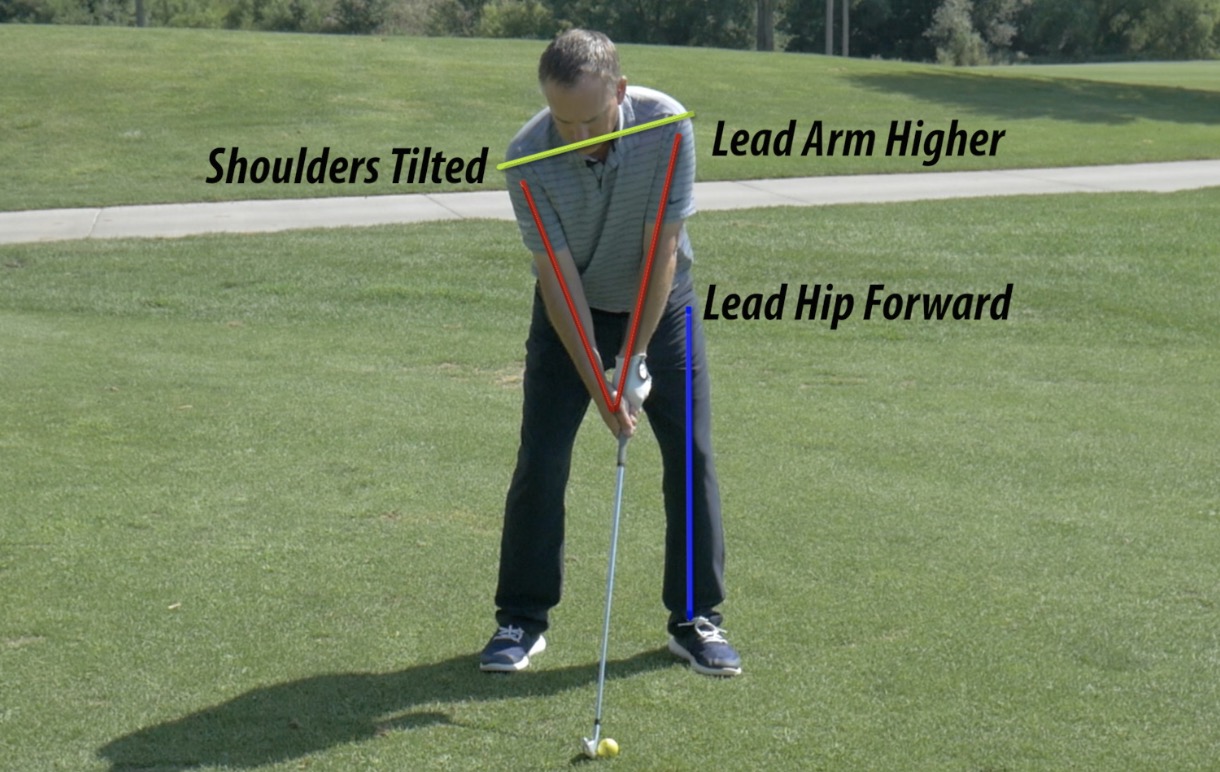
This one is also shockingly simple. When you take your setup at the golf ball, you want a slight spine tilt.
Here’s what you do:
- Take your regular golf posture.
- Hold your golf club against your body with the handle running down along the buttons or zipper of your golf shirt.
- Tilt your upper body away from the target until you feel the clubhead bump your knee or thigh.
When you start from this position, you hands and arms naturally move through the corridor on your downswing. On the other hand, if you tilt towards the target, your hands and arms want to work out and across, intersecting that blue line and causing a slice.
Steps to a Proper Downswing
Now that we’ve covered how you can get set up for a stellar golf downswing, let’s talk about the actual motion.
If you could use a more comprehensive look at golf swing mechanics, I recommend checking out our ultimate golf guide. For now, I’m just going to go over those aspects of your motion that have the most influence on your downswing.
On the Takeaway . . .
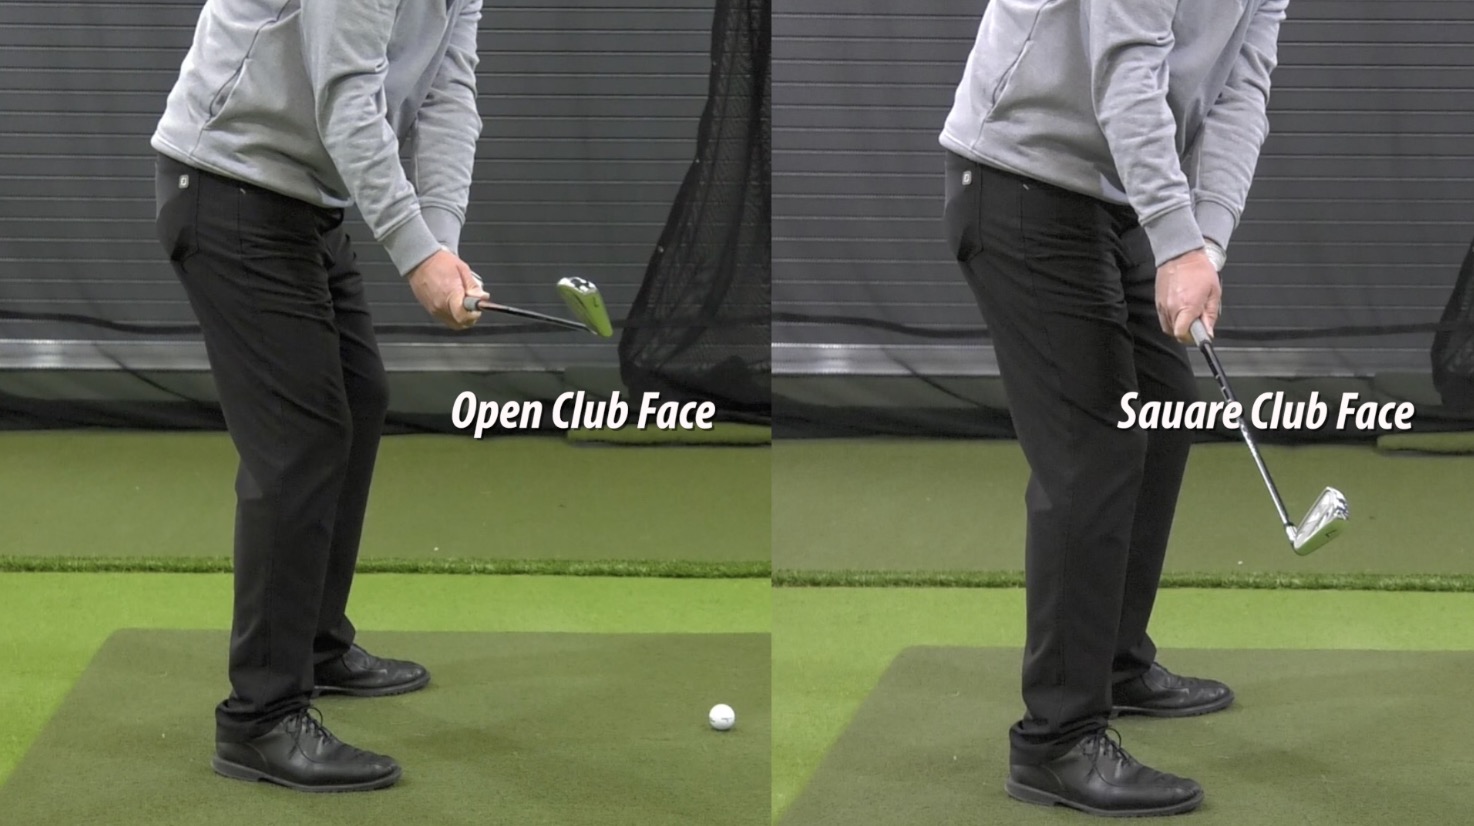
If a golfer struggles with their downswing and tempo isn’t the problem, the next thing I look at is face orientation. Are they delivering a square clubface at impact?

In many cases, the answer is no. Most likely, they’re making contact with an open club face. “Open” means the face is rotated away from your body, aiming more towards the right of the target (if you’re right-handed).
Golfers who have a habit of opening the face are stuck constantly watching their golf ball fly to the right of their target line. They try to correct this by swinging the club more to the left. This only makes things worse.
You can’t correct a face orientation problem with an adjusted swing path. But here’s what you can do.
First, recognize where the problem begins. Many golfers who have this issue look great at setup. The clubface is square and they’re ready to hit a straight shot. Then something changes in the takeaway.
So, check your takeaway. At that moment in your backswing when the club is behind you and parallel to the ground, what is the angle of the leading edge of your clubhead? It should be at 45 degrees. If it’s greater than that, you’ve got the clubface open.
Of course, this moment in your golf swing happens too fast to check every single time to you hit the golf ball. However, you can get the feel for a proper takeaway by practicing with an eye on your golf glove.
If the logo on your golf glove points toward the golf ball on the takeaway, you should have a square clubface. (Note: this assumes you have a neutral golf grip.)
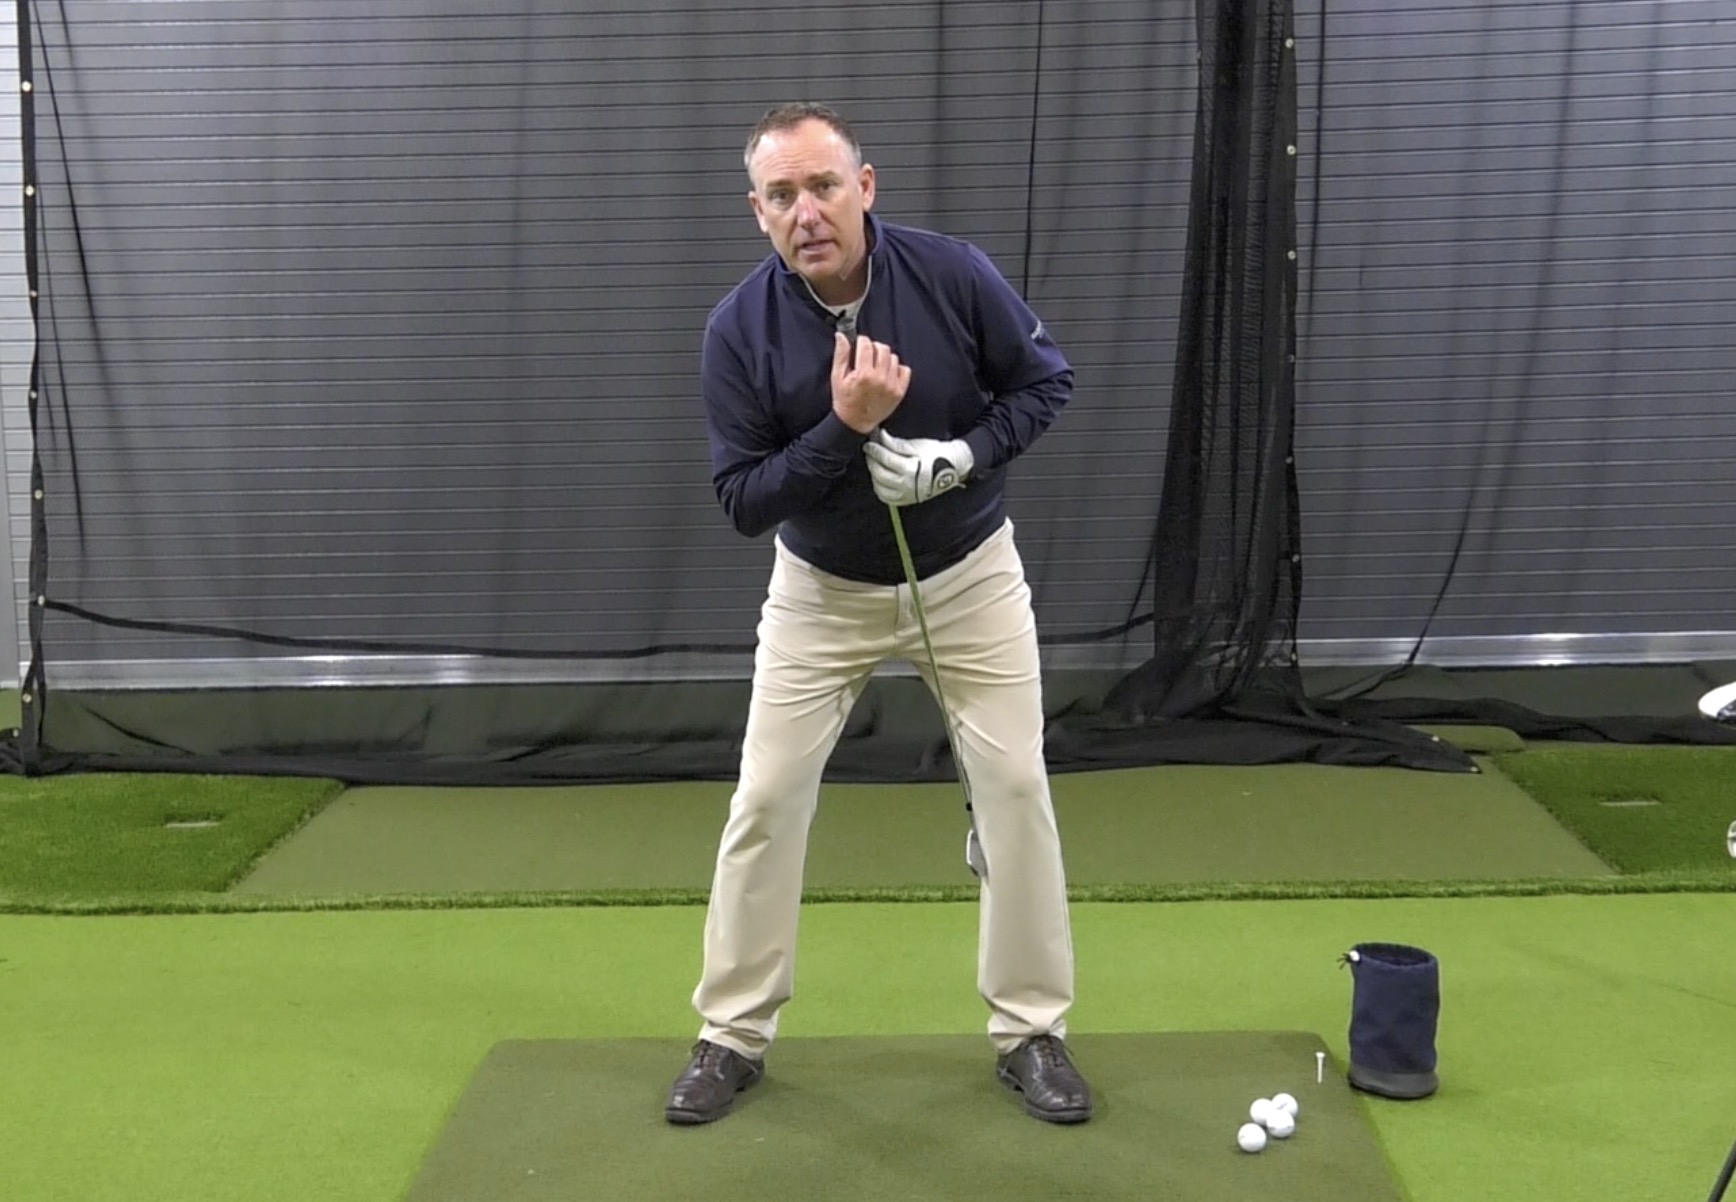
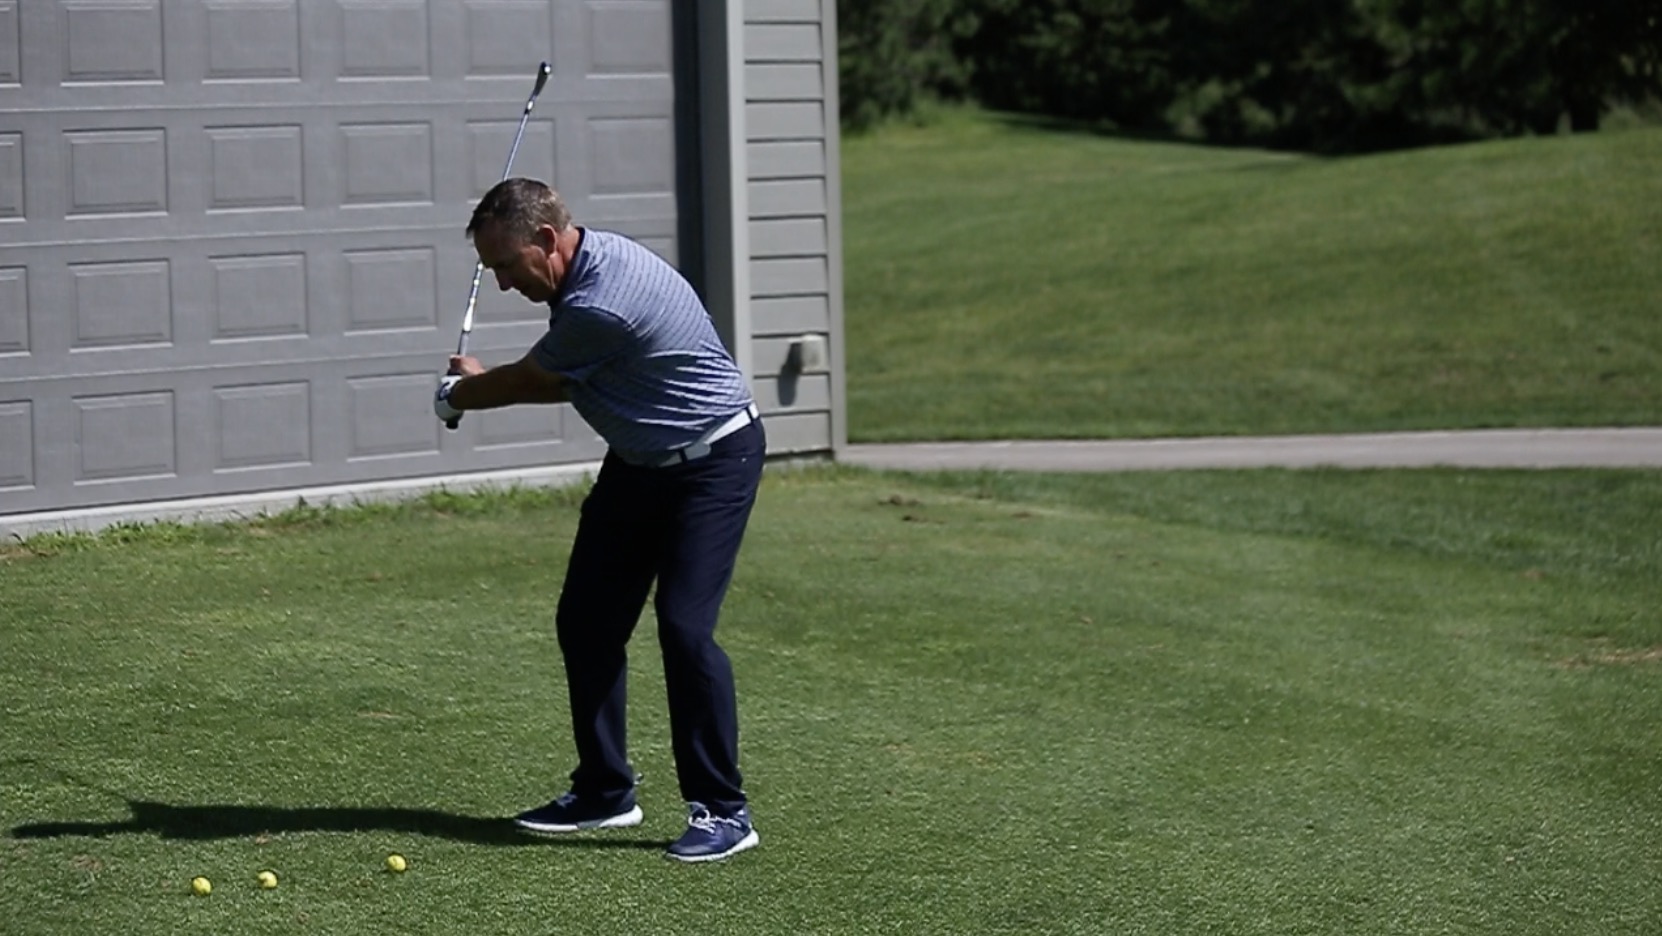
In the Transition . . .
So, you’re feeling good about your setup. There aren’t any issues in your backswing. Now it’s time to check the transition.
![]()
As far as I’m concerned, this is your moment of truth. The transition is hard. This is the portion of your golf swing where you switch from a backward motion to a forward motion. A lot can go wrong.
Keep an eye on these three checkpoints to ensure a smooth transition into a powerful golf downswing.
Lower Body
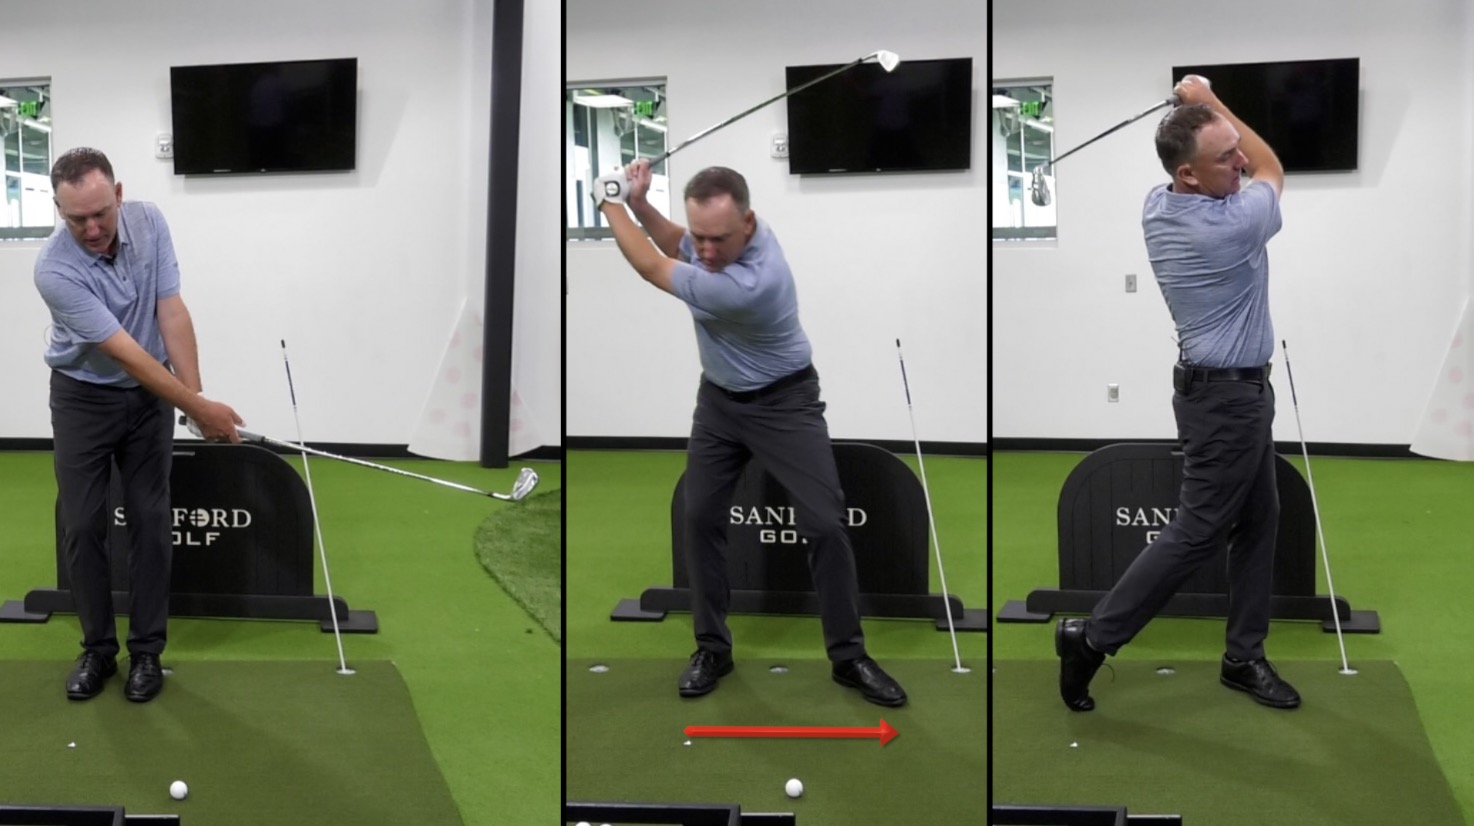
Remember that all-important weight shift? You started with most of your pressure in your lead foot. You shifted back to your trail foot in the backswing. Now it’s time to shift back to the lead foot in the transition.
To practice this, stick an alignment rod into the ground so you can feel it against your lead leg. In the transition, you should feel yourself bump into the alignment rod as you shift your weight and hip back over the lead foot.
Sometimes I like to do a few warmup swings to make sure I feel that bump before I take my actual golf shot.
Upper Body
You’re going to notice a pattern here. In the transition, you return to body positions that are similar to those in your setup. Once again, this is part of your rhythm and timing.
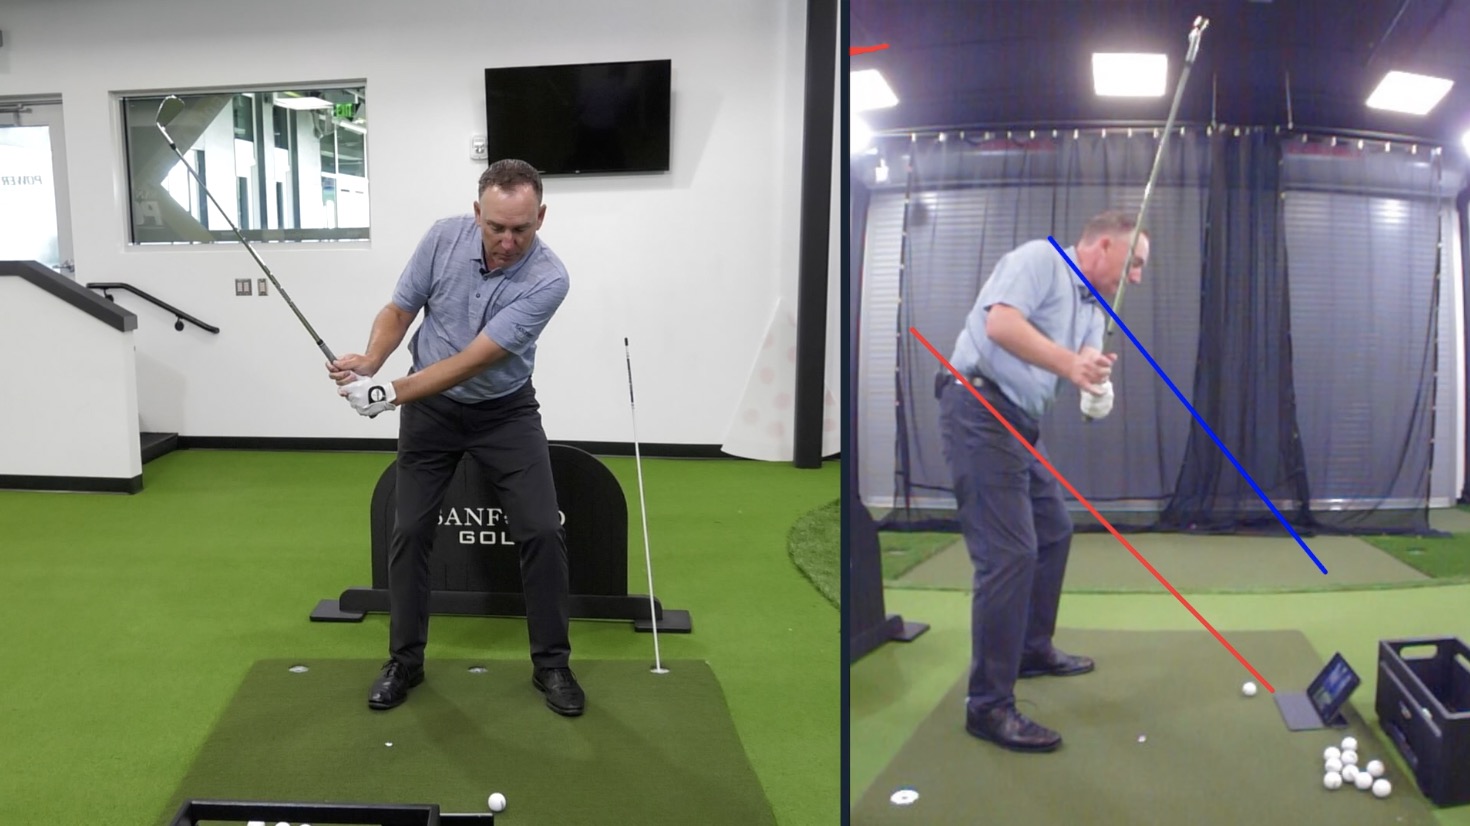
Some golfers are in the habit of leaning their upper body out and forward as they swing down. This forces the hands and club to work out and across—way beyond the Corridor of Success. They inevitably slice the golf ball.
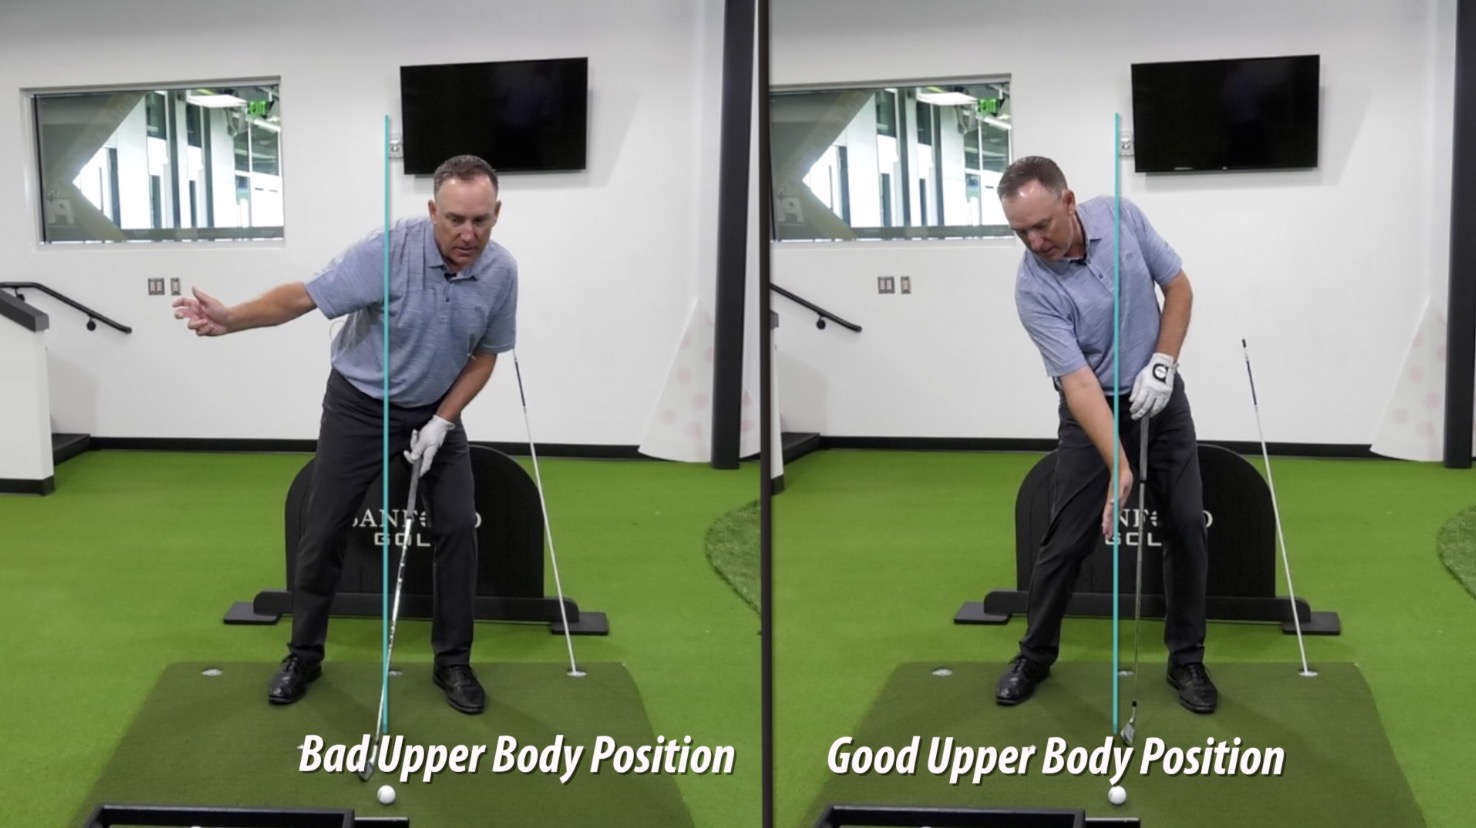
Instead, you want to feel your upper body tilting away from the target in the transition. In fact, think about keeping your head back, possibly even turning your head back slightly.
This minor adjustment allows you to swing from the inside and stay safely within the Corridor of Success.
Clubface
This one is fairly simple. As you start swinging down in the transition, you should feel the clubface start rotating back down.
If you feel the clubface rotate upward, that means you’re opening the face and you’re going to slice it.
At Impact . . .
Okay, so the moment of impact actually marks the conclusion of your golf downswing. Nevertheless, you have to know where you’re headed if you hope to get there properly.
At impact, your lead hip should be bumped forward (towards the target) with much of your weight in the lead foot.
Once again, you can use an alignment rod to test this position. Stick it in the ground so it’s against your lead leg, and make sure you feel the bump at impact.
Practicing with an alignment rod in this way also helps you check yourself for proper spine tilt. That bump naturally forces the upper body to tilt back, away from the target.
Drills for a Proper Golf Downswing
Now that you understand what a great golf downswing looks like, how do you master this skill?
First, make sure you take a look at the videos within this article. Watching golf videos can help you learn complex concepts faster and more completely.
Then, get out on the driving range or golf course and try the following drills. Each of these exercises will help you turn cerebral understanding into practical experience. They help you get the feel for proper form without having to overthink your downswing sequence.
Swing Step Drill
This is a great drill for perfecting tempo and weight shift. I like to use a 7-iron for this one.
The steps are simple:
- Take your regular golf setup.
- Step your lead foot back so it’s right next to your trail foot.
- Hold your golf club right out in front of you with the shaft parallel to the ground and the clubhead pointed towards the target.
- Take your golf swing from this position. As you transition into the golf downswing, step your left foot towards the target.
You can try this drill with or without a golf ball. The point is to feel that weight shift on the downswing.
Right, Left, Right, Left Drill
I like this drill for practicing tempo throughout your swing and getting that sense of rhythm into your mind and body.
You do not need a golf ball for this drill. This is a continuous motion with no pausing between swings. It works like this:
- Take your regular golf setup (without the golf ball).
- Start with more pressure in your lead foot. A 60%/40% distribution is about right.
- Take your golf swing. As you do:
- Say the word “Right” out loud as you move both the club and your weight back towards the right foot.
- Say the word “Left” as you transition and swing down, drawing the club forward and shifting weight into your left foot.
- After you swing through, immediately swing back again, continuing the “right, left, right, left” motion.
You may feel strange mumbling obvious directions to yourself at first, but trust me: this drill really helps you get the rhythm of the your golf swing in your head.
Now, if you are left-handed, reverse everything I’ve just said. For lefties, this is the “Left, Right, Left, Right Drill.”
Baseball Drill
If the slice has absolutely been killing your golf game for years, this drill is your solution.
- Take your golf setup with your lead foot slightly forward (towards the ball, not the target).
- Position your trail foot slightly back. The invisible line running along the toes of both feet should aim where right field would be if this were baseball.
- In keeping with the baseball theme, aim your clubface toward center field.
- Bump your lead hip over the lead foot and hold it there throughout the swing.
- Swing your arms back, down, and through.
By keeping that lead hip over the lead foot throughout your swing, your body is naturally tilted away from the target at the finish. Your hands work from the inside and through the Corridor of success without you having to think about it.
In other words, you achieve an excellent downswing motion and a great golf shot.
I have a couple students who had been slicing their whole lives when I introduced this drill to them. The exercise immediately fixed the slice. In fact, it worked so well that they now hit every golf ball this way.
Try all three of these drills, and I promise at least one of them will help you discover your best golf swing.
Impact of a Proper Downswing
Your golf downswing has the power to make or break your golf shot. This is your last chance to correct errors in face orientation. This is your opportunity to ensure a proper swing path and deliver speed to the golf ball.
A bad golf downswing will break your heart. But a great golf downswing can help you find more success and more enjoyment in the game.
Here’s the broad overview of everything we just discussed. You can return to this guide the next time you’re at the golf course so you can remember how to adjust your swing for solid contact.
The Mechanics of Your Golf Downswing
First, remember that each segment of your golf swing is influenced by the segment that precedes it.
If your posture or ball position is incorrect, you’re going to suffer the consequences at impact. Backswing mistakes turn into transition mistakes, which lead to a poor downswing motion and poor contact.
Keep an eye on all parts of your swing to make sure you can accomplish two things in the downswing:
- A square club face
- A swing plane that lies within the Corridor of Success (between your hip and neck)
The Next Time You’re at the Golf Course . . .
Review the following checkpoints:
At setup:
- Is your lead hip bumped over your lead foot?
- Have you tilted your spine and shoulders away from the target?
On the takeaway:
- Is the clubface square? Do you feel the logo of your golf club rotating toward the golf ball?
In the transition:
- Is your lead hip bumping toward the target?
- Can you feel your upper body tilting away from the target with your head turning back?
- Do you feel the clubface rotating back down toward the ground?
At impact:
- Is your lead hip forward with your weight in the lead foot?
- Can you still feel that tilt in your upper body?
If you’re hitting all these marks, you should see the proof in your ball flight. And if you have trouble checking these aspects of your motion in the split-second it takes to swing the golf club, try running the three drills listed above.
With a little extra time at the driving range, you can train your body to master the golf downswing. As a result, you’ll start smashing the ball at impact and enjoying a straighter, more controlled ball flight.
Give it a shot and let me know how it goes.
Thoughts? Comments?
Was this advice helpful? Do you have any questions? Anything here you disagree with?
Join us in the comments. We want to hear whatever is on your mind. Whether you need clarification or want to start a debate, we welcome any opportunity to talk golf.
For more in-depth golf tips, visit us at GreatGolfTipsNow.com. This golf instruction is completely free and packed with detailed advice to help you play better golf!
Todd, you always seem to set up with your right foot back a few inches, every club.
Is that your preferred setup?
Eric,
You have a good eye my friend! Yes, I like to see a slightly closed stance with most all clubs. This type of set up make it easier to make a full turn and also an inside to out golf swing…promoting a nice draw. Make sense?