Golf Swing Basics: Swing Tips on All Skill Levels
Are These Golf Swing Basics Missing from Your Golf Game? Discover the Key Fundamentals That Can Get You Out of Your Rut.
It doesn’t matter what your skill level is—every golfer can benefit from revisiting a few golf swing basics.
I have been teaching the game for more than two decades. Trust me when I say there are a handful of mistakes that are common at all levels of the game. And these errors are often as easy to fix as they are to make.
If your game isn’t quite where you want it to be, I recommend doing a quick review of your golf swing. I’ll walk you through each element of your setup and swing motion, addressing the mistakes I see most often in students of all levels. I’ll cover:
- Your golf grip
- Proper golf stance
- Mastering aim, including elements of your backswing
- Maintaining your swing plane on the backswing, downswing, and through the finish
Plus, I’ll share a bonus golf swing tip that helps every single golfer I work with every single time.
These are truly golf swing basics . . . fundamental elements of your golf swing that are simple but crucial.
Ready to learn how to play better golf?
Golf Swing Basics #1: How to Hold Your Golf Club
How often has a buddy tried to help you fix a common ball flight problem by suggesting you either strengthen or weaken your grip?
Most casual golfers understand that golf grip plays a major role in swing motion and the resulting golf ball trajectory. But there is quite a lot of confusion about what the “right” golf grip actually looks and feels like.
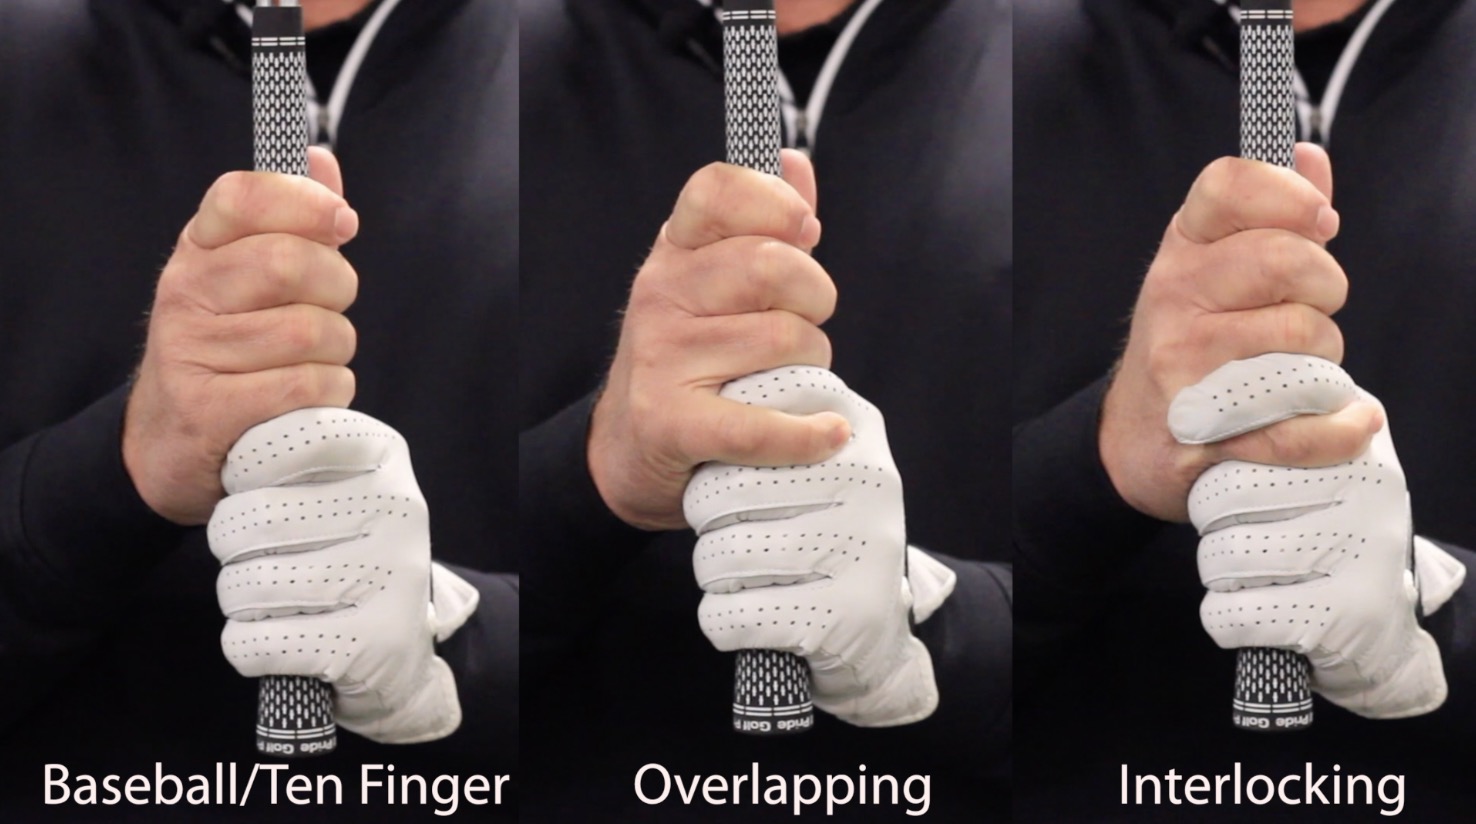
Here’s the truth. Most aspects of your golf grip depend on what’s right for you as a golfer. Your individual grip is typically a combination of grip strength and grip style. Grip style refers to the way you arrange your hands. There are three basic styles of golf grip:
- Ten Finger Grip
- Overlapping Grip
- Interlocking Grip
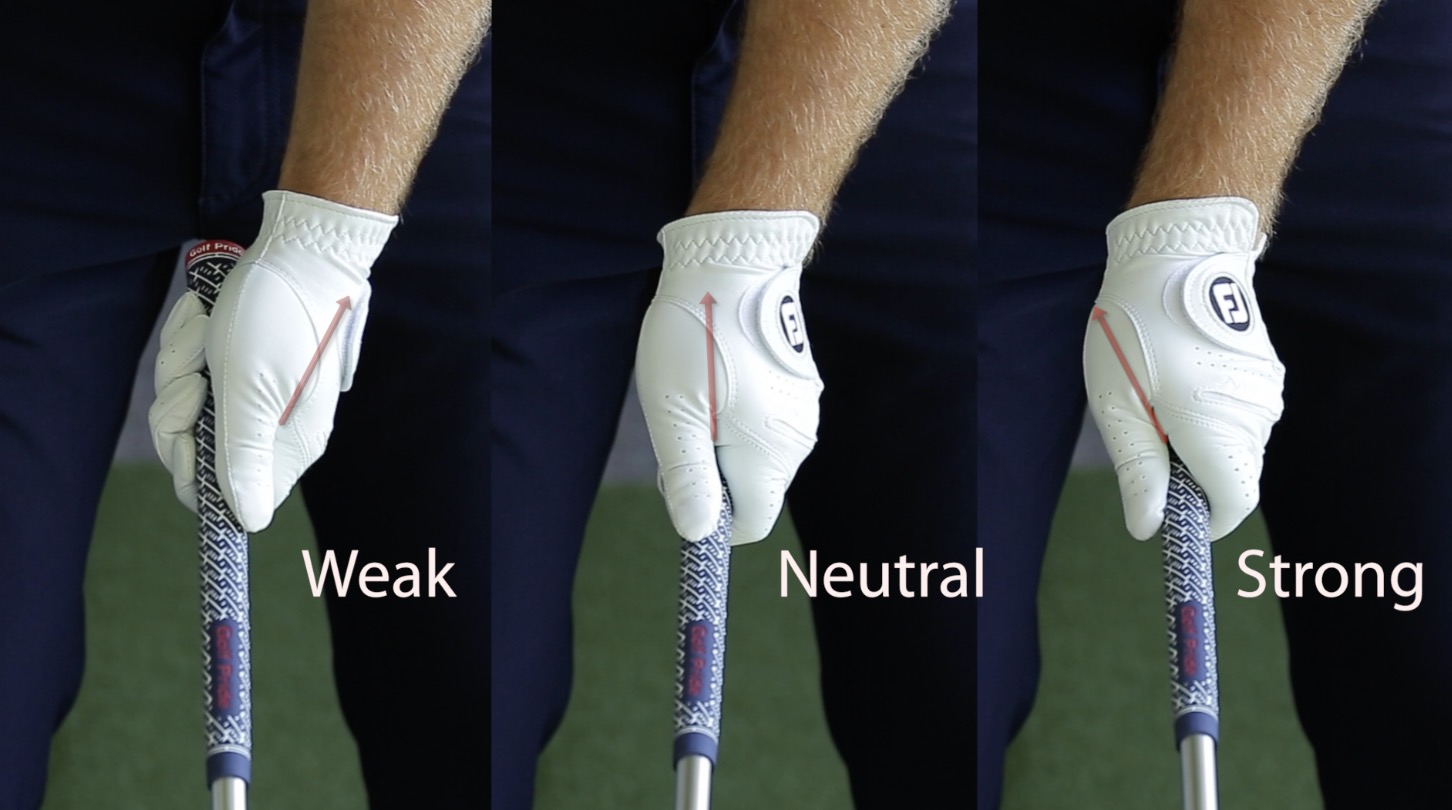
Each of these three grips can be done with any level of grip strength. We refer to your grip strength as either:
- Weak,
- Neutral, or
- Strong
If you pay close attention to the world’s best players, you’ll notice a variety of grip combinations. While most who play at the professional level use the overlap grip, you will see other varieties on the tour.
Similarly, a neutral grip is the most recommended grip strength, but some tour players do better with a strong or weak grip. They learn how to compensate for their grip strength in the golf swing, and you can do the same if you so choose.
(Here are some tips on finding the best golf grip for you.)
So, if the golf grip is such a flexible and individual aspect of your golf swing, how can there be a common mistake?
The Most Common Golf Grip Mistake
Whether you use a ten finger grip or an interlocking grip, whether your grip is strong or neutral, there is one thing you must always do.
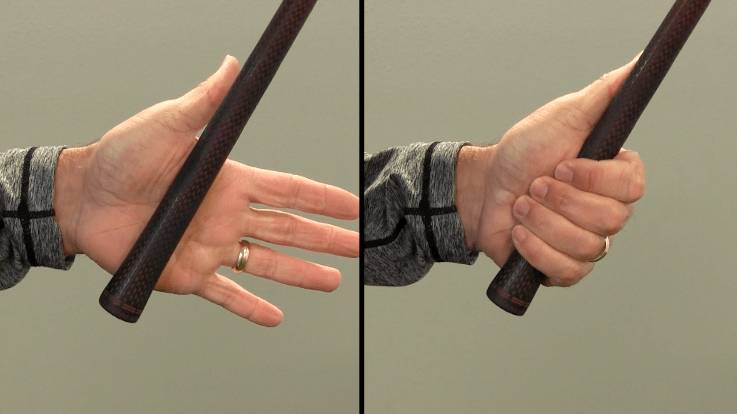
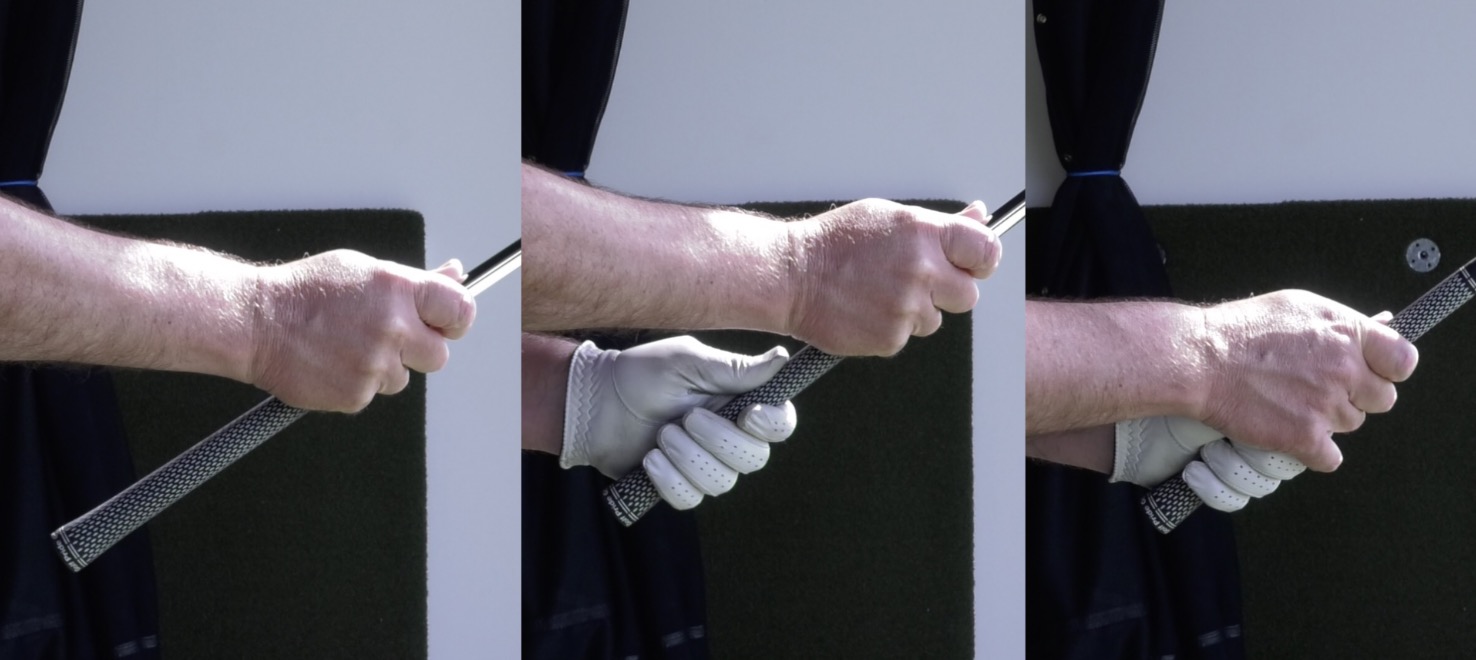
You have to grip the club in your fingers, not your palm.
This is the most common error I see among golfers of all levels. They grip the club handle in the palm of their hands because it just feels right. When you hold it in the palm of your hand, it feels like you have control. You have power.
Despite how it feels, this habit is going to hinder your golf swing motion considerably. Your wrist isn’t as loose and you can’t leverage the club the way you want to.
So, your first golf swing basics rule is to grip your golf club with your fingers, not your palm. The history of golf is filled with all different styles and strengths of golf grip. But one thing you can count on is that the greats are pretty much always holding the club in their fingers.
How to Grip Your Golf Club Properly
Here’s how to be absolutely certain you are holding your golf club correctly:
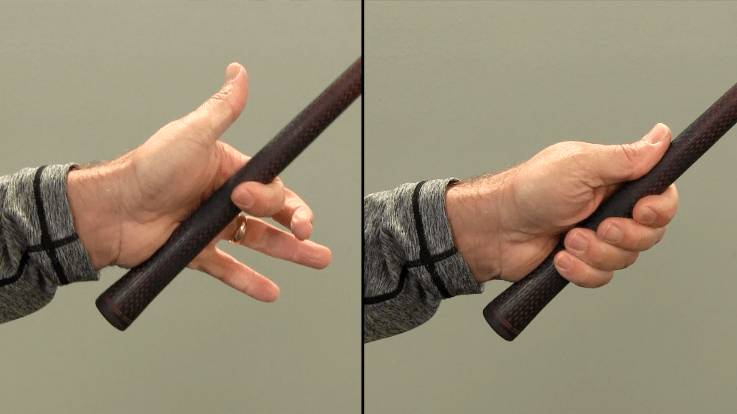
- Hold your club out in front of you, perpendicular to the ground with your trail hand below the club handle.
- The golf club should be at a 90-degree angle. Tilt it forward to 45 degrees.
- Wrap the fingers of your lead hand around the top of the handle.
- Put your trail hand in your grip position, holding the club in your fingers and not the palm.
The reason I recommend creating the 45-degree club tilt before positioning your hands is because that tilt helps you grip with the fingers. At 90 degrees, you naturally grip with the palm.
When you take your golf setup, test your grip by hinging up at the wrist to lift the club head up off the ground. This motion should be easy. If it’s not, you’re probably holding the club in your palm.
An Easy Golf Grip Checkpoint
One final tip on proper golf grip:
When I work with a new golfer for the first time, one of the first things I do is take a look at their golf glove. If their glove is evenly worn throughout, I know they probably have a decent golf grip. If the glove has holes, something is off.
Try to notice this detail for yourself. Are you getting holes in your glove after only a few rounds or practice sessions? If so, it’s time to examine your grip.
Golf Swing Basics #2: How to Stand Correctly for Your Golf Swing
That’s right: we’re already onto the second golf swing basics tip and we’re still not talking about the actual swing.
That’s because the choices you make before your golf swing influence how effective your swing motion will actually be. I cannot tell you how often a student comes to me with a problem that begins with incorrect golf ball position or improper golf posture.

What I love about teaching golf stance is that it can lead to some pretty exciting discoveries for a golfer. Students come to me thinking we’re going to spend months doing intensive drills to fix their slice. Then they correct the issue in ten minutes just by changing their ball position.
It really can be that easy.
So let’s take a look.
Elements of Your Golf Stance
We’re just focusing on the most essential golf swing basics in this article. So I’m going to steer clear of the detailed aspects of your golf stance and setup.
That said, I do want you to be aware of other places to look if the advice I am about to give isn’t enough. So I am providing a short breakdown of the most important aspects of your golf setup with links for more in-depth insight.
When reviewing your golf stance and setup, consider:
- Proper ball position for drivers as well as ball position for irons
- Correct posture, including spine angle, head position, upper body position, and lower body position
- Weight distribution
The last point is the one we’re talking about today. How should your weight be distributed at setup? And why does it matter?
Pressure in the Feet
Weight distribution is one of the most important golf swing basics because it influences your momentum, rotation, rhythm, tempo, and balance.
When you stand in any position, you feel pressure pushing down through the bottom of your feet. (You might think of this as “weight.”) At setup, you want to feel about 60% of that pressure in the lead foot and 40% in the trail foot.

This weight distribution gives you some room push off that front foot as you take your backswing. You then transfer pressure so more of your weight is in the trail foot at the top of the swing. In the transition and downswing, you shift pressure back towards the lead foot.
When you perform this pressure shift, you complement the motion of the swing with the distribution of your weight. This helps you get more rotation, create some torque, and pack more power as you swing down and hit the golf ball.
One of the most common mistakes I see is that golfers of all levels setup with 50/50 pressure distribution. This leaves them with very little shifting to do in the backswing.
Your second golf swing basics rule is to start with 60/40 pressure distribution at setup, favoring your lead foot.

Golf Swing Basics #3: How to Aim in Your Golf Swing
Many golfers would list “aim” among those golf swing basics they still have not mastered. They might be hooking, slicing, pulling, or shanking. Whatever the problem is, the bottom line is that the ball is veering off the target path, and they’re desperate to fix it.
The challenge with aim is that it’s often more complex than many golfers imagine. Beginner golfers are especially prone to try fixing wayward shots with a dramatic change in club path. This seems logical, but it often isn’t the solution.
This is because the direction of your ball flight may be influenced by any number of factors, including:
- The aim of your club path
- Club face orientation
- The quality of your contact with the golf ball
We have articles that dig deep on all these subjects. To keep things simple today, I’m going to focus on two golf swing basics related to aim:
- The quality of your backswing
- How you adjust your aim to fix the slice

Mastering your Backswing to Improve Your Aim
So many ball flight issues can be traced back to backswing mistakes. An improper backswing motion can mess up your face orientation, ruin your swing path, and rob you of that beautiful straight shot.
When I work with a student for the first time, I look for these three golf swing basics in their takeaway:
- Motion of the hands
- Movement of the club head
- Orientation of the club face
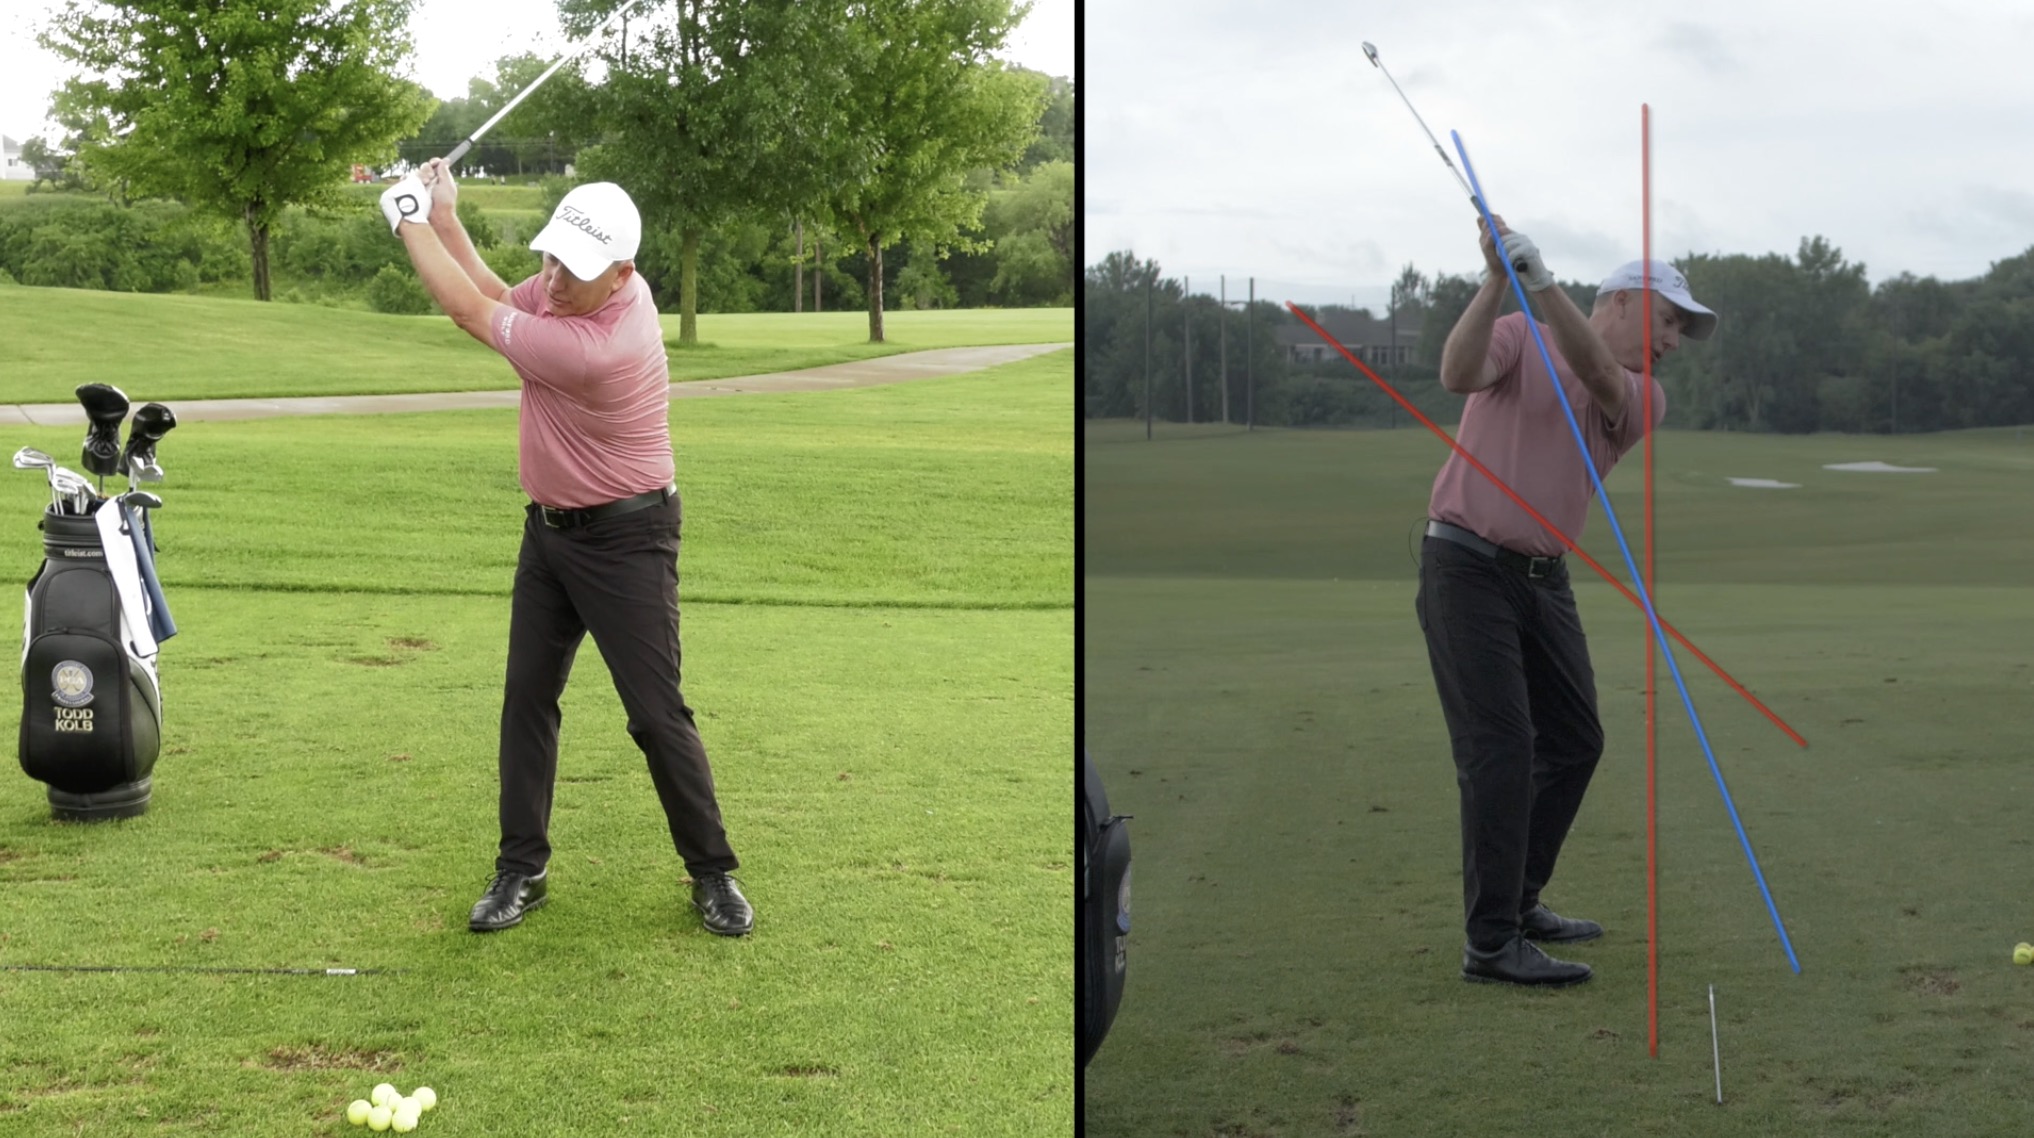
Now, when I walk my students through these three checkpoints, I like to use the LiveView golf camera. This is a small camera that sends real-time, mirror-image video of your golf swing to your smartphone or tablet.
What’s great about LiveView is that I can draw plane lines and other coaching tools directly onto the screen so my students can watch for alignment. When working on their backswing, I draw a blue line from the golf ball along the angle of the club shaft and through the hips.

If you don’t have a LiveView camera, don’t worry. Just imagine the placement of that line, and the following tips will still make sense to you.
Checkpoint #1: Hands
On the takeaway, your hands should track just underneath that blue line. You want to follow that angle all the way up to the top of the swing.
A lot high-handicappers lift their hands too early, tracking above the blue line right away. This affects the path of the club head which—in most cases—causes the golfer to slice the golf ball.

On that note, let’s look at:
Checkpoint #2: Club Head
You should see (or imagine) the club head moving along the blue line in the takeaway.
A lot of golfers make the previous error of raising their hands right away, which forces the club head in and around. In the LiveView image, this looks like a dramatic sweep well below the blue line.

Checkpoint #3: Club Face
In the takeaway, try to notice what’s going on with the club face when the club head is directly behind you, club parallel to the ground.
What is the angle of the club face?
Let’s say a straight-up-and-down club face is at 90 degrees in relation to the ground. If the face is looking directly at the ground, that’s 0 degrees.
What you want is 45 degrees. When your club face is at this angle, you know you’re set up to deliver a square face at impact.

An easier point of reference might be your golf glove. If the logo on your glove points toward the golf ball on the takeaway, you’re doing great.
Adjusting Your Aim to Fix the Slice
We have learned a lot of new information regarding the science of golf in the last several years. This includes some fascinating discoveries about the science of the slice. We have a ton of information about fixing your slice, so I’ll keep this brief and focus on the most basic concept.
If you’re like most golfers, your instinct is to aim to the left of the target line in the hopes of correcting that rightward slice. (Or the opposite, if you’re left-handed.) You may have found that somehow this is actually making your problem worse.
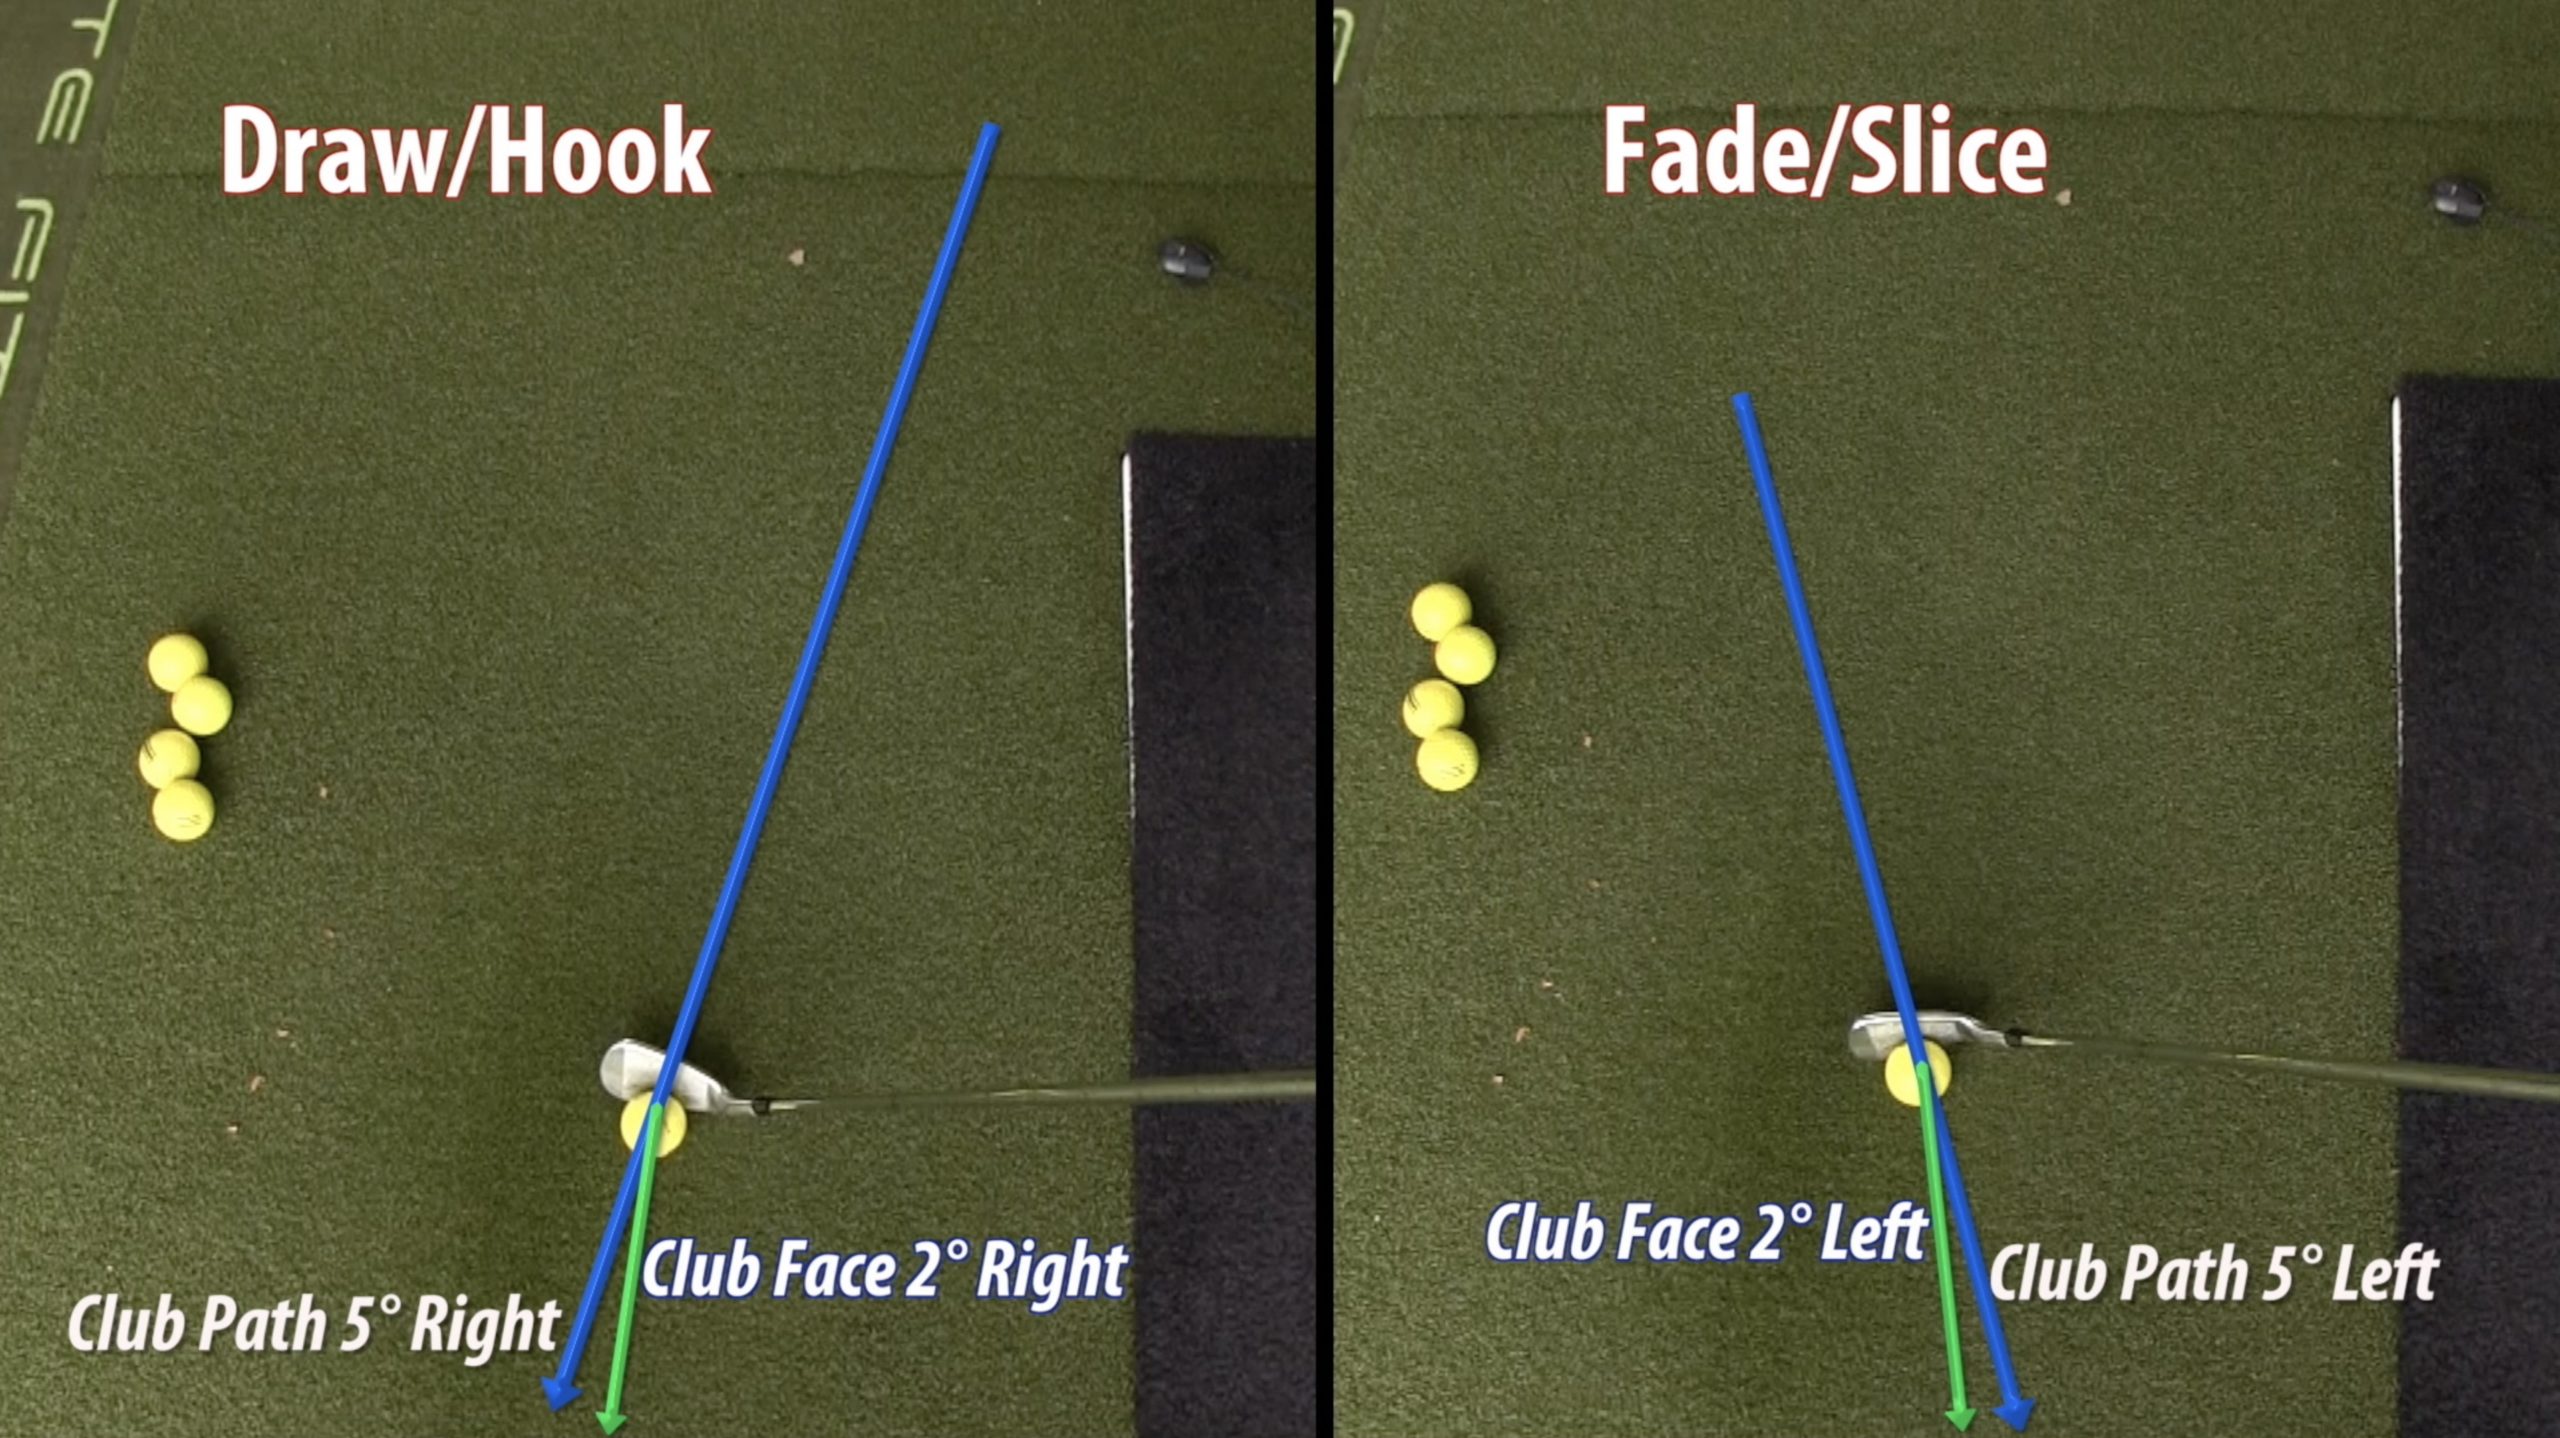
That’s because the slice is a result of not just swing path, but swing path plus face orientation.
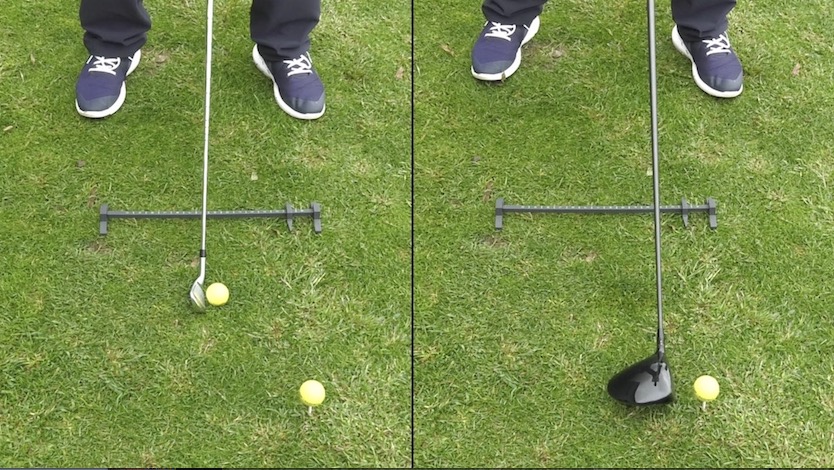
To fix your slice, simply do this:
Step your lead foot forward a bit (towards the ball) and step your trail foot back (away from the ball). If you were to trace a line between your toes, you should have a line that aims to the right of the target path.

If you are able to maintain a square club face along with this rightward aim, you will fix your slice. It’s that simple.
(Once again, if you are left-handed, just reverse those directions.)
Golf Swing Basics #4: How to Finish Your Golf Swing
We’ve talked about how to set up for an excellent golf swing. We’ve covered golf swing basics for how your swing motion should begin. Now, let’s talk about where you should end your golf swing and how to get there.
First, I’m going to cover some swing plane basics. If you want a deeper dive on golf swing plane, watch the video below.
Understanding Swing Plane
If you’re not familiar with the concept of golf swing plane, you can do a deeper dive into swing plane at this link. In the meantime, I’ll put it simply:
Imagine your swing shape as a hula hoop hanging in the air around your body. (Your golf swing is actually not a perfect circle, but it’s close enough for this analogy.) Swing plane is the angle at which the hula hoop sits around your body.
Staying on plane means tracking your club head along the hula hoop from takeaway to finish. Veering off plane happens when you lift the club above the hula hoop or smash it through.
You don’t want that second outcome. Instead, you want to keep your swing motion on plane.
To practice this, refer back to that blue line we drew in the previous section (either on your LiveView app or in your imagination). Practice guiding the shaft of the golf club along that blue line throughout your entire swing.

Now, it does not have to be directly on top of the blue line. What really matters is that the club shaft moves parallel to the blue line.
A lot of high handicappers bring their shaft to a super steep angle into the transition. This sets them up to slice it or pull it.

You can avoid such a tragic outcome just by keeping the shaft parallel to the blue line in the backswing, the downswing, and through to the finish.
Bonus Tip: How to Finish Your Golf Swing
Ready for the easiest tip in the entire golf swing basics article?
Even if you don’t have a LiveView camera, imagine you do, and imagine it’s set up to film you in profile from the trail side of your body. At the finish, make sure:
- Your knees are touching.
- The heel of your trail foot is lifted so the LiveView is looking at the bottom of your shoe.
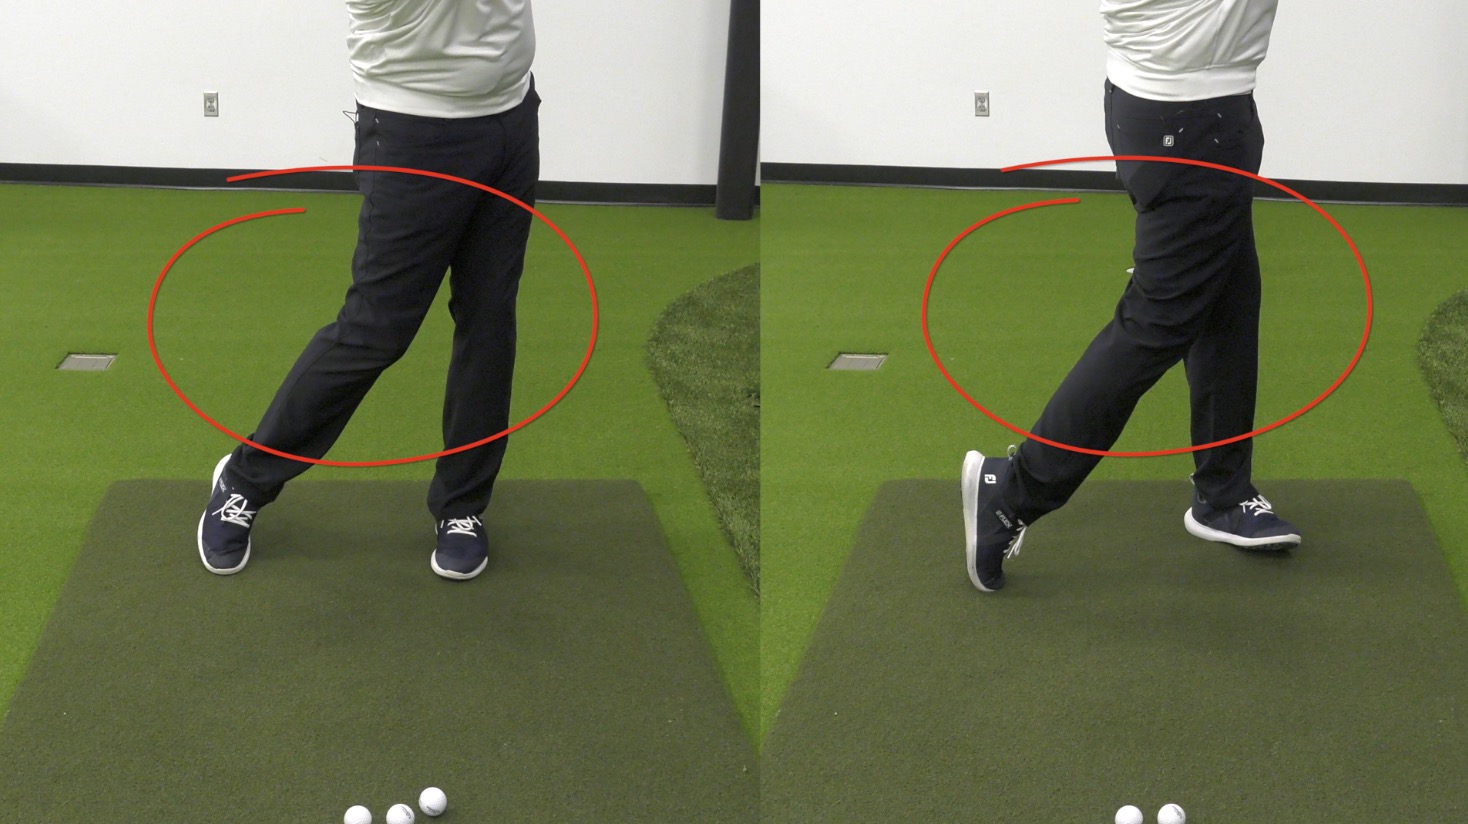
If you finish your swing in this position, you’ll know you have:
- Good tempo
- Proper rhythm
- A balanced golf swing
It couldn’t be simpler.
The Next Time You’re on the Golf Course . . .
Check yourself for these all-important golf swing basics:
- Are you gripping the golf club in your fingers?
- Do you have 60/40 weight distribution with more pressure in the lead foot?
- Are your hands tracking just underneath that imaginary blue line on the takeaway?
- Does the club head work along the blue line?
- Is your golf glove logo pointed down at the golf ball on the takeaway, putting your club face at a 45-degree angle?
- Does your club shaft travel on a swing plane consistently parallel with the blue line throughout your swing?
- Are you finishing your swing with your knees together and the sole of your trail shoe facing the imaginary LiveView camera?
If you have all these details in place, you’re well on your way to a perfect golf swing.
What Do You Think?
Do you have any suggestions of your own to share? See anything here you disagree with? Did I miss anything that you think belongs on a list of golf swing basics?
Share your thoughts in the comments! We always love hearing from you.
For more in-depth golf tips, visit us at GreatGolfTipsNow.com. This golf instruction is completely free and packed with detailed advice to help you play better golf!
It’s interesting to know that body weight distribution can also be a factor to keep in mind when learning how to play gold. I’d like to look for gold instruction services soon because I want to be able to place golf with my father competitively someday. Getting a professional teach me would surely surprise my dad the next time he takes me to a golf course.